Its a rainy weekend. I only got in one ride, and it was damp. Thankfully I have fenders which keeps me a lot more comfortable than everyone else. Beyond rain, we had winds and low temps, so it wasn't the most pleasant weather. I know my hands are getting cold when I can't feel the shifters - such was this weather even with winter gloves.
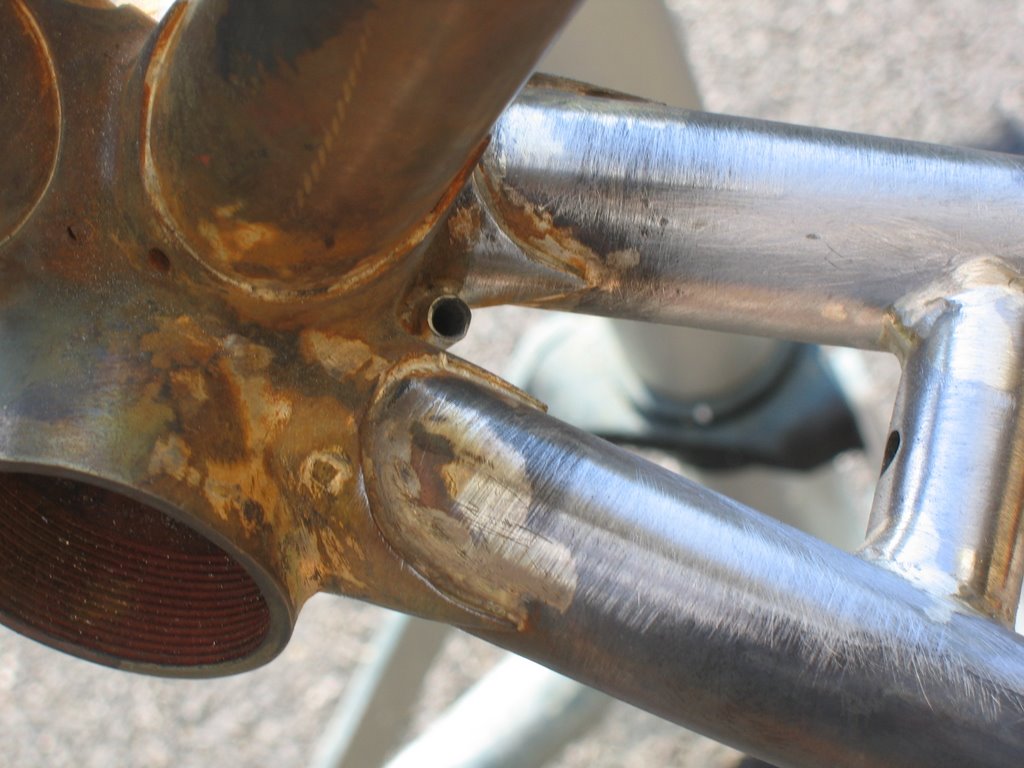
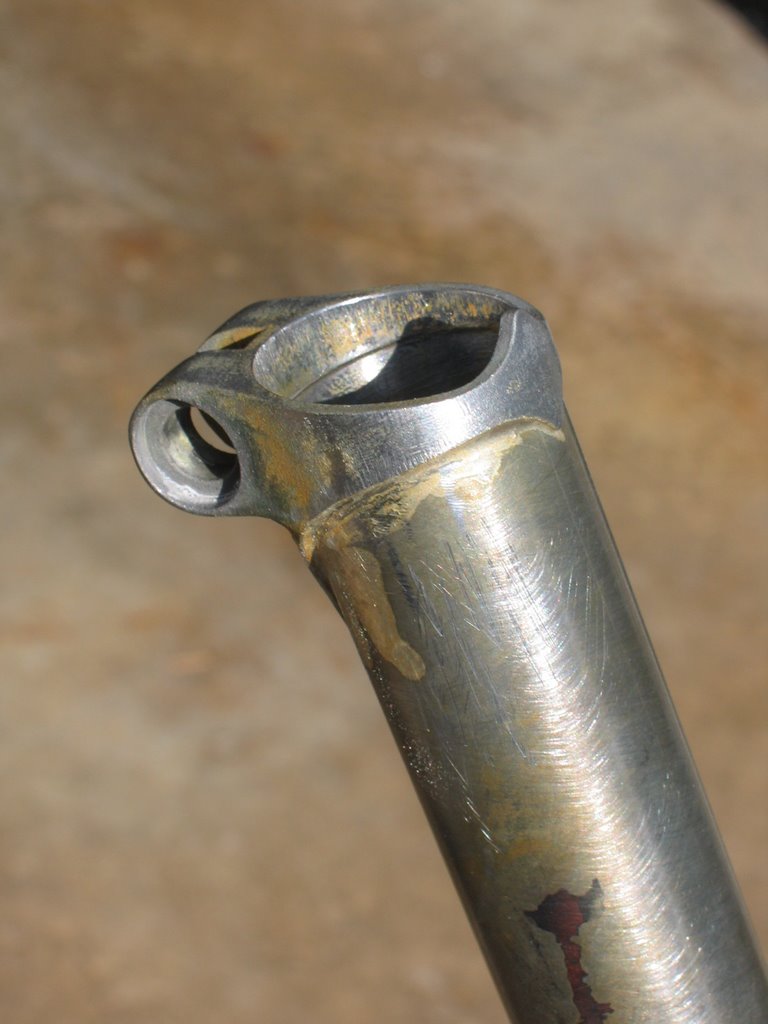
The crown of Sarah's fork is now cleaned up and looks pretty good. I got her tips in last night and they're waiting for cleanup. They warrant some additional comment.
I rolled little spools of filler and set them up into the fork legs with the flux. Then the fluxed tips were pushed in behind them. Somehow, one coil seemed to get lost. I heated one tip and the filler came out around the tip nicely over 360 degrees. The other once didn't seem to have any filler flow out. So, I tipped the fork over, and added a little filler to the first tip so that it could be filed with a nice smooth transition into the fork leg. The other tip sucked up a ton of filler before its edge could be filled. Obviously the filler ring was lost.
Sure enough, when I went to soak flux, the loose ring was rattling around inside the leg. I'm going to have to do something to stop that - probably locate it in the leg and heat that spot so it bonds to the leg.
I've also started fitting seat stays. This first is fit and now needs to be mounted. The second may get done tonight - the tops of both dropouts are modified to handle the angle of the stays, the stainless pieces are cut out, so there's not too much left to do on them.
Finally, this has been a weekend to update and fix links on the blog. My MS150 donation link still doesn't work - hopefully the techies will get back to me soon. But the rest are good and there's a new one too! I've added EBykr, and its not because he has a link to me. EBykr is like an online magazine of road-bike history, and one with high production values to boot. His pictures and prose are top rate! Recommended. So, hop the link and take a peek.
Sunday, April 30, 2006
Monday, April 24, 2006
Time slows down.
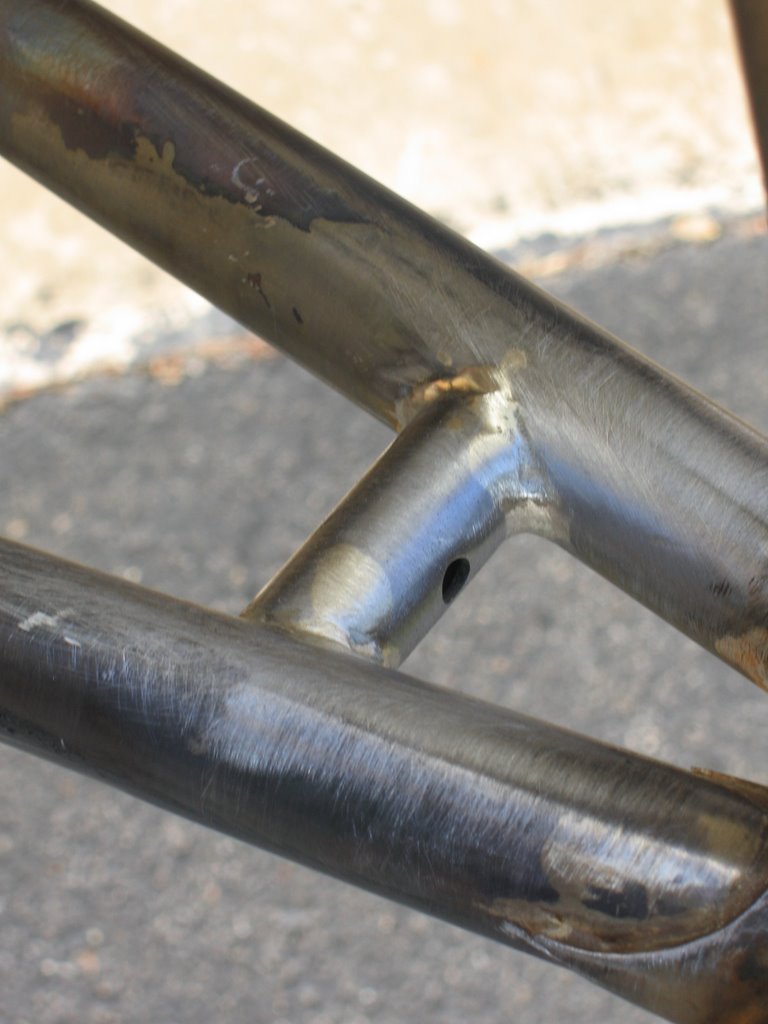
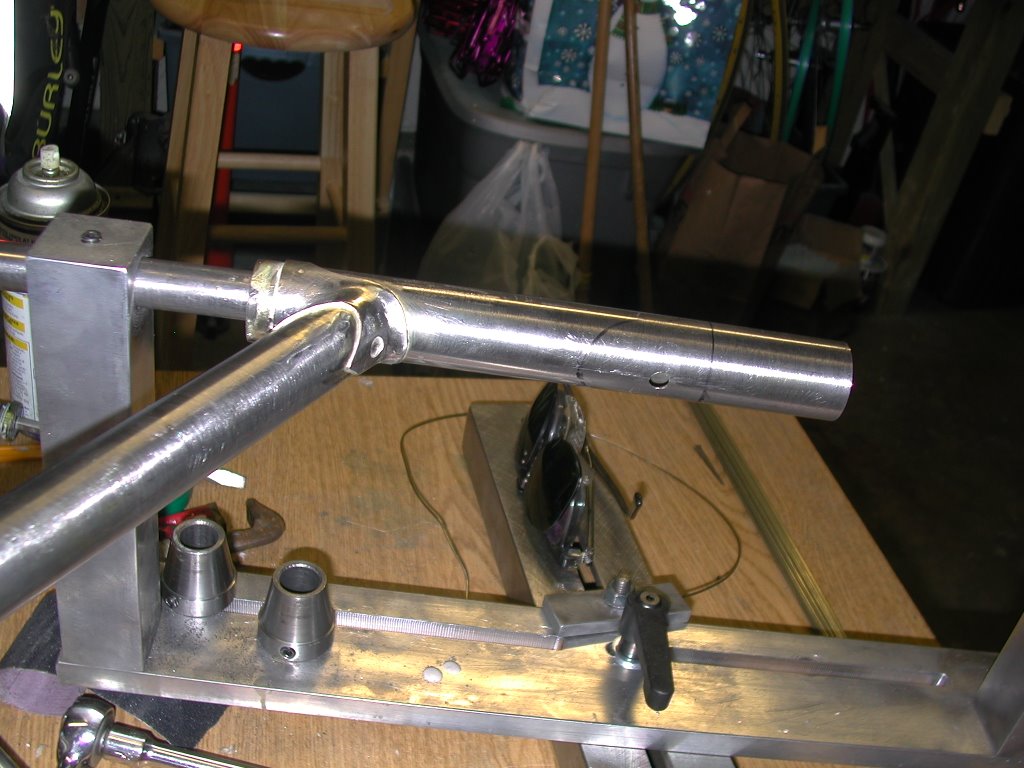
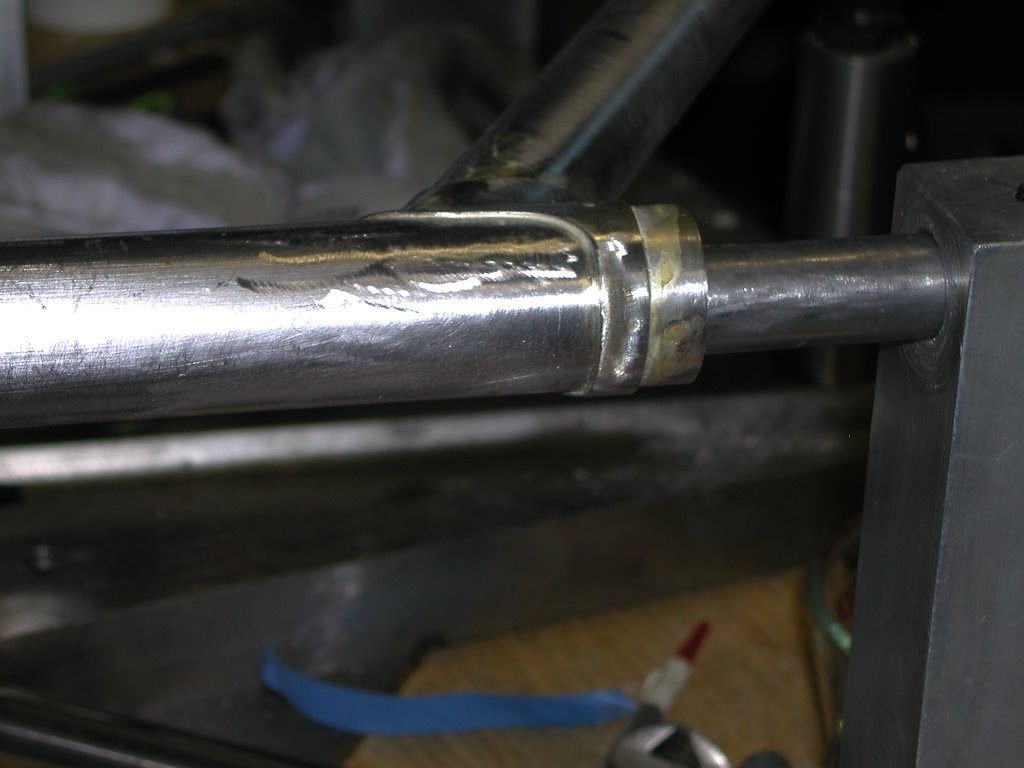
There's much to do yet, although mostly small things, to get Sarah's bike ready for paint. Today was step two of the fork. Again, this crown just soaks up heat like no tomorrow - must be pretty strong. Anyhow, the fork legs are in and look to be well aligned. There's a lot of cleanup. I tried a different flux and it just doesn't come off as well. The crown needs a lot of cleanup, then the tips will be installed.
Mostly, tonight was clean-up work on the frame. This is from where all the small tasks come. The other day I added to the filet on the brake cable tunnel and the one side of the brake bridge. While things were looking much better, they both still needed some filing and sanding to be right. I also went back around the various lug edges one more time, and spent some time feathering the points of a couple of lugs. Then there was general all-over sanding and filing on the drop-out faces.
All of this sounds quick enough, but it goes best when I get lost in time. Impatience is the enemy of fine work. I don't know that my work yet qualifies as fine, but its getting closer every day. I've learned to walk away if I'm feeling impatient - which is a good trick. But better yet is learning to relax and just go with the process. I don't usually work an area to completion in one stage. Instead I seem to work around and around the frame doing a bit at a time on each spot that needs finishing. This seems to work fine, because each time a spot is left and returned to, it gets a fresh eye with a new vantage point. This, in my experience, is a good way to make sure that the cure doesn't accidentally create another problem.
Sarah's bike is especially nice for this because it is so small. I can hold it and envelop it sitting down, without a vice, or putting it in a jig. As I turn it to reach another spot, I readjust my position and am able to wedge it comfortably enough to work a file or scrape the edge of a lug. Its very satisfying and when dinner is announced, I'm disappointed. Not because I haven't finished, but because I have to stop.
Sunday, April 23, 2006
A little more progress
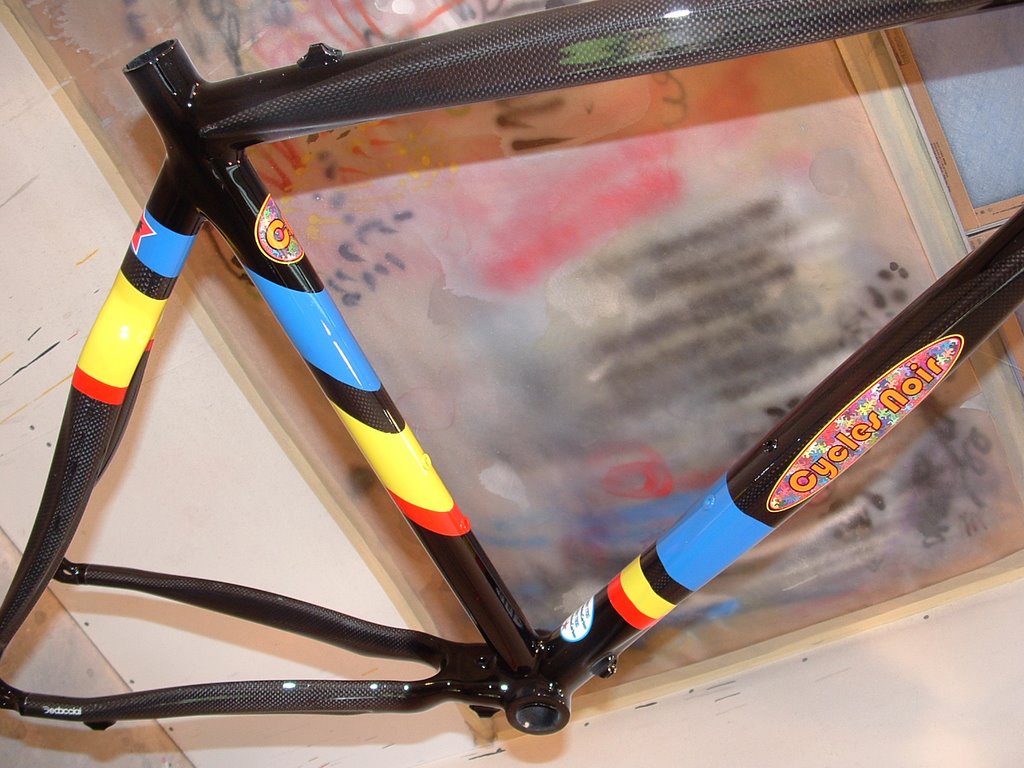
Today was a big day for hits on the web site, looks like folks were interested to see Carbon 1. That said, there have been no comments so maybe they didn't like the paint scheme. It's designed to appeal to a large local club, which limits what can be done in terms of colors and such. Anyway, I like it.
Sundays are a day of work for me, so bike building had to wait until after the kids got to bed.
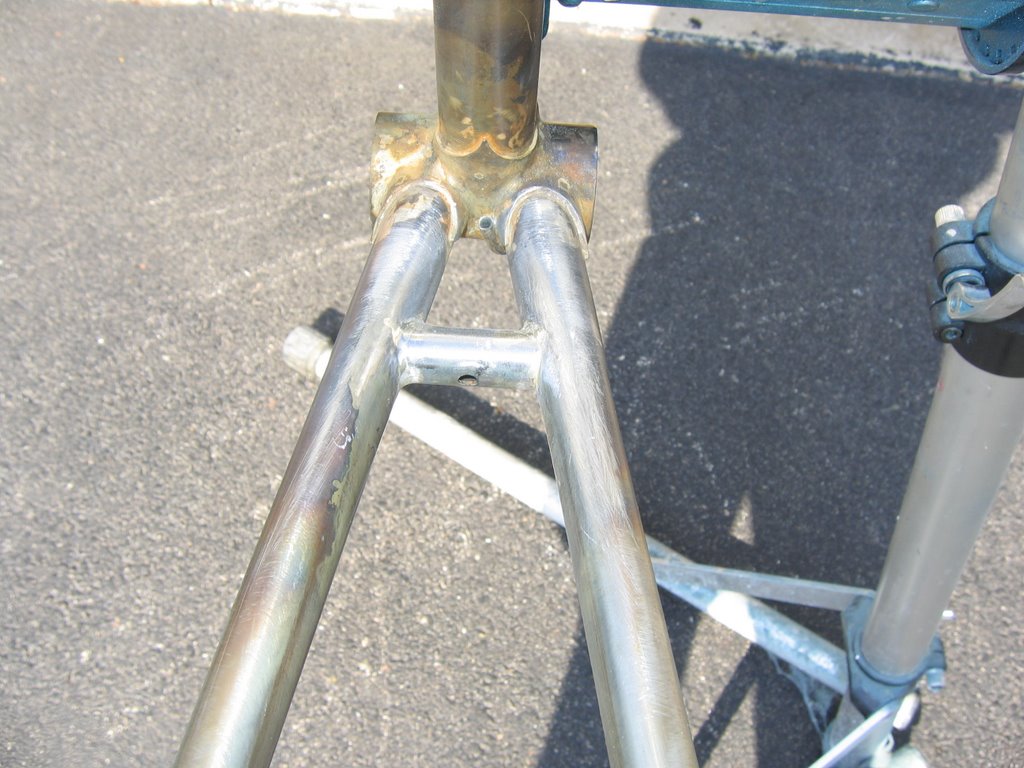
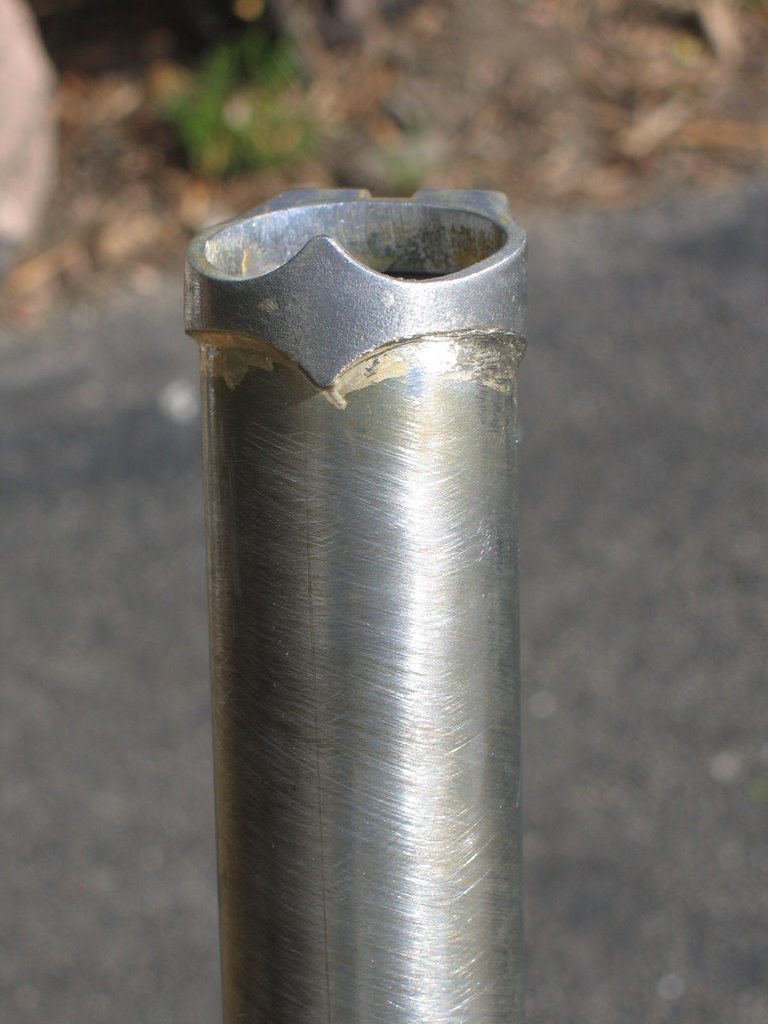
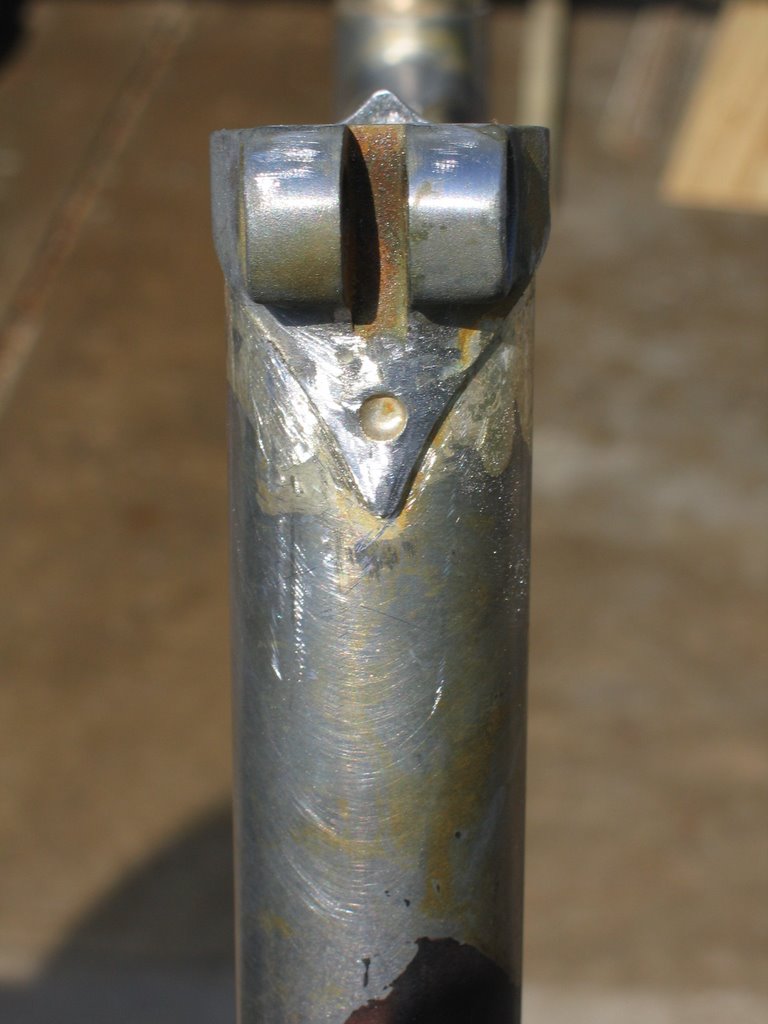
The task for tonight was to begin Sarah's fork. The crown is an Long Shen LC-27. It's a sloping crown with external tangs and a triangular cutout on the outside tang. The shape is really nice (unless you hate sloping crowns) and it has the rake built in.
The built in rake is important as it seemed like these legs would be hard to bend. They had to be trimmed from both the bottom and top. On the bottom, Joe B's stainless dropouts fit right in now. Long time readers will recall that I've had to chuck these up in the drill press and cut down the diameter of the internal part of the dropout for previous forks. Anyhow, the bottom of the legs couldn't be cut shorter. So the rest came off the top, and again as much was cut off as possible, while still fitting the sockets in the crown. A test assembly showed that the wheel fits fine and that the fork corresponds correctly to the overall geometry of the bike.
I spent a good deal of time duburring the ends of the fork legs and then cleaning up all parts for joining. Until Freddy's Al-tife arrives, I've been doing my fine cleanup using one of the organic solvents (probably uses citric acid).
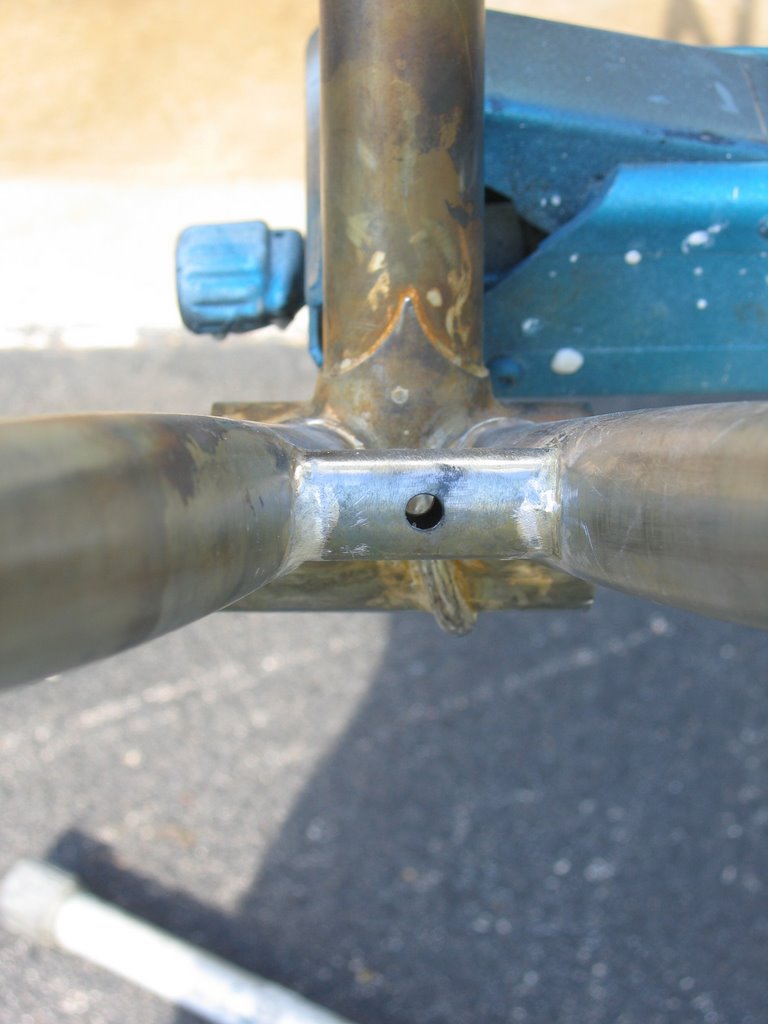
Out came the fork jig for the first time in a while, and everything was test fitted and the jig adjusted. Then everything comes off except the crown and steerer-tube. This crown has a lip on the bottom limiting how far the steerer is inserted. I ground a divot into the lip at the front and back. This way the filler can be fed from the bottom and its easy to see when its flowed out all the way around the steerer tube above the crown race. If the crown had no lip, it's just as easy to let the steerer stick out a little from the bottom and flow from the top.
It's interesting, I hadn't realized what a massive crown this is. It took about 3 hours to heat up. Maybe it just seemed that way, but it was slowwww. It cooled off just as slowly. In fact I began to wonder if it was stainless steel - but checking on the Ceeway site confirmed that it was not. Whew! Polishing the head tube will be enough for this old guy.
Hopefully we can finish the fork tomorrow and then move back to the frame. It would be great to ship it off to the painter by weeks end, but that depends on how busy the day job turns out to be.
Sundays are a day of work for me, so bike building had to wait until after the kids got to bed.
The task for tonight was to begin Sarah's fork. The crown is an Long Shen LC-27. It's a sloping crown with external tangs and a triangular cutout on the outside tang. The shape is really nice (unless you hate sloping crowns) and it has the rake built in.
The built in rake is important as it seemed like these legs would be hard to bend. They had to be trimmed from both the bottom and top. On the bottom, Joe B's stainless dropouts fit right in now. Long time readers will recall that I've had to chuck these up in the drill press and cut down the diameter of the internal part of the dropout for previous forks. Anyhow, the bottom of the legs couldn't be cut shorter. So the rest came off the top, and again as much was cut off as possible, while still fitting the sockets in the crown. A test assembly showed that the wheel fits fine and that the fork corresponds correctly to the overall geometry of the bike.
I spent a good deal of time duburring the ends of the fork legs and then cleaning up all parts for joining. Until Freddy's Al-tife arrives, I've been doing my fine cleanup using one of the organic solvents (probably uses citric acid).
Out came the fork jig for the first time in a while, and everything was test fitted and the jig adjusted. Then everything comes off except the crown and steerer-tube. This crown has a lip on the bottom limiting how far the steerer is inserted. I ground a divot into the lip at the front and back. This way the filler can be fed from the bottom and its easy to see when its flowed out all the way around the steerer tube above the crown race. If the crown had no lip, it's just as easy to let the steerer stick out a little from the bottom and flow from the top.
It's interesting, I hadn't realized what a massive crown this is. It took about 3 hours to heat up. Maybe it just seemed that way, but it was slowwww. It cooled off just as slowly. In fact I began to wonder if it was stainless steel - but checking on the Ceeway site confirmed that it was not. Whew! Polishing the head tube will be enough for this old guy.
Hopefully we can finish the fork tomorrow and then move back to the frame. It would be great to ship it off to the painter by weeks end, but that depends on how busy the day job turns out to be.

Saturday, April 22, 2006


Seat Cluster

Friday, April 21, 2006
Brazing Again
The pins came in plus Freddy threw in some stainless nails for use pinning stainless parts. Cool. Freddy says to file the stainless nails square before use. The first use for them will be to mount the stainless faces on the track fork for Aram's new track bike.
I'll have to post some pictures tomorrow.
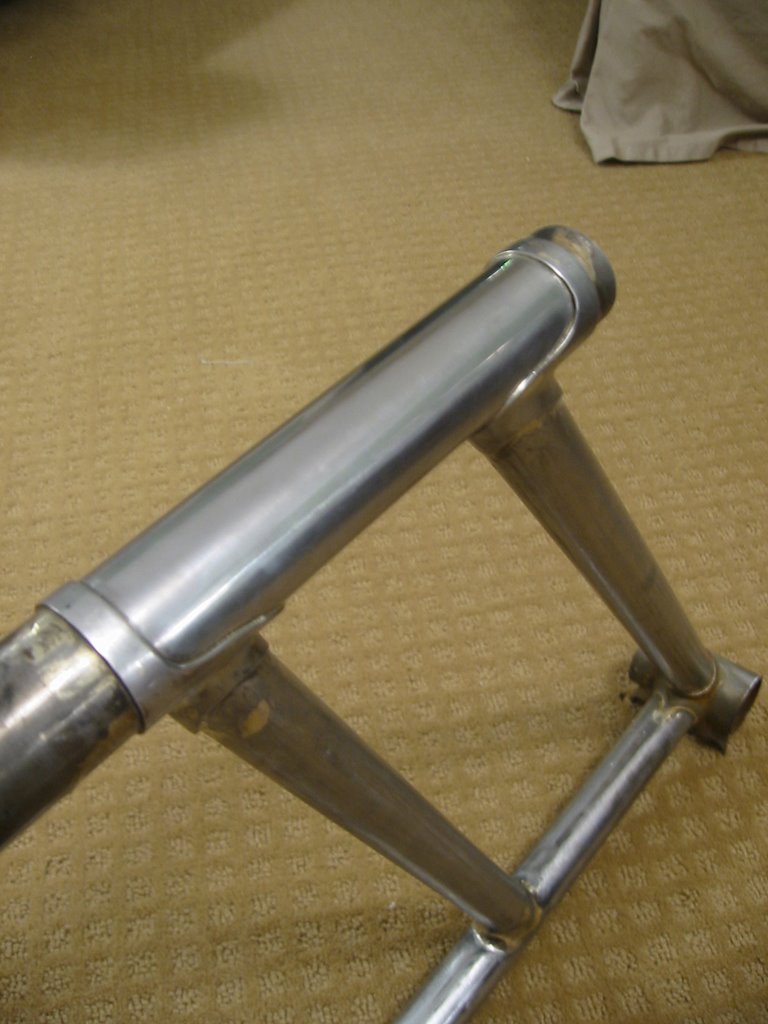
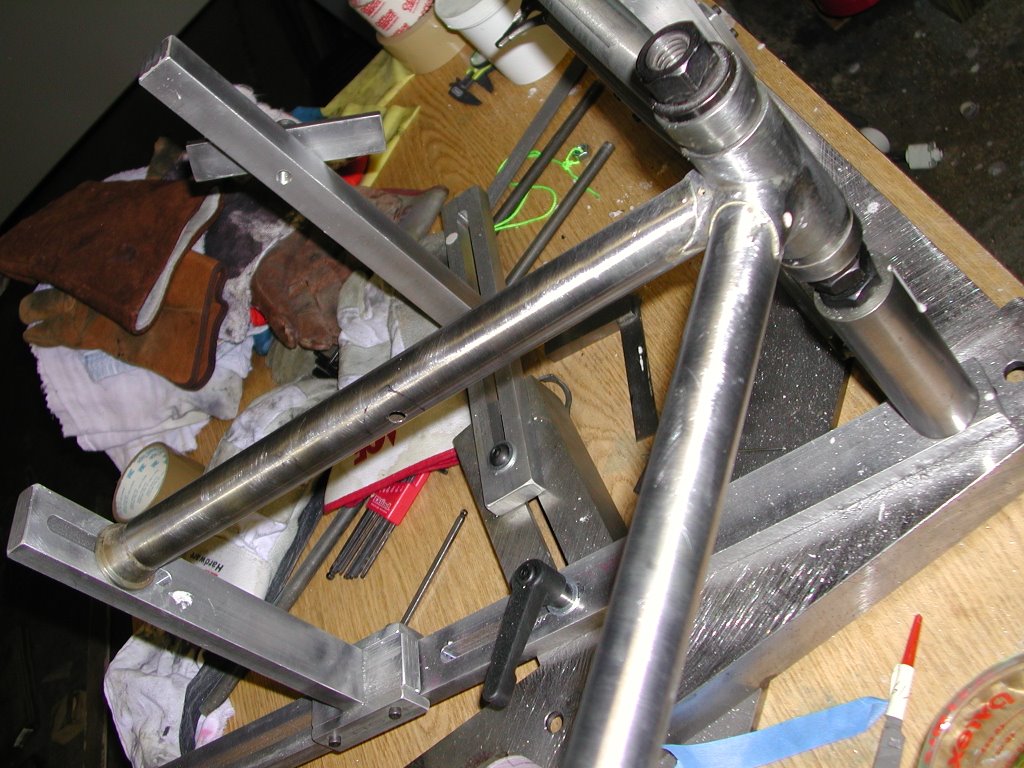
One at a time, I pinned the chainstays, pulled out of the jig, and brazed them. The alignment came out perfect. This is my best set of chainstays yet - and I'm psyched because this has always been my problem child. I put Sarah's back wheel in and could even see that it needed dishing (proven by re-installing it backwards).
The bike will use cantilever brakes. A question was whether to put in a second set of seat-stays pointed at the upper down-tube and mount the brakes on these with the brake cable running a straight line up the upper down-tube, or whether to mount the brakes on the normal seat stays and find a way to route the up to the seat cluster and back down to the straddle cable.
I decided on the later course. After studying the McMaster Carr catalog for a while, there were some decent looking nylon sheaves for wire rope (ha ha - the sheave is 3/16" wide - that's some heavy wire rope). I considered putting a pulley near the bottom of the seat-tube and one between the seat-stays, but decided to only use the pulley at the top.
Under the bottom-bracket shell, a bent stainless tube was brazed - sort of like a derailer cable guide. The front end points out parallel with the lower down-tube and the back end points up parallel with the seat-tube. With a little grease, and its large radius, the cable should move through it easily. This means that the front stop for the rear-brake cable will be under the lower down-tube.
For the upper pulley, a cutoff from the small end of a seat-stay will be mitered to fit horizontally near the top of one seat-stay. Before it is mounted, a waterbottle boss will be brazed into the other end. The pulley will need its center hole bored out (but the hub is plenty big for this), and then it will be installed to this hub with a couple of stainless washers and a stainless hex-bolt. It may be necessary to also construct some sort of guard to prevent the wire from coming off the pulley.
Next, a nice Long Shin seatpost binder was mounted. It transitions to a diamond in the front, and has a through-hole in back on the lower skirt. So it looks pretty snappy. It's inside diameter appears to be smaller than that of the tube. I think I'll take care of this when I ream the tube. In any case, even after honing, a 27.2mm seatpost won't begin to slide in.
I finished up the fitting of the chainstay bridge and installed it. I used Freddy's 45 to attach it and then some Brazage filet filler to make a nice radius. Well, 1 & 2/3 ends resulted in a a nice radius. I don't really want to heat the stays again, but I may go back in to finish the one radius. More on this later.
Sarah has now asked for a waterbottle cage. Kind of late in the process. I was afraid it would have to go on the top of the top down-tube - which would defeat the purpose of a mixte frame. Closer inspection suggests that it can fit between the downtubes. The upper hole in the cage may need to be enlarged so that the top of the cage can angle out slightly, but it should fit. Now, the only problem is how to drill out the holes on an assembled frame. Maybe I'll have to rent a drill with a right-angle head.
So, what's left? 1) seat-stays and cantilever bosses; 2) derailer housing stop on the right chain-stay; 3) derailer-cable and brake-cable housing stops at the top of the bottom down-tube; 4) assemble the fork; 5) Pulley mount on seat-stays; 6) Seat stay bridge; 7) clean up (including polishing the head-tube) and ship to painter.
There's enough excess head-tube to make stainless plates at the top of the seat-stays. Do I want to go to that trouble? Hmmmm.... We'll see.
The fork will be relatively simple. I'm using a straight-blade fork crown. So, its almost time to dig out the fork jig. Naturally, the fork will also need cantilever stops mounted. To those ends, I enviously eye the Henry James brake and bridge jig. I'm going to need a bit to think up my low cost alternative. More on that later.
I'll have to post some pictures tomorrow.
One at a time, I pinned the chainstays, pulled out of the jig, and brazed them. The alignment came out perfect. This is my best set of chainstays yet - and I'm psyched because this has always been my problem child. I put Sarah's back wheel in and could even see that it needed dishing (proven by re-installing it backwards).
The bike will use cantilever brakes. A question was whether to put in a second set of seat-stays pointed at the upper down-tube and mount the brakes on these with the brake cable running a straight line up the upper down-tube, or whether to mount the brakes on the normal seat stays and find a way to route the up to the seat cluster and back down to the straddle cable.
I decided on the later course. After studying the McMaster Carr catalog for a while, there were some decent looking nylon sheaves for wire rope (ha ha - the sheave is 3/16" wide - that's some heavy wire rope). I considered putting a pulley near the bottom of the seat-tube and one between the seat-stays, but decided to only use the pulley at the top.
Under the bottom-bracket shell, a bent stainless tube was brazed - sort of like a derailer cable guide. The front end points out parallel with the lower down-tube and the back end points up parallel with the seat-tube. With a little grease, and its large radius, the cable should move through it easily. This means that the front stop for the rear-brake cable will be under the lower down-tube.
For the upper pulley, a cutoff from the small end of a seat-stay will be mitered to fit horizontally near the top of one seat-stay. Before it is mounted, a waterbottle boss will be brazed into the other end. The pulley will need its center hole bored out (but the hub is plenty big for this), and then it will be installed to this hub with a couple of stainless washers and a stainless hex-bolt. It may be necessary to also construct some sort of guard to prevent the wire from coming off the pulley.
Next, a nice Long Shin seatpost binder was mounted. It transitions to a diamond in the front, and has a through-hole in back on the lower skirt. So it looks pretty snappy. It's inside diameter appears to be smaller than that of the tube. I think I'll take care of this when I ream the tube. In any case, even after honing, a 27.2mm seatpost won't begin to slide in.
I finished up the fitting of the chainstay bridge and installed it. I used Freddy's 45 to attach it and then some Brazage filet filler to make a nice radius. Well, 1 & 2/3 ends resulted in a a nice radius. I don't really want to heat the stays again, but I may go back in to finish the one radius. More on this later.
Sarah has now asked for a waterbottle cage. Kind of late in the process. I was afraid it would have to go on the top of the top down-tube - which would defeat the purpose of a mixte frame. Closer inspection suggests that it can fit between the downtubes. The upper hole in the cage may need to be enlarged so that the top of the cage can angle out slightly, but it should fit. Now, the only problem is how to drill out the holes on an assembled frame. Maybe I'll have to rent a drill with a right-angle head.
So, what's left? 1) seat-stays and cantilever bosses; 2) derailer housing stop on the right chain-stay; 3) derailer-cable and brake-cable housing stops at the top of the bottom down-tube; 4) assemble the fork; 5) Pulley mount on seat-stays; 6) Seat stay bridge; 7) clean up (including polishing the head-tube) and ship to painter.
There's enough excess head-tube to make stainless plates at the top of the seat-stays. Do I want to go to that trouble? Hmmmm.... We'll see.
The fork will be relatively simple. I'm using a straight-blade fork crown. So, its almost time to dig out the fork jig. Naturally, the fork will also need cantilever stops mounted. To those ends, I enviously eye the Henry James brake and bridge jig. I'm going to need a bit to think up my low cost alternative. More on that later.
Monday, April 17, 2006
Little Wheels
The pins haven't arrived yet, so it was a slow weekend for bike building.
After lacing Sarah's new wheels, I took them to a shop with a good wheelbuilder for tensioning and truing. Turns out the backlog there is at least two weeks (to accept work - not to return it) and that there's no assurance that Darrell will do the work. So, the wheels came home with me.
I got out my old cast-iron Hozan truing stand. It appears to be built for motorcycle wheels - very heavy and no way to center the wheel or to easily flip it over to check for dish. Part of the problem is that the axle holders are on big acme threaded screws. The threads have accumulated coagulated oil that makes them very difficult to turn (I use a monkey wrench on them). And part of the problem is that the axle ends go into hollows at the ends of the acme screws. The net of this is that removing the wheel is a slow laborious process.
Anyhow, up went the stand. A dial indicator got set up next to it. As tension got up there (no gauge), I would true the wheel. I figure tension pretty was even because the roundness looks great. The indicator says that the front wheel was true within +/- 3/1000's of an inch. The back wheel is true within +/- 4/1000's of an inch.
My son the rocket scientist has developed a program for me to analyze the possible seat-tube/top-tube/BB-drop combinations depending on what combination of lug I use in the DCS carbon system. This is cool and will make frame design/layout much faster and easier. Yea Nick!
That's it for now.
Wednesday, April 12, 2006
Tax Time


Well, its tax time.
Now I believe we all need to give Uncle Sam our due. That's what pays for everything we've got, like roads, parks, meat inspections, airports, medical research, and military spending. But, this isn't a good year to be owing extra to Uncle Sam - unfortunately that's were I stand.
Hmmm, looks like its time to tighten the budget. One item to tighten is frame-building expenses. I spent more than I thought last year, so it's time to build and hopefully sell a frame or two to recoup some of the expenses. Of course, this leads me into needing to buy insurance. I started the dialog with the agent today.
So what else is new?
I heard from Gordon, the bike ahead of me in the paint queue has presented some unanticipated challenges. Its too early to say what impact, if any, this will have on time frames. But, Gordon was clearly bummed - and I can easily sympathize with that. So its time to send good thoughts his way.
The tubes are ordered for my neighbors track bike. It's a mixture of Deda Zero & ZeroUno w/ ZeroTre chainstays. It'll be fileted with a lugged bottom bracket. The fork crown and steerer are coming from Ceeway in England, no one here in the states seems to stock these for 1-1/8" steerers. The rest is coming from Joe Bringheli. The top-tube will be 28.6mm as will the seat-tube, but for the down-tube I'm stepping up to a 35mm tube. It seems that my neighbor weighs about 15lbs more than what he looks like, and I don't want to risk flex with him - so big down tube and heavy thick chain-stays. With a little bit of luck I can start cutting tubes in a week or so.
Sarah's bike is held up right now for a lack of pins. I've got some stainless nails for stainless lugs, but don't really want to use them here. I did, however, find a source for what appears to be the right tapered cut nails. Hopefully these will be in tomorrow or Friday so i can get on with the rear triangle. The rims and spokes should also arrive in a similar time-frame, so building can commence on them. Yeah!
It appears to be confirmed that one of my carbon frames (to be custom built) will be a prize in this year's MS150, courtesy of an angel donor. That should give me a little publicity. Fun fun.
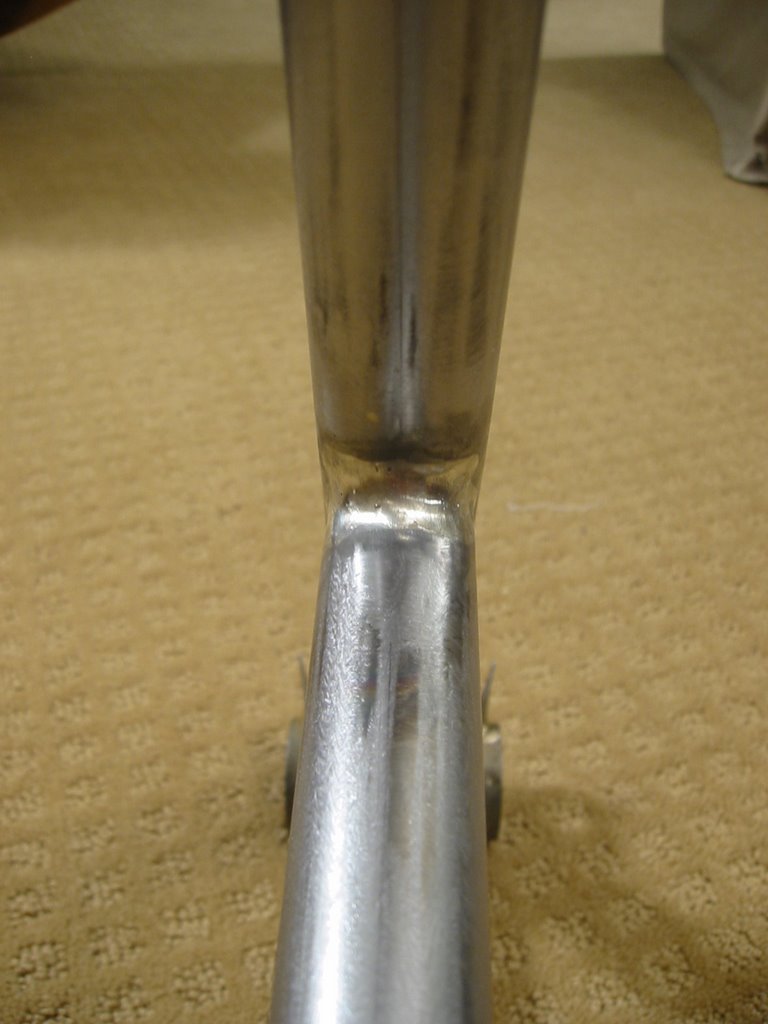
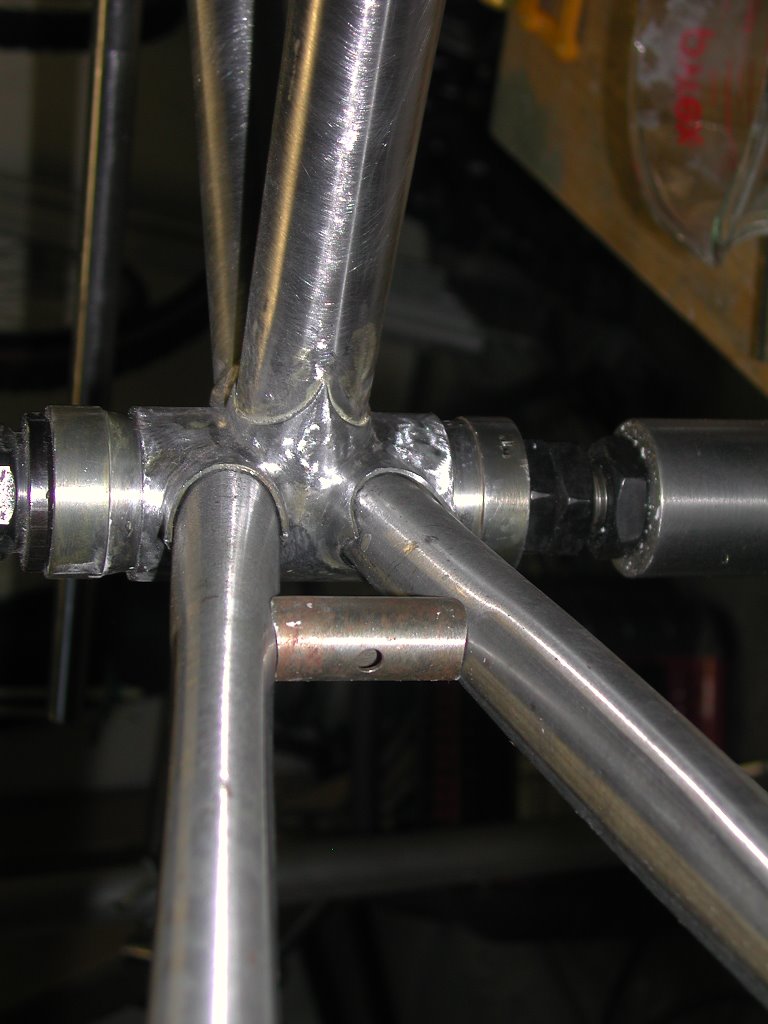
I think that the filet joint on Sarah's bike is done, although a little bondo may be necessary before paint. I'm pretty satisfied with it given my limited experience with this form of joint. Pictures are attached, but they don't seem to be positioning within the post the way that I've asked them to.
I've also begun the slow process of polishing the stainless head-tube. Dazza had a good description of the general polishing process over on the forum today, which was helpful. Because the tube has lots of open surface compared to a lug, I employed a palm sander for some of the work. A combination of sanding (down through to 600 grit), selective use of fine swiss-cut file, and some polishing with a mop in the grinder netted the results you see. The pictures probably don't fully convey the result, it has a very soft-looking finish and feels very smooth to the touch. There a couple of spots that need to go back a grade or two in sanding, and then it all needs to be sanded down to 1000 or 1500 grit before considering serious polishing. Still, the results so far are gratifying. It's also clear that until the frame is ready for paint, there's no point in further work on the head-tube. It's too easy to bump it in the shop and mess up the work. Nonetheless, I'm looking forward to the final result.
That's all for tonight, see you next time.
Sunday, April 09, 2006
Post Mortem
Well, I was working late last night.
I filet brazed the top-tube to the seat-tube using Freddy's Filet silver. Filet isn't really my thing, but it seemed relatively easy to build the filet up. I sanded it down and got better results than I thought. However, there are a couple of spots where I need to further build up with silver.
Finding a method to smooth out the filet without gouging the tubes is a challenge. What I finally found that worked was a small flap wheel. I think it came from a Dremel. Its about 1/4" wide and about 7/8" diameter. This got chucked into my Foredom tool and put to work. more pictures soon.
On the upper headlug, flowing the silver was harder than usual and I got some filler drips. This isn't normally a bad problem. Usually, its possible to spread them out with heat so they can barely be felt when the tubes cool down. Then its easy to sand them off. This time they wouldn't smooth out. It was frustrating. When all was said and done, it turned out I'd grabbed the filet silver for this lug. Duh!!!!
Anyhow the lug is in good shape, but there's lots of cleanup to get the drips off. As with the filets, its important to avoid cutting into the tube while removing the silver. So, time and patience are required.
Saturday, April 08, 2006

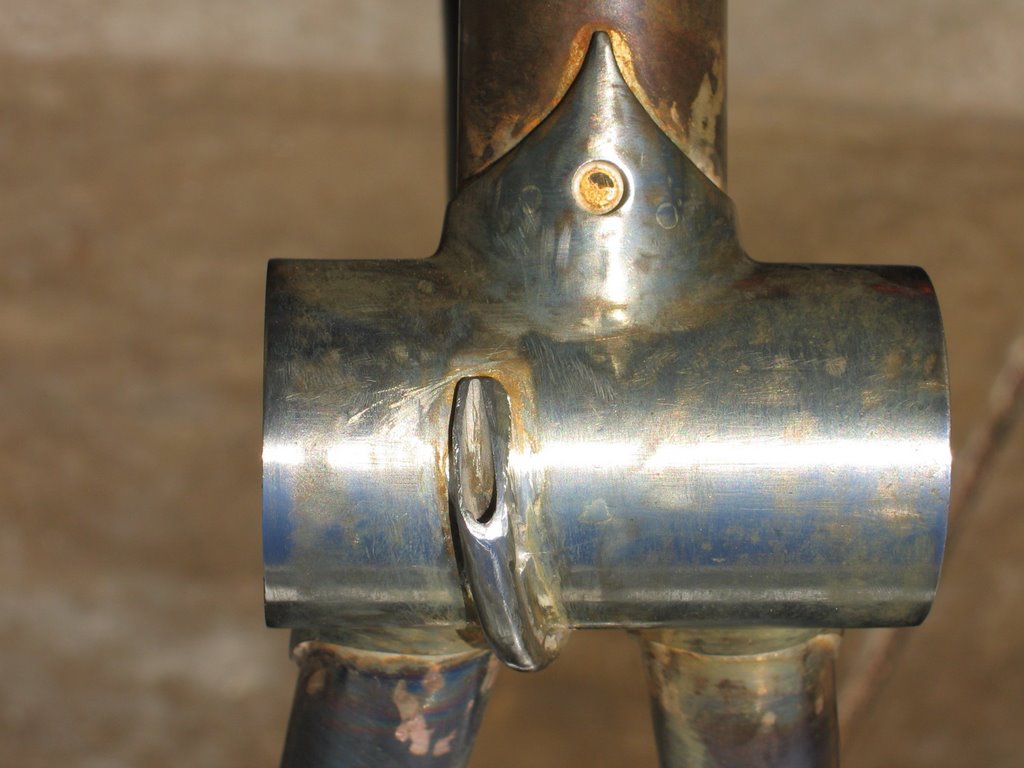
BB
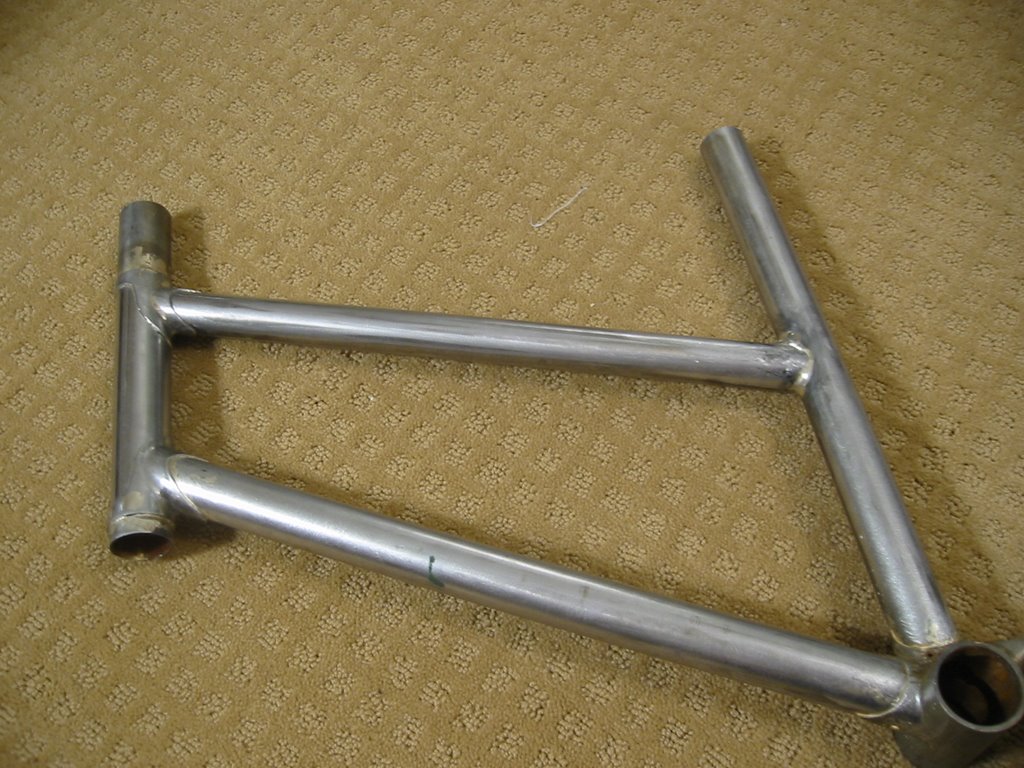
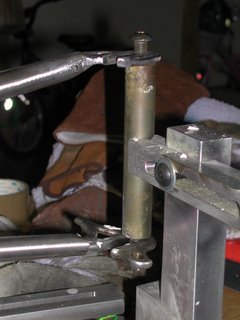
Here are some views of the Bottom Bracket. The head and seat tubes were pinned in place on the jig. Then the assembly was removed from the jig and placed in a stand to braze the joints. After the downtube cooled, the alignment was inspected and an adjustment was made to the seat tube. Then the Seat tube was brazed.


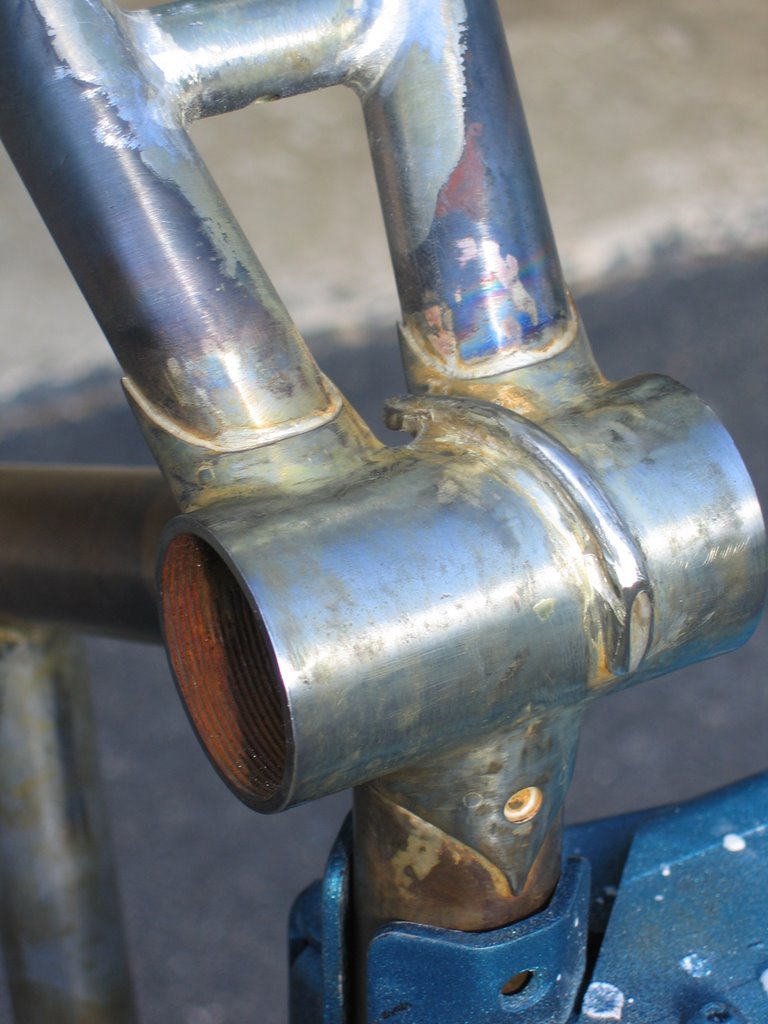
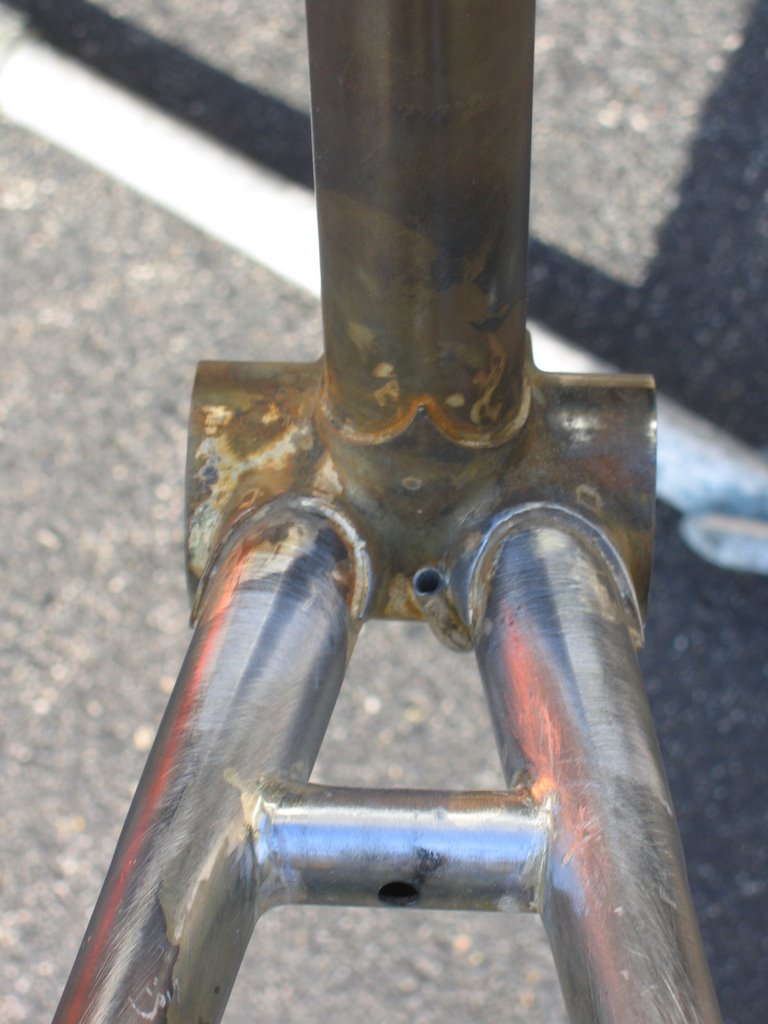
Dropouts
OK, Here are some Campy Dropouts. One brazed to the stay, the other waiting. As of now, they are both brazd to the stay. I tacked them in the jig, then pulled the stay out and mounted it in a vice to finish the braze.


Checking In
Hey Gang!
Lot's going on.
Let's see. My personal steel frame is on the side for the moment - there's too much else going on.
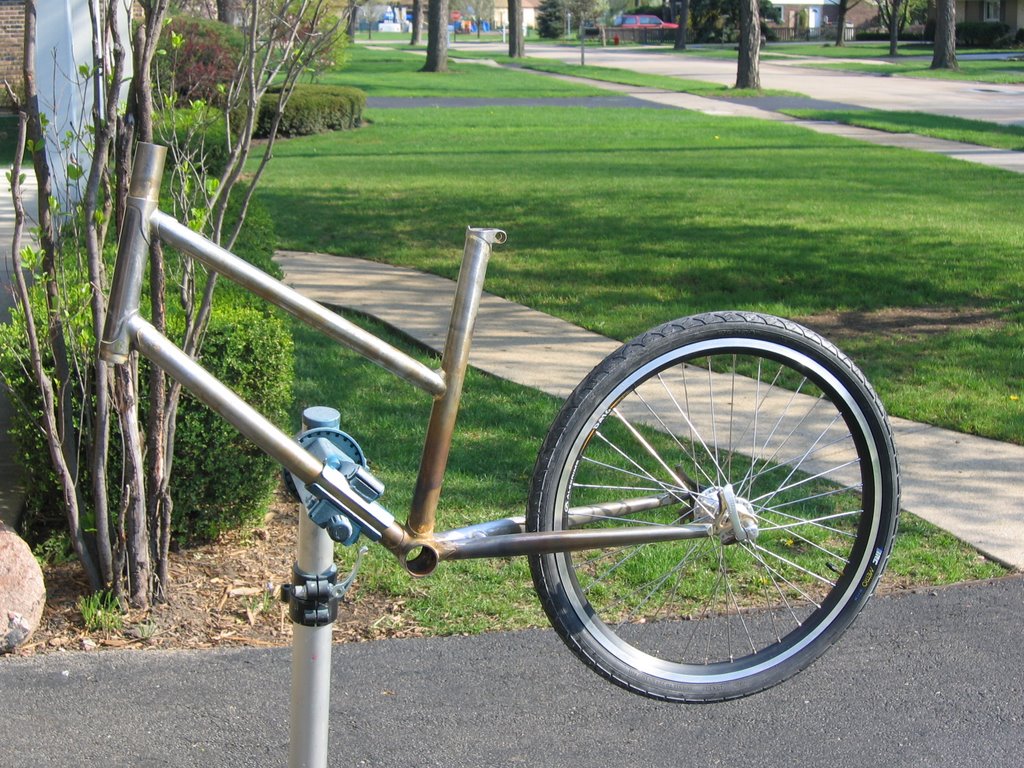
I've begun in Earnest to build a bike for my seven year old daughter. It has Strawberry pressed head lugs which are designed for a "girls" bike with the top-tube nearly parallel to the down-tube. The bottom bracket is a Henry James w/o guides. I'll braze on a tubular guide for the rear, but their won't be a front derailler. The rear drop-outs are old campy forged horizontal (long slot). Tubing is generally True Temper Versus and Versus HT. The exception is that I have an old Columbus Metax stainless steel head tube. Hopefully I'll be able to polish this up nicely - but it's going to be a lot of work. The top tube will have a filet joint at the seat-tube, and there will two sets of seat stays. The second set of stays will mount the canti-brakes- allowing them a nice straight cable run. Wheels will be 406mm BMX rims on Shimano 105 hubs. With a nine speed rear-end, there will be no shortage gears - probably I should have obtained a narrower bloc as an 11-32 seems like overkill.
Right now, the keel is done - Head-tube, down-tube, seat-tube. The alignment looks good, although I had to adjust the seat tube post-pinning and pre-brazing. The top tube is fitted, I worked especially hard on getting really tight miters. The stays are rough fitted and It looks like the BB sockets are fully ground out. The latter is an issue because the 308mm chainstays and a 130mm axle, the stays really splay out. The chain-stay bridge (tubular) is very nearly done (just a little less length) so we're really making progress quickly.
Pictures soon.
Gordon has prep'd Carbon One and just about has the first set of masking done. He's making good time and I'm excited about seeing this bike finished soon. He's been great to work with. More details when its done!
I'm going to build a track frame for a neighbor. He's Cat 1/2Pro and should be able to give me good feedback as well as exposure at our local velodrome. I've been working on the design with Freddy Parr - and I think it's going to turn out nicely. I'm going to get a chance to stretch my silver filet joint technique. Fred's talking about using the new Reynolds Stainless - but we'll see. The neighbor wants a 1-1/8 fork, so I'll have to order a fork crown from Ceeway.
I spent the morning trying to find some iron horse-shoe nails for pinning. Not even close. There do seem to be some potential internet sources - but they're tough to find. So, I added this to my recent order from Fred (flux & silver needed restocking).
This week my Ceeway order came in. It includes two vintage sets of SLX (complete 11 tube sets). Along with this are lugs and BB's to fit, and two sets of internal cable routing parts). I also recently received six sets of Campy old-style rear horizontal drop-outs (like on Sarah's bike), from Richard Sachs. This complements the Sach's dropouts I recently purchased.
So, along with finishing my frame, and building one for my son, I've got my hands full. It feels good.
That's it. More soon.
Lot's going on.
Let's see. My personal steel frame is on the side for the moment - there's too much else going on.
I've begun in Earnest to build a bike for my seven year old daughter. It has Strawberry pressed head lugs which are designed for a "girls" bike with the top-tube nearly parallel to the down-tube. The bottom bracket is a Henry James w/o guides. I'll braze on a tubular guide for the rear, but their won't be a front derailler. The rear drop-outs are old campy forged horizontal (long slot). Tubing is generally True Temper Versus and Versus HT. The exception is that I have an old Columbus Metax stainless steel head tube. Hopefully I'll be able to polish this up nicely - but it's going to be a lot of work. The top tube will have a filet joint at the seat-tube, and there will two sets of seat stays. The second set of stays will mount the canti-brakes- allowing them a nice straight cable run. Wheels will be 406mm BMX rims on Shimano 105 hubs. With a nine speed rear-end, there will be no shortage gears - probably I should have obtained a narrower bloc as an 11-32 seems like overkill.
Right now, the keel is done - Head-tube, down-tube, seat-tube. The alignment looks good, although I had to adjust the seat tube post-pinning and pre-brazing. The top tube is fitted, I worked especially hard on getting really tight miters. The stays are rough fitted and It looks like the BB sockets are fully ground out. The latter is an issue because the 308mm chainstays and a 130mm axle, the stays really splay out. The chain-stay bridge (tubular) is very nearly done (just a little less length) so we're really making progress quickly.
Pictures soon.
Gordon has prep'd Carbon One and just about has the first set of masking done. He's making good time and I'm excited about seeing this bike finished soon. He's been great to work with. More details when its done!
I'm going to build a track frame for a neighbor. He's Cat 1/2Pro and should be able to give me good feedback as well as exposure at our local velodrome. I've been working on the design with Freddy Parr - and I think it's going to turn out nicely. I'm going to get a chance to stretch my silver filet joint technique. Fred's talking about using the new Reynolds Stainless - but we'll see. The neighbor wants a 1-1/8 fork, so I'll have to order a fork crown from Ceeway.
I spent the morning trying to find some iron horse-shoe nails for pinning. Not even close. There do seem to be some potential internet sources - but they're tough to find. So, I added this to my recent order from Fred (flux & silver needed restocking).
This week my Ceeway order came in. It includes two vintage sets of SLX (complete 11 tube sets). Along with this are lugs and BB's to fit, and two sets of internal cable routing parts). I also recently received six sets of Campy old-style rear horizontal drop-outs (like on Sarah's bike), from Richard Sachs. This complements the Sach's dropouts I recently purchased.
So, along with finishing my frame, and building one for my son, I've got my hands full. It feels good.
That's it. More soon.
Subscribe to:
Comments (Atom)

