I made it out to see Joe Bringheli yesterday and he's doing fine.
Joe's really busy. He's been selling (and building) four frame jigs a month, plus assorted other tools and jigs. Likewise, orders for steel tubing keep coming in. Joe says that he's working to train his daughter to help with parts of the business, just so he can keep up with everything. Yea Joe, it's a good problem to have.
Joe showed me the new Corsa Nero frame set from Deda. Very pretty. It has the newly fashionable large check weave in the outer carbon layer. The tube shapes are nice - very aero-profile looking. It is a complete frame. There's no building involved - so there's no customization either. Corsa Nero will be replacing Black Pearl (which continues to be available for a short while), and offers one improvement: Corsa Nero comes in more sizes than Black Pearl. So, for off the peg fitting, it offers more options. I think it should be popular.
Since my last visit Joe has done 4 frame builds. He clearly enjoys this side of the business, but with all of his other work, he finds it hard to fit more framebuilding into his schedule. It's interesting to note, Joe's custom frame and fork packages are priced as a real bargain. He prices to his local market, and doesn't reflect what a custom steel frame and fork would cost across the rest of the country. So, if you're looking for a frame, you're on a limited budget, and have the patience to wait 3-4 months for it to be built, you might try giving Joe a call.
Saturday, July 29, 2006
Friday, July 28, 2006
Checking in
Aram's new fork is part way built, but I've run out of O2. I knew it was about due, but haven't had time to refill. Nick going to run over tomorrow and trade the tank in for me.
Already its clear that I'm going to like this fork with a flat crown better than the slopers. The tips are Henry James SS, which will leave some nice looking faces.
It's possible to get tugs for aluminum forks (the name for a rear dropout on a track frame) which should fit over my steel forks with the stainless plates. Nonetheless, I've decided to remove the one plate and just go with plain forks and the standard MKS NJS tugs.
This weekend should see the frame assembled. There's a little work left on the front fork, the removal of one SS plate, and the filing of the tops of seat stays, all of which should be done tomorrow.
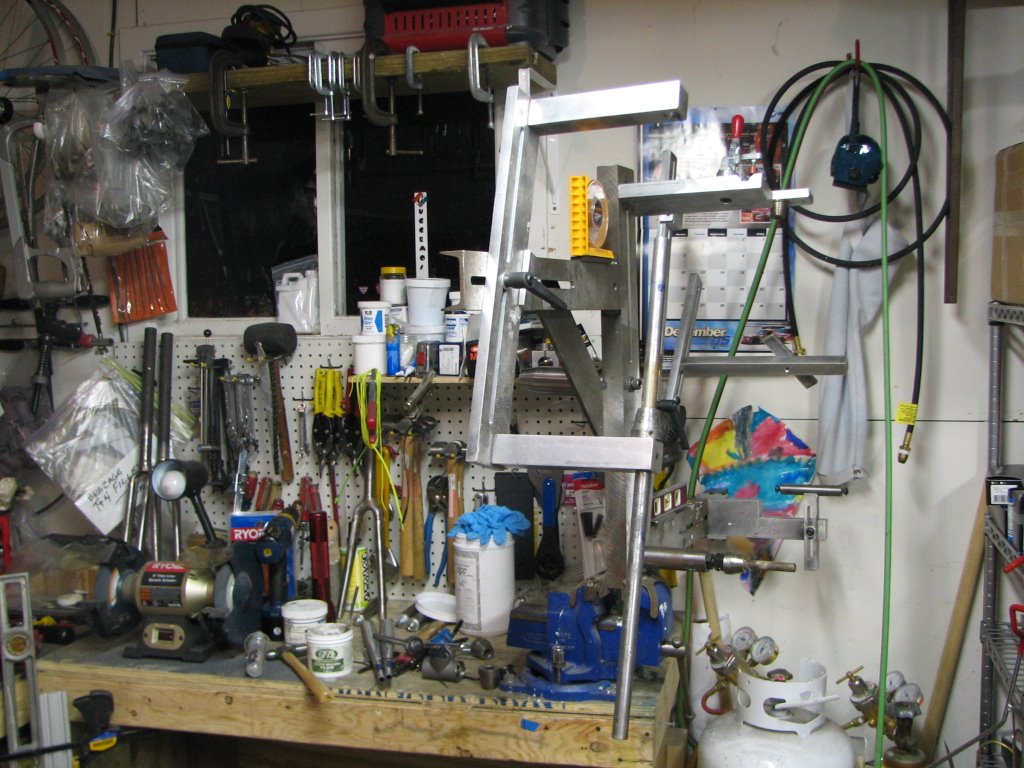
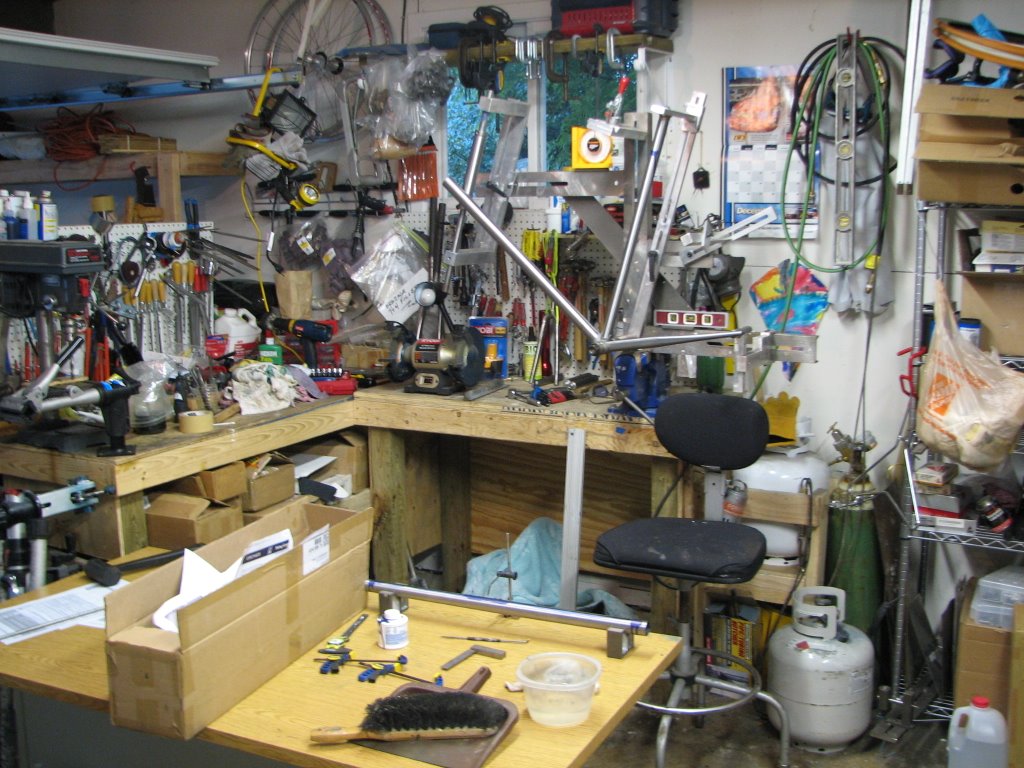
Meanwhile, my Bringheli alignment table just arrived. It looks good, and fits in the shop - which is a big issue for me. If there was more space, I'd probably have just purchased a reject granite counter top - but there's no place to put on. The Bringheli stand is made of heavy angle steel (about 2" x 2") in a configuration and size much like a saw horse. It's very rigid and has holes in the feet to mount it in the floor. Because the table is long and narrow, one has to work one tube at a time. Joe points out to be careful and fully loosen the BB before turning the frame so that the machined face of the BB post doesn't get damaged.
Tomorrow, while I take care of the clean-up tasks, the head photographer will get some pictures of the seat-stays with their plates brazed on, the head-tube/down-tube joint, the seat-post binder, and the new alignment table. We'll post them here for all to see. Then it will be on to brazing up the frame.
More soon.
Already its clear that I'm going to like this fork with a flat crown better than the slopers. The tips are Henry James SS, which will leave some nice looking faces.
It's possible to get tugs for aluminum forks (the name for a rear dropout on a track frame) which should fit over my steel forks with the stainless plates. Nonetheless, I've decided to remove the one plate and just go with plain forks and the standard MKS NJS tugs.
This weekend should see the frame assembled. There's a little work left on the front fork, the removal of one SS plate, and the filing of the tops of seat stays, all of which should be done tomorrow.
Meanwhile, my Bringheli alignment table just arrived. It looks good, and fits in the shop - which is a big issue for me. If there was more space, I'd probably have just purchased a reject granite counter top - but there's no place to put on. The Bringheli stand is made of heavy angle steel (about 2" x 2") in a configuration and size much like a saw horse. It's very rigid and has holes in the feet to mount it in the floor. Because the table is long and narrow, one has to work one tube at a time. Joe points out to be careful and fully loosen the BB before turning the frame so that the machined face of the BB post doesn't get damaged.
Tomorrow, while I take care of the clean-up tasks, the head photographer will get some pictures of the seat-stays with their plates brazed on, the head-tube/down-tube joint, the seat-post binder, and the new alignment table. We'll post them here for all to see. Then it will be on to brazing up the frame.
More soon.
Tuesday, July 25, 2006
Overdue reporting
Life's getting busy again....
Pictures soon, but here's a status update.
The first joint is faired in and looks nice. The fit and angle are on the money. The seat-post binder is mounted on the seat-tube. The seat-tube, down-tube, and chain-stays are mitered to the BB. The bottom bracket itself needs cleanup. In particular the edges of the spigots need to be squared up and the chain-stay sockets adjusted to accommodate the 120mm rear spacing of a track bike. The rear forks (aka dropouts on a road bike) are installed on the chain-stays and cleaned up. The top-tube is rough fitted, but needs a few more file strokes prior to brazing. I've installed concave plates at the top of the seat-stays and just need to do the final filing of the edges to flow smoothly into the tube. So.... we're almost ready to braze things up.
But first, I decided to install stainless plates on the sides of the rear forks. The idea is to avoid paint here where it will get damaged from installing and removing wheels.
In fitting things up, a couple of issues came up: a) the plate isn't as long as the slot; b) the end of the plate sticks out beyond the top and bottom of the fork at its rear end; c) the axle tug (MKS) fits on the fork, but has no room to accommodate the plate. So, I figured to shorten the plates just a bit so the tug can fit on the end of the fork. Also, to trim the end of the plate to echo the curves of the rear fork. Then, another problem came up: if the inside plate is installed, then the tug won't work. The piece that goes around the axle has a guide that rests on the side of the fork. The rear of the tug fits snuggly on the rear of the rear fork, and won't twist to allow this guide to ride along a plate installed on the inside of the fork.
I decided to try mounting the outside plate only. Not ideal, but at least everyone passing by doesn't need to see paint damaged by axle nuts. Using three small clamps to hold the plate in place, it was time to braze.
Looking at the results, it doesn't look all that good. While others have found ways to use these stainless plates, I find them problematic. It seems like the best solution is a stainless rear fork.
In the meantime, I have to decide whether to remove the one plate, or build a new chain-stay. While I think about that, I'm going to concentrate on building a new fork. It's got a flat crown that will look much better than either of the sloping crown forks that I made. The crown has been fitted to the steerer, and the brake mounting has mostly removed. I've started fitting blades. Their sockets in the crown need to be opened up a bit.
This piece needs a good edit, but no time for that now. So let me summarize: The BB shell needs to be cleaned up and fitted for the chain-stays. I need to finish a new fork. The tops of the seat-stays need to be finished, and the right chain-stay needs to be resolved w/o stainless. Then everything can be brazed up, cleaned up, and shipped to Gordon for paint.
Monday, July 17, 2006
Lower Head Tube
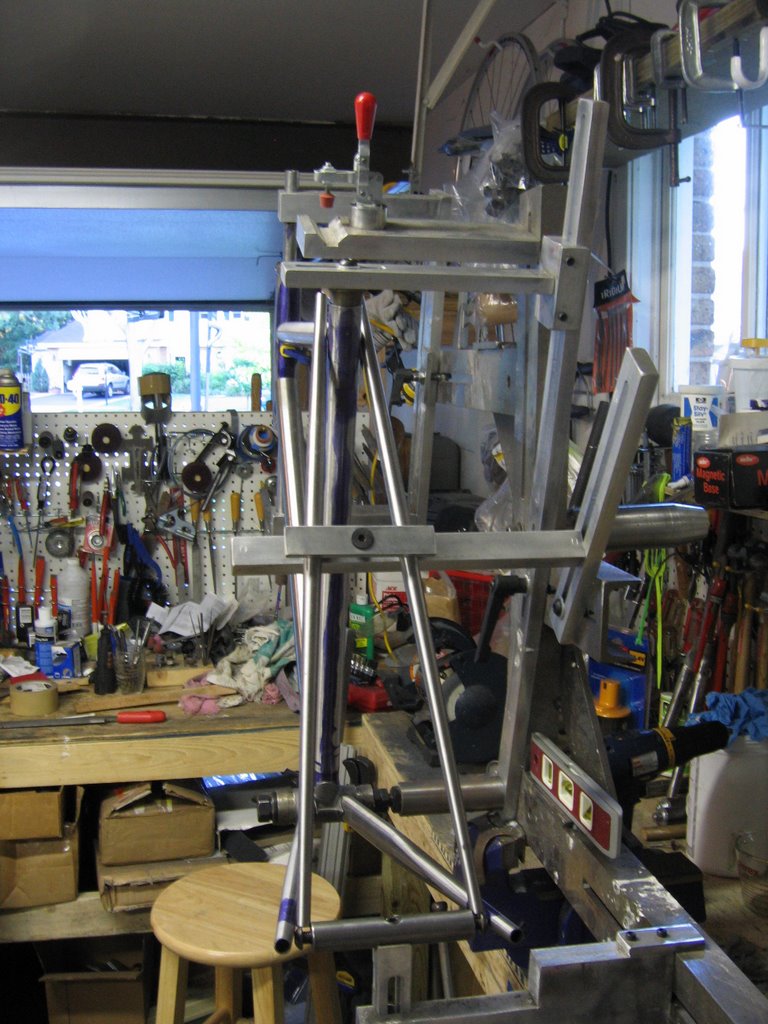
Blogger isn't wysiwyg, so it's not clear the order in which you'll see these images. The first should show the jig, after removing the combined head-tube/down-tube. My vice can swivel, which is great. In this position, it's easy to put tacks on both sides of the joint.

The next two shots show the tacked joint. Sorry, should've taken the pic before beginning to smear more flux on. In any case, there is a tack on each side, and one at the top.
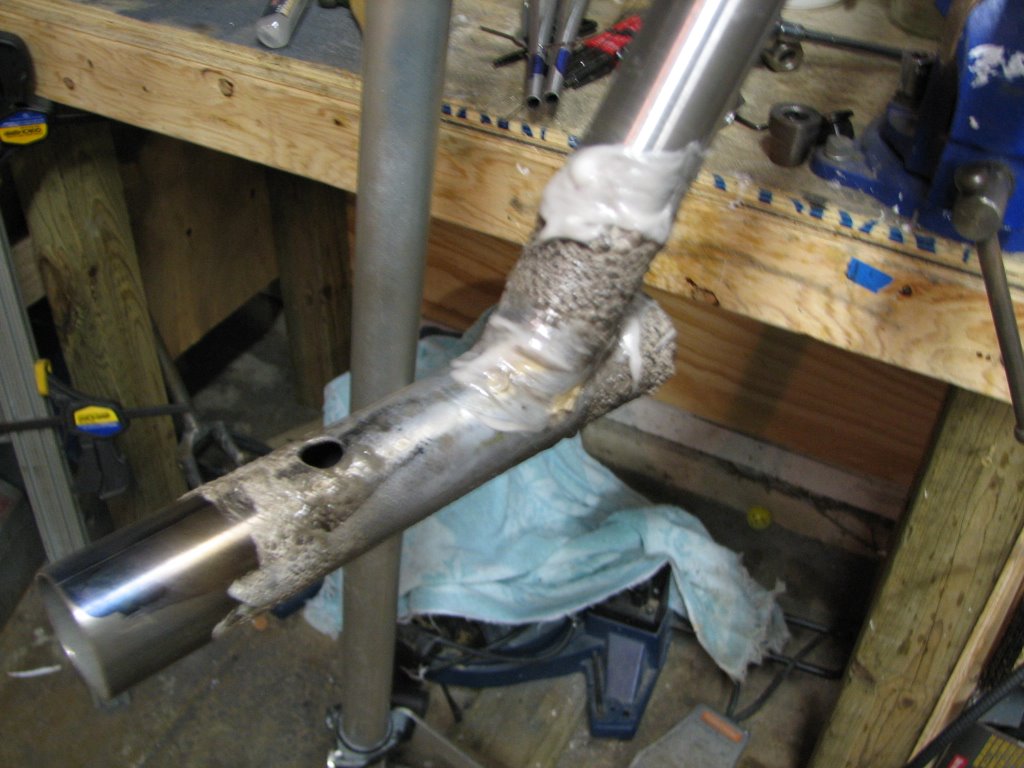
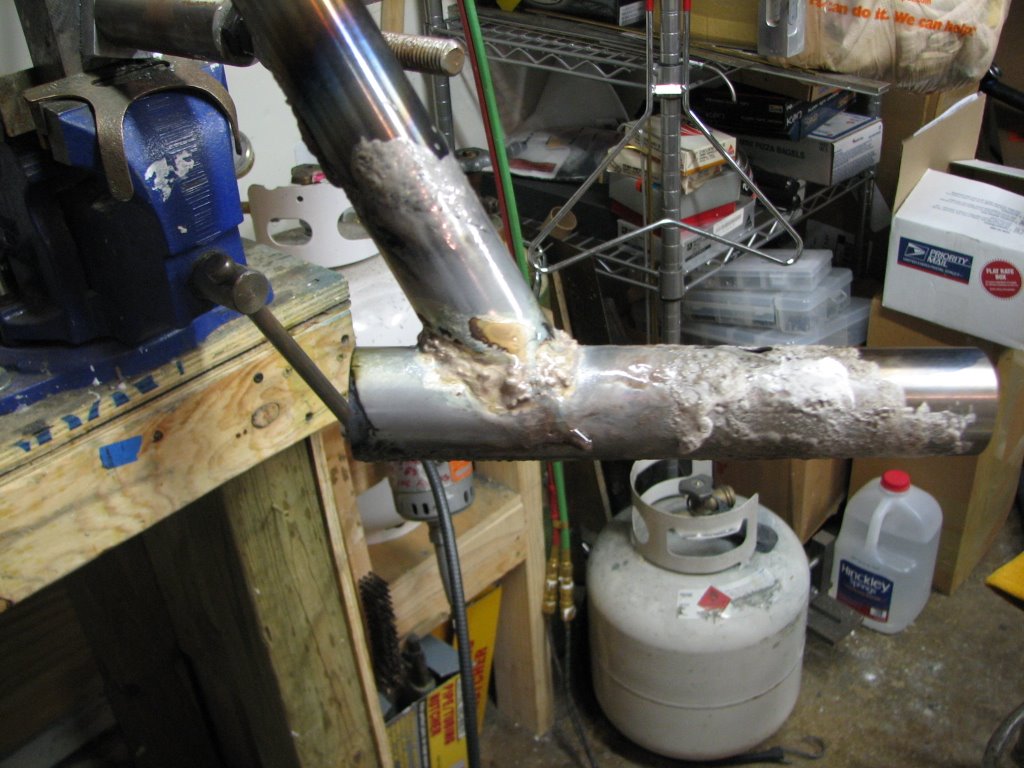
After cooling, The angle and fit of the joint were double checked. All looked good, so it was on to more flux. The joint is held upside down because it seems to be easier to control the flow of filler, plus the flux inside the joint tends to stay at the joint instead of sliding away from it.
The last pic is post-braze. I'm using Fred Parr's Fillet pro. It's a little lumpier than I'd like - but I find it sands down easily to a smooth filet.
Because the down-tube is about 0.8mm thick at the joint, and the head tube is closer to 1mm, the direction of the torch is critical. Instead of pointing straight into the line of the joint, I point the flame a little towards the head-tube to balance the heat between the two tubes. Experience has show that failing to to this causes scorching of the flux on the down-tube.
That's all for tonight.
Sunday, July 16, 2006
More Pix
 The down tube is fitted (one of the pins is located in the BB to hold it in place). The top tube is mitered - final filing to be done after the rest of the front triangle is brazed up. The seat tube is cut to length and mitered on the bottom. The chain stays are mitered and marked for length. The seat stays are just sitting there to see how I like the look of them - they're a narrow biconical stay. The downtube is 35mm .8/.5/.8. The headtube is 35.5mm. Top tube is a conical 31.7mm front, 28.6mm rear with a .7/.5/.7 profile. The seat tube is a standard 28.6mm with an external butt (1.2mm wall thickness) at the top to avoid ovalizing from heat. Chainstays are oval w/ .9 wall thickness for stiffness. The Walter bottom bracket has a built-in chain stay bridge.
 Angles are 74.5 head tube, 74 seat tube. Bottom Bracket drop is 60mm (our local velodrome is relatively flat).
Apart from the lugged bottom bracket, joints will be filet - most being with silver. The bottom bracket has loose fits so will be joined with brass, as will the connection of the track forks to the chain stays. The stays will have stainless faces brazed on - but the ends will be bare to fit the tugs (MKS njs).


Wednesday, July 12, 2006


Tuesday, July 11, 2006
What's new?
Now that Sarah's bike is off for painting - I can turn my attention to some other projects.
I'm building a carbon frame won by one of the top 150 fundraisers at the 2006 MS150 Tour de Farms. This process has its own blog - so if your curious, look at: www.LindasNewBike.blogspot.com.
Meanwhile, I'm getting serious about Aram's new track bike. The frame will be of silver filet construction except for a lugged bottom bracket. At first, it looked like the BB angles wouldn't work out with the limited (60mm) drop on this frame. Closer examination revealed that it has brass clearances - giving me a number of degrees of wiggle room for both the down-tube and chain-stays. None of the tubes are super light, so I'm not to concerned about using brass in the BB.
The tubing is large diameter steel. The down-tube is 35mm, the head-tube is 36.5mm with a 1.2mm wall thickness, the top-tube is conical being 31.7mm diam in front and 28.6mm in back, and the seat-tube is 28.6 with an external buldge at the top (to help prevent heat distortion when connecting the top-tube and seat-stays). Oh yeah, the chainstays are ovalized for good clearances - so they'll probably get a bridge to stiffen things up. And for the seat stay bridge, I'm considering a polished stainless 3/8" tube. Do I really want to go through that polishing thing again? Hmm...
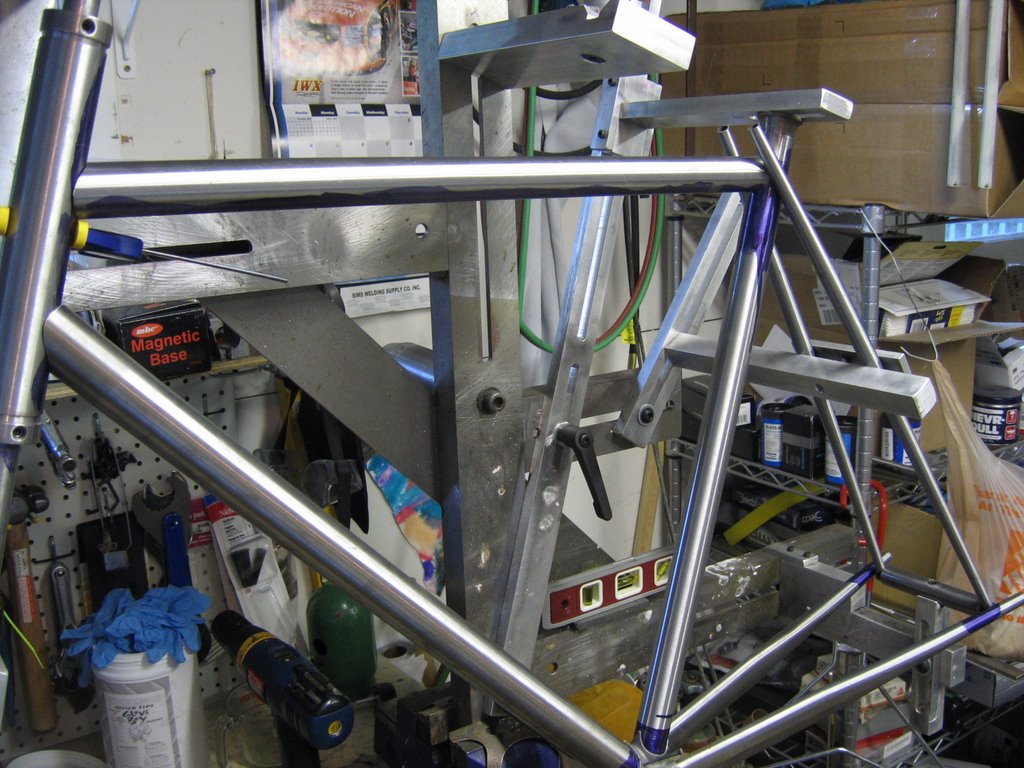
The jig is up and I've been working on its fit. The overall design was refined on Martin Manning's design spreadsheet - good stuff, especially if one wants to be precise. This is a fast handling track bike. It's not a single speeder for the road. Aram is a serious and competitive racer, so we want to be very precise to avoid handling anomolies.
Related to this, I'm going to deviate from my usual building sequence. The goal here is to create a strong and well aligned keel connecting the head-tube to the rear wheels. The first build will be chain-stays and then connecting them to the bottom bracket. This will be done with very careful attention to alignment. Then the head-tube/seat-tube will be put together, again with a critical eye on alignment. Finally, these two assemblies will be connected - with much fitting and testing to make sure that the head-tube is in a vertical plain aligned with the track of the bike, and that the track forks (the proper name for "drop outs" on a track bike) are perfectly parallel (on two axes), and equal distances from the ground and from the frame's center line. Once all this comes together, we're over the hard part.
After fitting the jig, it was time to start working on tube prep. So far, I've washed out the insides of the head, top, and down tubes. This is necessary pre-brazing, but also makes it easier to read the butts inside the tubes. By looking through the tube at a light, and moving it around, one can see where the butts transition. By so doing, it possible to make sure that the ends of the tube were marked correctly (one end usually has a longer butt and this is the end from which to trim excess length).
Then I set up some v-blocks on my reference surface along with a surface guage. If you're not familiar, a surface guage is a precision base with a post rising from it. A spindle is atached to the post and can be adjusted up/down & in/out. The post has a hinge at the bottom and a screw that delicately angles the top out or back. By adjusting the spindle close to an object, and then fine tuning with the post's screw, its possible to index a precise height from an object sitting on the same reference surface as the surface guage. By moving the guage around on the surface, one can compare heights from spot to spot.
We're using this a little differently here. A tube is set in the blocks, and the surface guage is adjusted to the highest point in the tube at a location midway between the ends. Then the tube is rolled in the v-blocks to detect if and how much bend there may be in its length.
The head-tube measured out fine, but its short so that's to be expected. Both the top-tube and down-tube have very slight bows. Not enough to be a problem, but enough that its important to be concious of the bows in order to insure the alignment of the finished product. For both of these tubes, the concave side of the bow will face down.
Then it was time to refine the position of the head-tube. With most jigging systems, this is he most complicated part. Most jigs don't provide a way to fit fork into place, as a means of locating the head-tube. Often, the head tube is difficult to remove and replace to the same location. It will be on the same axis, but may have moved up or down along the axis.
I go about positioning the head-tube from several different basis points so as to find any errors in my methods. The first method involves locating the top of the seat-tube and with a long level determining where the top of the head tube should be. The raw head-tube is too long, so there should be some extra sticking up above this point; this can be removed later.
A second basis is to measure up from the datum line on the jig to it's front horizontal frame member. Then, it' possible to determine where the bottom of the head-tube should be relative to this new datum line, based on the design produced in Martin's spreadsheet. Using a vertical measure and a small level horizontally, it's possible to put a guage mark on the head-tube. From there, it's possible to measure up from the mark, parallel to the head-tube axis, to a fixed point on the frame holding the head-tube assembly. This point becomes a new datum point, and the measure is retained as a basis for where the lower head-tube should end. Again, there should be a little extra tube below this point.
After adjusting the height of the tube, and double checking the measures for each end, it's possible to hold up the fork, parallel with the tube to the appropriate point. With a little help, a long straight edge, level, and a tape measure - its possible to compare the axle height to the rear axle height and then confirm that the drop to the center of the BB is correct.
Once all of this is done, we're part way there. From this point, we need to establish where the head and down tubes intersect. In some degree, this can be done visually, but we're trying to be precise here. So we employ a protractor to check the angle between the down and seat tubes. when this is correct, we check the angle between the head and down tubes. If these comply with our design, and the spacing between the down-tube and planned bottom of the head-tube look good, we should be a go.
So far, I've reached this point - but not marked anything. Next time around, I'll begin by confirming the basic measures as above. Then I'll add one more check. Holding the fork in place, I'll check the front center (that's the distance from the front axle center to the bottom bracket center. If all is good, I'll mark the vertical center of where the head and down tubes meet. I'll then do the same for the top-tube and head-tube. These will be aligned on a vertical line on the head-tube creating the point at which the breather holes will be drilled.
As I said, locating the head-tube is one of the more complicated bits of preparing to braze a frame.
I'm building a carbon frame won by one of the top 150 fundraisers at the 2006 MS150 Tour de Farms. This process has its own blog - so if your curious, look at: www.LindasNewBike.blogspot.com.
Meanwhile, I'm getting serious about Aram's new track bike. The frame will be of silver filet construction except for a lugged bottom bracket. At first, it looked like the BB angles wouldn't work out with the limited (60mm) drop on this frame. Closer examination revealed that it has brass clearances - giving me a number of degrees of wiggle room for both the down-tube and chain-stays. None of the tubes are super light, so I'm not to concerned about using brass in the BB.
The tubing is large diameter steel. The down-tube is 35mm, the head-tube is 36.5mm with a 1.2mm wall thickness, the top-tube is conical being 31.7mm diam in front and 28.6mm in back, and the seat-tube is 28.6 with an external buldge at the top (to help prevent heat distortion when connecting the top-tube and seat-stays). Oh yeah, the chainstays are ovalized for good clearances - so they'll probably get a bridge to stiffen things up. And for the seat stay bridge, I'm considering a polished stainless 3/8" tube. Do I really want to go through that polishing thing again? Hmm...
The jig is up and I've been working on its fit. The overall design was refined on Martin Manning's design spreadsheet - good stuff, especially if one wants to be precise. This is a fast handling track bike. It's not a single speeder for the road. Aram is a serious and competitive racer, so we want to be very precise to avoid handling anomolies.
Related to this, I'm going to deviate from my usual building sequence. The goal here is to create a strong and well aligned keel connecting the head-tube to the rear wheels. The first build will be chain-stays and then connecting them to the bottom bracket. This will be done with very careful attention to alignment. Then the head-tube/seat-tube will be put together, again with a critical eye on alignment. Finally, these two assemblies will be connected - with much fitting and testing to make sure that the head-tube is in a vertical plain aligned with the track of the bike, and that the track forks (the proper name for "drop outs" on a track bike) are perfectly parallel (on two axes), and equal distances from the ground and from the frame's center line. Once all this comes together, we're over the hard part.
After fitting the jig, it was time to start working on tube prep. So far, I've washed out the insides of the head, top, and down tubes. This is necessary pre-brazing, but also makes it easier to read the butts inside the tubes. By looking through the tube at a light, and moving it around, one can see where the butts transition. By so doing, it possible to make sure that the ends of the tube were marked correctly (one end usually has a longer butt and this is the end from which to trim excess length).
Then I set up some v-blocks on my reference surface along with a surface guage. If you're not familiar, a surface guage is a precision base with a post rising from it. A spindle is atached to the post and can be adjusted up/down & in/out. The post has a hinge at the bottom and a screw that delicately angles the top out or back. By adjusting the spindle close to an object, and then fine tuning with the post's screw, its possible to index a precise height from an object sitting on the same reference surface as the surface guage. By moving the guage around on the surface, one can compare heights from spot to spot.
We're using this a little differently here. A tube is set in the blocks, and the surface guage is adjusted to the highest point in the tube at a location midway between the ends. Then the tube is rolled in the v-blocks to detect if and how much bend there may be in its length.
The head-tube measured out fine, but its short so that's to be expected. Both the top-tube and down-tube have very slight bows. Not enough to be a problem, but enough that its important to be concious of the bows in order to insure the alignment of the finished product. For both of these tubes, the concave side of the bow will face down.
Then it was time to refine the position of the head-tube. With most jigging systems, this is he most complicated part. Most jigs don't provide a way to fit fork into place, as a means of locating the head-tube. Often, the head tube is difficult to remove and replace to the same location. It will be on the same axis, but may have moved up or down along the axis.
I go about positioning the head-tube from several different basis points so as to find any errors in my methods. The first method involves locating the top of the seat-tube and with a long level determining where the top of the head tube should be. The raw head-tube is too long, so there should be some extra sticking up above this point; this can be removed later.
A second basis is to measure up from the datum line on the jig to it's front horizontal frame member. Then, it' possible to determine where the bottom of the head-tube should be relative to this new datum line, based on the design produced in Martin's spreadsheet. Using a vertical measure and a small level horizontally, it's possible to put a guage mark on the head-tube. From there, it's possible to measure up from the mark, parallel to the head-tube axis, to a fixed point on the frame holding the head-tube assembly. This point becomes a new datum point, and the measure is retained as a basis for where the lower head-tube should end. Again, there should be a little extra tube below this point.
After adjusting the height of the tube, and double checking the measures for each end, it's possible to hold up the fork, parallel with the tube to the appropriate point. With a little help, a long straight edge, level, and a tape measure - its possible to compare the axle height to the rear axle height and then confirm that the drop to the center of the BB is correct.
Once all of this is done, we're part way there. From this point, we need to establish where the head and down tubes intersect. In some degree, this can be done visually, but we're trying to be precise here. So we employ a protractor to check the angle between the down and seat tubes. when this is correct, we check the angle between the head and down tubes. If these comply with our design, and the spacing between the down-tube and planned bottom of the head-tube look good, we should be a go.
So far, I've reached this point - but not marked anything. Next time around, I'll begin by confirming the basic measures as above. Then I'll add one more check. Holding the fork in place, I'll check the front center (that's the distance from the front axle center to the bottom bracket center. If all is good, I'll mark the vertical center of where the head and down tubes meet. I'll then do the same for the top-tube and head-tube. These will be aligned on a vertical line on the head-tube creating the point at which the breather holes will be drilled.
As I said, locating the head-tube is one of the more complicated bits of preparing to braze a frame.
Tuesday, July 04, 2006
What's New
It's been a busy few weeks.
Gordon is back, so Sarah's bike will be shipped this week. She's anxious to see it finished. Fair enough.
So, that's freed up a little room in the shop for frame next. This is the track frame for my neighbor Aram. He's a strong rider. The frame will feature a 1.125" steerer at his request. Consequently, it has continental oval fork legs. I don't think this will hurt anything, but for traditions sake, round legs would have been nice. The blades are straight gauge 0.9mm.
I've finished two forks: a) one with an internal sloping crown; b) one with an external sloping crown. The first has a 35mm rake and is planned the normal fork. The other has 41mm of rake and is to experiment and with a short (50mm) trail. Anyhow, now that they are done, and lengths are confirmed, I can lock in the rest of the geometry and start cutting tubes.
One question that is about to be resolved is whether I can use a lugged bottom bracket or not. If not, I'll probably use one with chainstay lugs. Then, I'll probably drill it for the downtube. This way I can braze the joint through the interference fit between the tube and BB - probably using 56 silver. Then I'll build a filet around the tube using Filet Pro.
Stay tuned for fork pictures soon.
Subscribe to:
Posts (Atom)

