Hey you! Want to do something good? Something that will help the world? Then click on the link Support My MS Ride. Why?
Well, MS is a nasty disease. Just about everyone knows someone with it - but often they don't know that the someone has it. It can take many courses, but fundamentally is a disease of the central nervous system. Some of the symptoms can include loss of balance, loss of muscle control, acute sensitivity to light, various forms of pains, and loss of energy. Sometimes its comes and goes, other times it is progressive. In the later case it can be fatal. But, even in its most benign forms its impacts the lives of MS patients and the people around them.
One of this social impacts is related to the onset of MS. MS tends to begin during early to mid adulthood. This means it hits the parents of young children, limiting their ability to nurture these children the way the rest of us nurture our own children.
There are no cures and only limited treatments so far. But, research has developed several promising avenues to pursue. All of this takes money, my money, your money, everybody's money.
Please take a moment to visit my MS website and make a donation!
End of Commercial.
Today, I left work early and went for an nice ride. It's really humid but the temp was only in the low-mid 70's so it was sweaty but comfortable. Afterwards I took a nap (too many late nights in the garage). Then it was back to work for a bit.
After mounting the bottom bracket and crank (compact), I put the front derailer on its tab and scribed it proper position on the seat-tube. There's not a lot of adjustment range, so positioning is sensitive. Old pins in the BB were ground off next and I spotted a slight gap at the tip of one BB point on the seat tube.
To pin the derailer hanger I ground down a finish nail. I was afraid that a hob nail would be to big and might cause the tab to turn or shift. After fluxing and pinning the tab went on and a spot of silver went under the tip of the BB. The latter turned out to be a big spot leading to a bit of filing. But the tab was beautiful. A riding neighbor came by a took a look and said "sweet".
Along the way, I've found a new technique for cleaning tight valleys in the BB. The Fordham tool has a small (3/4 - 1 inch diameter) sanding disk. It works (most of the time) with self-adhesive sanding disks. 80 grit, used with caution, cleans off brass leaving a smooth finish without damaging tubes or lugs. The sanding disk is bigger around than the head it sits on, so it can sand on edge - getting into tight places.
The BB look pretty good now, but I'm going to do just a little more cleanup tomorrow. With luck, I'll cold set the seat-tube and get the top tub installed.
I think this frame will be ready to go by the time Troy is back in town.
Cheers!
Friday, July 22, 2005
Thursday, July 21, 2005
Pro's not threatened!
Okay, Richie, Curt, DW, if you're paying attention - you don't need to worry about me catching up to you soon - not that these guys would have worried anyway.
I looking in my BB this morning with daylight and found a small spot where I couldn't see the silver. Bummer. After checking with Fred, I went ahead and fluxed things up, reheated and pulled through as necessary before dinner. I also got a drop of silver in a difficult to clean spot on the top of the BB. ugh. But, my technique is still improved.
After dinner it was time to put water bottle mounts (complete with fancy reinforcements) on the down and seat tubes. Cooled and cleaned these - essentially just had to take off the flux. Next prep the seat-tube and check it against the drawing. A slight adjustment to its spigot and things look good, so clean, flux, pin and braze. The result is soaking in hot water now. I clean off the flux in a little while. Any filing will wait until tomorrow night, along with mounting the front derailer tab. I wish I already had one of e-richie's new tabs, in stainless steel. That would look cool. But, I'm going to make do with what I have.
I probably won't work on the top tube as I have an early ride Saturday morning. Instead, I'll try to get the TT done on Saturday and then focus on properly jigging my rear triangle on Sunday. At the present rate of progress, this frame should be ready for the painter when he's ready for it.
I just remembered that I have to replace steers in two forks. Probably will get than done tomorrow or Sunday too. It shouldn't take long.
Today I sent Freddy some money for flux and rod. Hope it arrives soon as my flux is running out. It will be a good test for the local welding supply to see if they have any good silver flux.
In the next week or two, I'm planning to order a tubing bender and some stainless tubing. With this, I'm going to make a front rack, to hold a Berthold bag. Hopefully it can be built to also hold lights and possibly to provide the cable stop for the front brakes. My thinking is to run verticals up from the back corners which would come together at the point of the cable stop and then join a plate with a hole in it for the steering column. There might also be a cross bar against which to attach the upper part of the bag for stability. We'll see.
That's it for now.
Wednesday, July 20, 2005
...got to admit its getting better, its getting better all the time
Well, work has begun on version two of my French inspired frame. Like the last version, it's made up of Deda Uno O/S tubing - but this time I'm using HJ lugs and BB. The later has the built in cable guides, so we'll see how they work and how the paint holds up around them.
As you may recall, frame #1 didn't pass inspection. It's likely that I can redo the rear triangle and have a good frame, but due to timing and schedules (including vacation for my painter's family and for mine) - I will get to a completed bike faster by starting over. Frame 1 will get repaired and painted yet, but just not yet.
Now, having built 3 forks already for this frame, I should be able to save on the effort of making another one. And for the present purposes that's true. However, I want to try a HJ 3degree crown with some Reynolds pre-bent touring blades to see how close that comes to giving the requisite 61mm rake. But that will happen somewhere down the line. For one thing, HJ is temporarily out of stock on the crown, and for another, I'm out of pre-bent blades.
Last night, I did the lower headtube joint. The lug got prepared prior to dinner, then the down-tube was mitered and the joint brazed after diner. BTW, one change on this frame is a decision to go all silver. It's easier for me to work with....I'm going to practice brass on some more cheap lugs before trying it on a frame again.
The HJ lugs seem an interesting contract to the Walters that I got from Joe Bringheli. Put simply, the HJ need less work on the inside and more work on the outside.
For those who have been following this blog, the Walter head-lugs were too large in diameter around the head tube to silver braze. I also found them stiff and couldn't adjust angles on them without destroying the roundness of the spigots. Finally, for other joints, the lugs were "tight" and needed to be opened up some to fit the tubes. But, I didn't need to do much of any cosmetic work on the outside - they were nicely finished.
The HJ offered good fits out of the box (bag?). All that the insides needed was a good sanding to clean the surfaces for brazing. On the outsides, there were lots of seams from the mold. This called for a little elbow grease. The lugs also have their "degrees" cast in and this too needs to be cleaned up (unless you don't adjust the lugs and want to remember the measurements on a frame).
As is now my common practice, I pinned the tubes, fluxed things up, and started the braze. Troy suggested that I try his approach of heating the last point in which the silver will flow first, and working back toward the point of entry. So, working slowly to heat things up without scorching the flux, I worked from the bottom (physical relative to how the piece was clamped) up. The results were great. Along with the changed sequence of heating, I'm getting better at recognizing when the silver has pulled through - and am willing to move the flame away and take a closer look before putting any more silver into the joint. All of this paid of with a really clean joint. Does it look like the pictures that Sachs posts? No (well except for a little area). But, there was only one small area of shoreline to clean up and even this was well below the surface of the lug (making it easier to clear the silver without damaging the lug). The overall cleanup of flux and silver was just about the shortest step of the process, rather than the longest step (by far). Yea!!!!!
How did my lug differ from a Sachs? Well his pictures show that he generally has just a slim line of silver showing at the edge of the lug. I has some spots like this, but more spots where the silver flowed up to a quarter inch away from the lug. The thing is that this was all a very very thin coat of silver. I had one area away from the lug that need a minor file and this area was smaller than the end of an eraser on the end of a pencil. Cool. Also, on the bottom face (where the headset cup rests) I had a thick blob of silver most of the way around. This should disappear when the head tube is trimmed and faced - so I'm not worried about that. I got a lot here drawing silver to a point where the flow seemed to have been partially blocked by a pin and this point was also furthest from the source of the silver (front of the lug band that goes around the head-tube). I could have cheated and applied silver here from the top side of the band, but I was trying to limit how many sources the silver came from. Using careful pin placement next time should help alleviate this problem.
Tonight preped the bottom-bracket before putting the kids to bed. Afterwards, I mitered the down-tube, cleaned things up, set the pins and fluxed the joint and went on to braze. Using the same technique as above, I may have got a little excess silver into the BB, but the joint is quite clean. I'm feeling like some real progress is being made.
Hopefully, tomorrow will see the seat-tube installed and any adjustments/alignment done. Then Saturday I can spend getting the top-tube in and Sunday can be spent making sure I have adequate jigging in place for making up the rear-triangle. With any luck, I can deliver this to Troy between his and my trips, and see a finished bike in a few weeks.
Good night.
Monday, July 18, 2005
Good News/Bad News
It was a day much like any other... no wait, change the channel.
I started work early to get out early and take a ride (crazy idea, upon exiting my car this morning, my sun glasses fogged over from humidity). Imagine my surprise to find that my new BB tapping set had arrived! Yea!
So, it was off to the garage to chase and face Sarah's BB. All went well. It should be noted that the tools have a nice solid feel to them. Also, Cecil included a couple of beautiful old Campy Decals. I'm going to need to find a special project for them.
While in the garage, I got a call from Lon at Nova. I hadn't used them before, but wanted some various tidbits (e.g. SS front derailer hanger) and so put an order through. He was very nice, and seems pretty plugged in. i suspect that he will become a good resource.
So those were the highlights.
In the evening I got a an e-mail from Troy. It seems on close inspection, my rear-end alignment wasn't as good as it should be, and there is some evidence of overheating the chainstays at the BB. He thinks the front end can be resurrected, but that the rear-triangle needs to be re-built.
The good news is that he's available to put an experienced eye on my work. Further, he is happy to help out with honest criticism and helpful advice.
So, my new ride is still a little way off into the future, but that's not going to stop progress.
Thursday, July 14, 2005
I can be really dumb!
First of all, I lied. No pics of the finished product sans paint. My digi-cam is on the fritz, so sorry Charlie.
Yesterday I took the frame to Troy for paint. It was nice to meet him, see his shop and swap info. He's working on a pretty restore of a Holdsworth. I liked the paint color so much that I decided on the spot to use the same. It's a deep blue metallic. Very nice.
I'll be using my French inspired decal set. If I can figure out how, I'll post some examples as pictures. Anyhow, they should work well with the paint.
Troy called me after I left. He said something like: "...You've got some mighty thin steerers. Is this some kind of new material?" Well, I thought that I only had 1 piece of 1" tubing (apart from straight gauge 4130 which is readily recognizable). So picking out the steerer when building the fork was a snap. I looked in the shop when I got home, but no missing steerer to be found. Hmmm.... I'm really dumb, and used the wrong tubing for a steerer.
I looked again today and guess what? The missing steerer is found. I'm not sure where the other 1" tubing came from, but I'll not make the same mistake again. So, I made a new fork tonight. It's made of Reynolds pre-bent (45mm) blades, and Walter touring crown, and some of Bringheli's fork tips with the axial breather holes. For (a custom front bag) rack mounting points, I used Troy's suggestion of H20 bosses surrounded with reinforcements. Using the Bringheli jig really makes the fit and build process go fast. I still have to mount fender eyelets and sand and file. But primarily it's done. My first fork took a week+.
Also, there is comparatively little silver to clean up. Several factors went into this, but the net is that managing the flow is getting easier. This is fun.
Troy has a vacation scheduled before he will be able to complete my paint. So, I'll be waiting impatiently for the next 2-3 weeks. This time, when it comes back, there will be pictures. Now its off to see if decal examples can be posted.
Sunday, July 10, 2005
Cecil Speaks
I've heard from Cecil! My faith is restored. His container is delayed, so rather than send the BB tapper he's sending a refund. Yea!!!
Looks like I'll end up with a little more expensive grade of tapping tool, but I'll have one.
Well, back to work so I can be ready for the painter.
Looks like I'll end up with a little more expensive grade of tapping tool, but I'll have one.
Well, back to work so I can be ready for the painter.
Friday, July 08, 2005
Almost Ready for paint
Well there's been lots of fiddling on the frame since the last post. Mostly its been cleanup, getting off flux, filing to regain shorelines on some lug edges, trimming the headtube and cutting the slot in the seat cluster.
I still don't have my bottom bracket tapping tool. I suspect I won't be getting it. Cecil's site on eBay indicates that he's now set up in the US and shipping product, but he doesn't respond to my emails. So, I appear to be SOL. And, I'd really like to clean out my BB which has a bit of brass in it.
I have a little bit of filing and sanding left on the dropouts and the seat cluster. They won't be perfect, but they should be sound. I'm counting on the next frame looking going together with less mess so there's less cleanup. There's also a matter of installing a chainstay bridge of some kind. The key purpose here is to provide a mount for a fender, as the BB shell has a bridge. So, I'm thinking about non-tubular alternatives. Some neat ideas come to mind, but some of them go beyond the combination of tools and skills in my shop - and so will have to wait for another frame.
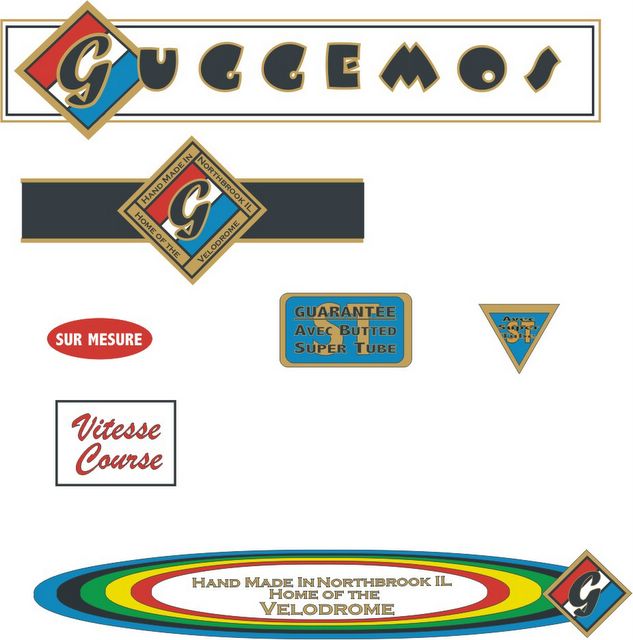
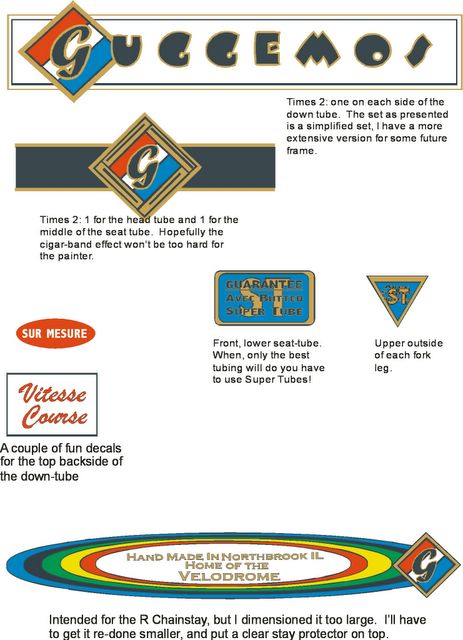
AJ over at Victory Graphics got my decals to me today. Boy, he does some nice work! I can't wait to pick a color and the appropriate set of stickers - it might keep folks from looking at my joints so closely. :) Anyhow, Victory Graphics is definitely on my recommended list!!!
I may have mentioned that Troy Courtney is painting this frame. Originally, I contacted Doug Fattic, but as I learned about the quality of his work, it seemed like a waste to put his paint on this frame. There will be another better opportunity to work with him. Meanwhile, I don't think that Troy is a slouch at painting. What I've seen indicates that he's seriously good. Plus he's only about an hour away from my house, which is cool. I'm glad he's back to working in the shop again. Depending on his schedule (he has a vacation coming up), I should have a complete bike in a week or three. And, he has the tools to handle the BB, Headtube and fork milling, and reaming the seat-tube. So.... it's getting close enough to taste.
That's it for now. Pictures soon.
Cheers
I still don't have my bottom bracket tapping tool. I suspect I won't be getting it. Cecil's site on eBay indicates that he's now set up in the US and shipping product, but he doesn't respond to my emails. So, I appear to be SOL. And, I'd really like to clean out my BB which has a bit of brass in it.
I have a little bit of filing and sanding left on the dropouts and the seat cluster. They won't be perfect, but they should be sound. I'm counting on the next frame looking going together with less mess so there's less cleanup. There's also a matter of installing a chainstay bridge of some kind. The key purpose here is to provide a mount for a fender, as the BB shell has a bridge. So, I'm thinking about non-tubular alternatives. Some neat ideas come to mind, but some of them go beyond the combination of tools and skills in my shop - and so will have to wait for another frame.
AJ over at Victory Graphics got my decals to me today. Boy, he does some nice work! I can't wait to pick a color and the appropriate set of stickers - it might keep folks from looking at my joints so closely. :) Anyhow, Victory Graphics is definitely on my recommended list!!!
I may have mentioned that Troy Courtney is painting this frame. Originally, I contacted Doug Fattic, but as I learned about the quality of his work, it seemed like a waste to put his paint on this frame. There will be another better opportunity to work with him. Meanwhile, I don't think that Troy is a slouch at painting. What I've seen indicates that he's seriously good. Plus he's only about an hour away from my house, which is cool. I'm glad he's back to working in the shop again. Depending on his schedule (he has a vacation coming up), I should have a complete bike in a week or three. And, he has the tools to handle the BB, Headtube and fork milling, and reaming the seat-tube. So.... it's getting close enough to taste.
That's it for now. Pictures soon.
Cheers
Subscribe to:
Posts (Atom)

