I now have around 200 miles on frame 090105. It continues to please - its an all day riding bike. Speaking of which, Sunday afternoon at about 3PM I headed out for a ride. Planned to be home by 6.
PUMP
The temperature was in the mid 40's (F), there was a low overcast and intermittent rain. In other words, great riding weather. Don't get me wrong. I like cool weather, especially when properly dressed. By the 20 mile mark I had my jersey unzipped about 6 inches. Meanwhile, the Chicago Bears were playing football and the White Sox were getting ready to play game 2 of the World Series that night. Combined with the weather, there weren't many cars on the roads, and my lights caused most of them to leave me plenty of room. All this had me in a zone, as I maintained a comfortable but steady pace North into the wind. At about the mid-point of my ride, I felt the familiar thump start in the front wheel - I had a flat.
Normally, this wouldn't be much of a problem. But, I'd forgot to bring a pump. The bike hasn't yet a frame pump, so I've been using pocket size pump - which is easier for me to forget. So, Monday afternoon, it was off to the LBS to find a pump. The Zefal HPX is nice, but none of the shops around here carry it. There was a nice looking Blackburn on sale, however, so that's what came home. I've measured the space under the top tube about 20 times. I looked carefully at the package and what it said about sizing, and selected a large. Guess what, the package is wrong. It's too long. So, it'll have to go back to the shop for a medium.
Seat Post
The new fork is done, and the front rack is essentially done. So the goal is to have these on the bike for Saturday. This means dismantling a few cables, and the frame needs a good cleaning from the weekend, so it seemed like a good opportunity to strip everything down, fix a few bits of paint, and put everything together again.
Naturally, this means pulling the seat post. Guess what, it was frozen in place. I've never had this happen before. My guess is that the brushed finish caused a couple of problems: a) inherently more friction with the seat tube than a polished one; b) the aluminum post's oxidation was cleaned up while applying the brushed finish; c) the brushed finish gave more surface are to speed re-oxidation of the post; d) insufficient grease on the post given these circumstances. Anyhow, URGH!!!!
After trying to spread the ears of the seat cluster, and repeated applications of penetrating oil, it seemed likely that the post would have to be cut out - thank goodness it was old and cheap. Given that the paint isn't particularly good, it seemed like it would be worth trying some heat first. So out came the torch - and the paint of the seat clust didn't like it, but it freed the post up. Yea!!!!
Paint
One thing I've seen for a while is that repeated paint "repair" efforts have left the paint real thick is some places. I'm thinking that in January it will be time for a bead-blast and a pro paint job. Meanwhile, I'll be living with sort-of-ugly rust protection.
Speaking of which, during my ride, I used a strap-on (the seat post) rear fender - which helps, but it's time for real fenders. The LBS had some Bike Planet Freddy Fenders - which I bought. Tonight I scuffed them up with some 320 grit paper - shot some primer and put down a coat of color. I think they'll look pretty good.
White Sox
The White Sox just beat the Astros in a sweep to take the World Series. I think the team and the organization earned and deserve the title. Personally, I think they're a class act - with no star-fever, just a sense of camaraderie and teamwork.
Tri TT
Well, this should catch me up for a while on the bike. I'll be receiving my new jig soon from Joe B. Then it will be time to finish Sarah's bike - I've started collecting parts for it already. A few more bikes are lined up to be built after that so there will be plenty of further antics.
However, with this milepost down, my next post will return to my Tri TT rumblings and pursue where we might best head in term of Tri TT frame designs.
More soon.
Wednesday, October 26, 2005
Tuesday, October 18, 2005
Misc Thought
We'll get back to Tri/TT Bikes and frame design soon, but for now I'm still stewing about the loss of a big bit of word-smithing.
Meanwhile, saw the latest Tech Q&A w/Leonard Zinn over at Velonews. IMHO, it shows just how pervasive commercial power is over the press.
The first question was about someone who wanted to upgrade their current DA crank to the "...new stiffer..." 10 Speed Crank without having to upgrade the rest of their drive train. Leonard said go ahead. He didn't ask: What are you trying to accomplish, or Why do you want a "...stiffer..." crank? Seems to me that these should be the first questions. Like, how many people had problems with flexible cranks prior to marketing folks churning out stiffer ones? Answer: approximately zero. Who cares about stiffer cranks? It's a nonsense issue that has led to poor bottom bracket bearing design. First there were the bearings crammed between an oversize spindle an the bb shell. Now there are oversize bearings (yea) cantilevered outside of the bb shell (BOOO). Nope, stiffness isn't a problem with reasonably good cranks, but bearing longevity, friction, and alignment are. Give me a traditional tapered square axle any day.
Which leads into the next question. It was about getting a long crank capable of running small chainrings for climbing. Zinn answered the question fine. But the correspondent mentioned not wanting "...old school square spindles..." Lennard ought to ask what's wrong with old school spindles, and then answer the question: Nothing. He doesn't and won't. Don't want to make Shimano mad. But face it, Shimano's antics in spindle design have been about two issues: a) planned obsolesence to drive more replacement sales of perfectly functional product; b) proprietary design as a means to weaken competitors. Kinda anti-consumer aren't they? Makes me wonder why they can't survive on their own merits without a bunch of marketing engineering.
Then there was the guy who wanted to know what he should do to convert his triple crank to a double. Zinn went farther than either of the opposing opinions he was adjudicating. Len suggested that the rear derailer should be replaced as well. Why? DUH? He goes on to say that "...it probably would work acceptably with your old triple derailleurs." Gee, you think so? Its shifting across the block fine as of now, but removing a chain-wheel will reduce that capability to acceptable, or potentially less? Give me a break!! Moreover, his choice of words is poor when her refers to "...your old..." triple derailers. These are '04 derailers. How new do we need to be to avoid being labeled "...old..." Current generation only for Mr. Zinn, please.
Don't get me wrong. Zinn knows more about bikes than I could ever forget (and I can forget alot). He's not just dancing to Shimano's drum - nowadays its a requirement for the press to watch out for the boss's cronies, advertisers, and political/social/religious fellow travelers.
But, its too bad so many readers are so frequently fooled because the press is complicit with corporate marketing departments. And Lenny, appears to be playing into this role with gusto.
Saturday, October 15, 2005
Tri and TT bikes.
I tend to have a contrarian analysis of much of the world. If you haven't yet figured this out, than consider this your warning.
I think a lot about bike design and fit, this is probably an outgrowth of my inability to get a good fit from and off the peg bike combined with my analytical nature. There are lots of other factors to boot, but this is my main itch.
IMHO - most bike fitting methods are flawed - unless you've got an average build in which case an off-the-peg-bike will probably work for you.
IMHO most bike designs are flawed - unless you're a bike racer (or at least a wanna-be).
Some of my starting assumptions include:
- If the bike isn't comfortable for the rider, it will be hard to ride well or fast
- If weight isn't distributed appropriately, handling suffers - usually at bad times
- If you ride for any distance, stability is more important than quick handling. Moreover, a stable design can handle quickly on request
- Super light tires are less stable and more prone to slip on corners
- Light wheels and tires help with climbing and maybe sprints - but nothing else
- Most bicycle aerodynamics are bogus. The "aero" structures on a bike are too small & thick to manage air flows efficiently through the range of speed critical to a cyclist. Moreover, the effective direction of the wind is rarely directly head-on, negating the possible benefits from these "aero" structures.
- Body position is the most important and adaptable component of cycling aerodynamics
- Hard tires (high air pressure) works well on billiard tables and wooden tracks. In the real world, roads are rough and without the ability to absorb this roughness, the bike is bounced around - and energy is with each bounce
- A low bottom bracket may not improve handling. But, it does allow the top tube to be lower for a given frame size, or it allows for a larger frame size with the same top tube height off the ground.
- People often select or accept a fit based on what looks right. This is tantamount to what looks good - or in fashion. There is little evidence to demonstrate that fashionable design is related to either: a) going faster; b) enjoying a comfortable ride.
- More than a few people subscribe to the "no-pain, no-gain" theory in accepting uncomfortable fit. While pain is part of training, hitting ones foot with a five pound hammer will create pain, but only makes one slower and less fit. Be careful not to think that fit related pains are part of going fast.
If one accepts these thoughts, then a non-standard approach to frame design is the necessary outcome. We typically start by trying to establish the proper length of seat-tube and the height of the seat above the bottom bracket. As we get more sophisticated we also take into account the length of the top tube. Then folks worry about things like seat-tube angle, stem-length, and the relative height of the seat and handlebars above the ground.
I'm going to propose a different sequence of analysis. I won't give numbers or norms - because we aren't working with typical conditions. Some experience helps, but even more important is a sense of inquisitiveness and a willingness to experiment.
So, to begin, consider that if we could, we should lie on our bellies or backs to reduce air resistance. This isn't generally practical (recumbents notwithstanding). The first problem is that if we position ourselves as a pencil parallel to the ground, we can't see very well. So, that straight pencil approach becomes impractical quickly. Some athletes involved in HPV(human powered vehicles) tolerate the discomfort and complications of trying to achieve the pencil position, and they achieve good results in terms of speed. However, practically, this position isn't functional for day to day riding.
Secondly, there is the issue of tradition. Recumbents are real and well appreciated by a growing minority. But, for many of us, a traditional upright bike is necessary to enjoy cycling. Moreover, some of the sanctioned requirements of the various racing bodies specifically maintain this traditional approach - limiting the degree to which a bike can vary from its traditional form. In fact, a key difference between a Tri and a TT Bike relates to these limits, with the Tri rider allowed more latitude as to how far forward the tip of his/her saddle may be.
I confess to belonging to the traditional approach, and recognize that recumbents may be better bio-mechanical devices for self-powered transport. This however doesn't dissuade me from preferring upright bikes.
It is my contention, that the first point of fitting should be the handlebar/seat relationship. The importance of maximizing comfort and minimizing aerodynamic resistance is directly addressed by this relationship. The question is: How Low Should You Go? In reality, only the rider can say. At what point is there too much weight on the hands/wrists or is the effort to hold one's head up to see causing discomfort? Two fit factors play into this equation: a) reach from seat to handlebar; b) height of handlebar relative to height of seat. Finding the right combination of these factors is a matter of experimentation and experience.
One's upper body can maintain its position and posture relative to the seat while the handlebars move in an arc - the radius of which is the rider's arm and and the center of the arc is the riders shoulder. With arms extended straight ahead, less weight is on the hands and wrists than if the arms are pointed nearly straight down. However, with the bars farther ahead, more muscle strength is typically needed to support one's upper body.
Be aware that geometry is not the sole determinate of weight on the wrist and hand. The muscles in the lower back, as they apply pressure to the pedals, help to hold the upper body up. One can lean forward, take their hands off the handle bars, and keep from falling over if they push the cranks with enough vigor.
Also, the more flexibility one has in one's back, and the more freedom one has from various back ailments, and the stronger the back muscles - the more one can use the lower back muscles to hold one's self upright. And by extension, they can also accept a position that leans further forward because they will not be exerting as much pressure on the wrist and hand.
Finding the right back angle (relative to horizontal) and the right relative position of the handlebar to the seat establish a position of comfort that also maximizes the riders aerodynamic efficiency - and should be the first fitting goal.
The next step recognizes cycling as an aerobic activity. Oxygen uptake is critical to successful riding. Even if one isn't a racer, sooner or later there is a hill which requires big effort. So it is critical that ones position not impinge on the ability to breath. How far up one's thighs travel at the top of the pedal stroke determines whether breathing will be limited by their position on the bike. If the thigh doesn't rise high enough, some of the legs power may not be used. If the thigh rises too far, breathing will be limited.
It's relatively easy for a rider to recognize when their lungs are being constrained by their thighs. Factors that can affect thigh travel include the circumference of the belly, the length of the legs, the diameter of the thigh, the length of the crank, length of the leg, and position of the foot over the pedal. The factors of the rider's physiology are obviously independent variables. We aren't going to change these as part of the fitting process. So, once we know the highest appropriate position of the thigh, we can start to determine some other key fits.
Crank length is impacted by leg length and one's preferred cadence. Higher cadence is easier with shorter cranks - more power can be transferred each revolution with longer cranks. However, this is generally and minor consideration until all other aspects of fitting and performance are addressed.
Instead we should focus on obtaining a crank length within a range where: a) when the pedal is at the top of the stroke, the thigh is not limiting breathing; b) when the pedal is at the bottom of the stroke, the extended leg is still flexed and the pelvis doesn't rock from side to side. The sole of the foot above the center line of the pedal axle is a relatively minor adjustment that can usually be taken care after everything else by a simple adjustment of the pedal. But, the fore/aft position of the foot should be determined early in the process, as this is a key determinant of effective leg length.
As part of positioning the foot to pedal, we to ask two questions: a) is the rider able to pedal comfortable circles? b) does the rider suffer any Achilles problems? If the Achilles is comfortable, we can focus on circles - if not, we should move the foot forward on the pedal until the comfort problem is solved. Once comfortable, we can experiment to see where the rider can obtain his/her smoothest stroke. Again, this can take time - and is best determined by the rider for themselves.
Having got the foot position addressed, and knowing the preferred riding style and cadence, we can prescribe a crank length and try it out for comfort. Ideally, it should feel very natural for the rider - and typically it will allow the maximum extension of the leg (that is most riders will feel uncomfortable with a crank-limited stroke). From crank-length, and maximum thigh height, we can determine the distance from the seat to the center of the bottom bracket.
You will note that we haven't yet spoken of frame size or angles. What we have so far is a handlebar to seat distance, relative height of seat versus handlebar, a crank length, and distance from seat to bottom bracket. Interestingly, each of these factors can be adjusted within a minimal number of frame sizes if a shop is willing to swap seats, stems, crank arms, and handlebars. This doesn't necessarily mean that a good fit can be had this way, but many times it can.
To be finished later...
Friday, October 14, 2005
Noodling
Well, I think that I've found the Achilles heel of my new bike. I find myself noodling on the bike. By that I mean pedalling right along, but maybe 1-2 mph slower than usual. It's taken me a while to figure this one out - nothing about the bike is slower than my other bikes. But, its so darn comfortable.
I've spent lots of time trying to find a saddle that works with my derriere - with limited success. I've concluded that most modern saddles are too narrow for me, which is what lead me to spec a Brooks on this bike. So, historically I keep my weight on the pedals to protect my butt - which keeps me maxing out my heart-rate. On a long (multi-hour) ride, I find myself overpushing my legs just to get to the end so as to get some relief for my tush.
Riding my new Caddoo, none of this is necessary. Everything is smooooth. But, I'm going slower. Now, for the most part, slower seems like an improvement. But, I start with Asthma which makes me a bit slow compared to the competition - hopefully, when riding with others, I can find a working motivation to keep up with them. :) If not, that's ok too.
Speaking of noodling. I decided not to try to get anything done for this weekend except basic tuning prior to my group ride. This gives me more time to spend time with the family. Plus, it helps to not be compulsive about getting bike things done. So, I've been noodling on the bike.
The rack is defluxed with the legs off. The fork is ready for fitting new rack legs and fitting everything together prior to paint. And, the bike (as is) is working well - there's just no place to put tools/spares etc. So maybe Sunday evening we'll get back to the rack.
I should probably explain why there's no place for tools. The Brooks conquest has a rail that slopes down as it goes from front to back. This allows the springs room between the rails and the base of the saddle. My tool bag is of the variety with a bolt-on mount from which the bag can be snapped on/off. So far so good. But mounting it on the rails of the Brooks causes the bag to be more or less upside down (better not forget to zip it shut), and more importantly has it trying to bisect the head of the seat post. The seat post isn't giving any ground to no lousy bag, so... the bag won't clip in. Lately, I've been taking minimal tools in my pockets.
Anyhow, tonight's noodling started with the seatpost. I pulled the lovely straight Thompson and put it away for now. I dug out an old Trek aluminum single-bolt post. The back of the head shows where I cut a tang (some kind of mounting point) off years ago - so it was over to the grinder to clean up the cut. Then I cleaned off the old adhesive from a long ago wrap of reflective tape. But, the post still looked old and not too distinguished.
About a month ago, when buying painting supplies, I purchased a 3M wheel, about and inch thick and about 3-4 inches in diameter. This is mounted on a 1/4 inch shaft and is supposed to be great at removing paint and rust. The disk looks like a brown sponge - only it has lots more hollow than any sponge you've seen.
I started at the bottom to see how it would work at cleaning the post, but also to see what kind of finish it leaves. The finish looks relatively course (not bad but distinct swirl marks), and the marks it leaves are dependent on how the post is positioned against the disk. Long story short, I got the post clean and gave it a neat "brushed" finish that is quite unique. It looks great in the bike and may distract people from asking me why I sprung for a sprung saddle.
On the back of the post, I mounted a decal of a scorpion (I'm a Scorpio) about 3/4 inch long. This was produced with laser-print water-slide decal paper. Given that this worked well, I tried another decal on the left chain stay. This one is yellow with red outline text saying "Steel is Real" It doesn't work well against the dark paint. The printing is too thin so the colors darken with the background - preventing it from popping. Good to know.
From there, it was time to take out one more link in the chain. BTW, the KMC chain's quick connector is easy to use. We'll have to see how the chain lasts, and its not clear how well the chain shifts compared to a Campy, but so far I'm favorably impressed.
After that, it was time to further investigate the rear derailer. It turns out that the cage is bent. I don't know how this can be or when it happened. The bike hasn't fallen or anything - the derailer was in its box until the bike was built up - so its a mystery to me. But, I took the time with the chain off to straighten the cage, and clean the inevitable gunk off the lower pulley (the upper was clean for some reason). After buttoning everything up, and playing a little with the shifter cable tension, it was clicking off single cog shifts all the way up and down the cluster from either chainwheel. So, that's great - maybe the derailer tab isn't off. On the other hand, the shifts still felt a little tentative. They weren't as crisp as I like. So, we'll see how the ride goes and check the derailer alignment next. addendum: my ride observations are that the shifting is working correctly now. Yea!!! Now I can concentrate on the gearing. Right now its 50/34 front and 13/26 rear. Most of the rear cogs are so close together that I'm chosing to use double shifts often. Meanwhile, the bigger (16 tooth) range on the front is noticable and not entirely great. I may check for a 12 or even 11 by 26 rear to give me a higher high and bigger steps between another cog or two. If that works, it will be time to try a 48/34 front. This should net out to a broader overall range, better steps between the shifts, and more overlap between the small and large chainwheel gear ranges.
Another aside: when I mounted the Columbine chain hanger, I didn't have any instructions. As a result, I was conservative and put it a bit forward. The only real disadvantage to this is that the chain needs to be on the 2nd or 3rd cog to work when mounting or dismounting the wheel. But the real message here is that this thing works great!!!!
I was concerned how well it would automatically catch the chain - but it's flawless. I was concerned about how well it would hold tension and keep the chain off the paint - it works like a champ. and, I was concerned with how easy it would be to mount the wheel - its very easy. On the last point, with vertical dropouts - it may be necessary to have the hanger back further where it can work with the chain on the smallest cog.
After all this, I mounted a bell and the Cateye LED headlight on the steering column, and the Halogen light on the handlebars. I should be good to go in the morning.
That's all for now. There ain't no more.
Thursday, October 13, 2005
Mafac Rack Attack
So, the faithful reader knows that frame 090105 uses old Mafac centerpull brakes. The cons: hard to fit/adjust (or at least hard to maintain the fit while tightening up the bolts); brake squeal when stopping. The pros: powerful brakes; easy to modulate; light weight (say Record or Dura Space level). I just discovered another con last night.
After mounting the rack (80% done) to the fork, I installed a brake on the fork to fit a rack support that would connect to the brake-bolt and snake under and around the brake to reach the rack. Installed is incorrect. I tried to install the brake. It turns out that the brake extends so low, and so wide, that it interferes with rack and vice-versa.
So, despite having redone the one rack leg - its time to take the legs off again. Urgh!!!
For a long time, I've been looking for an excuse to move the rack eyes from the front of the fork blades to the sides. In the later config, a hole gets drilled into the fork blade and an H2O nut and reinforcement are brazed in. Because the nut goes through the leg, it is better supported. Plus, it just looks nice.
So, the legs are off the rack - it'll get cleaned up (old flux and silver) tonight. The old rack eyes are off, and the new ones are on. And, I've designed some rack legs which I think will look nice and which will clear the silly Mafacs. I might still get this fork on the bike for Saturday.
Along the way, I found it takes a lot of heat from the torch to adversely affect the paint. When it does - the paint becomes really noxious, but I wore my respirator. Anyhow, after I was done, I fiddled with the paint some. Two things, it seems to be less brittle and it definitely has a better bond to the fork. So.... I'm considering a scuff sand of the whole fork, applying primer where I sanded down to fresh metal, allowing this to set overnight, then heating all the paint with the torch in the morning and spraying a new top coat on tomorrow evening. If this leads to more durable paint (probably just a dream) I might go back to the whole frame and apply the same basic process.
Once again, I'm making lots of mistake to learn from.....but hopefully I am learning from them.
Another side lesson, the 3/8"X0.035" stainless tubing is tough stuff. For such a little, light, assembly, it is stiff and strong.
Tuesday, October 11, 2005
More little bits
I've been concerned about rear-end alignment because of some shifting problems. A full check-out of alignment on Saturday indicated that nothing was wrong. As a consequence my next suspicion is the alignment of the derailer tab. After checking out the pricing of derailer alignment tools - I'm going to try to make up my own tool from some angle steel.
Saturday was also a day to do some polishing on the fork tip faces for the new fork. I think it's going to look good. There will be some mini cigar bands around the legs about half way down.
This morning I got out for an early morning ride. Janet warned me that I was too warmly dressed. She based this on her run. I don't always remember that she doesn't deal with wind-chill - this morning was a good example. It would have been nice to wear my full finger gloves. :)
Last night and tonight I've tried to make a front rack. Mondays effort was just bad. I tried to bend the main rectangle from a single piece of tubing (3/8" stainless). Similarly I tried to make the fork-leg stays from a single piece. I'm not good enough with the bender to get everything square and equal.
Tonight was time for a different approach. The main rectangle has three sides which can be squared and adjusted after bending. Then, there's a second piece of tubing brazed on to close off the open end of the loop. That went well. So it was on to mitering the ends of a cross piece for the center of the rectangle. That fit in nicely and easily brazed up. From there it was time for the fork-leg stays. This time, I went with two separate "hockey-sticks." The ends were squeezed flat in the vice, then a 1/4" hole was drilled into the flat, and then the end of the flat was rounded off with the grinding wheel so that there would be no binding as the stay was rotated around its fixing screw.
After fluxing everything up, I screwed the stays to their eyelets on the fork. Then clamped the rectangle to the foot on the end of the hockey sticks. At this point, all looked well. After tacking the stays to the rectangle, the clamps came off and the rack was removed from the fork. As I went to finish brazing one stay, it heated up again to shift slightly. This doesn't affect fit, but it looks a little bogus. So, I think I'll have to take it off and try again, even though I don't want to put too much heat on the stainless steel. ERGH!!!
The tubing is small enough that it heats quickly. Generally, I haven't had a problem with overheating, but I've also been using a small flame. Thought all this I've been using some of Freddy's flux (mixing a little of the dark Boron-added to his White silver flux) - this stuff is doing a great job. His 45% silver acts like a fileting mix when warmed up, but the flows great when its hot. This makes it easy to put a dab on in one spot for tacking, and then to pull it through to the other side to get a good bond. I've been finishing the brazes using Freddy's filet mix - it's easy to get a nice smooth chinking between the two parallel tubes. I love his brazing materials.
There's a bit more work to do before there are any more pictures. Hopefully that won't take too long.
Oh, and the rest of my new decals arrived. AJ does a great job - they look nice.
Saturday, October 08, 2005
Cool Ride - Cold Riding
Got up at 5:15 this morning and went downstairs to get ready to ride. Daylight Savings time ends in two weeks which means it was dark out. It was also 50 degrees F. Pretty chilly.
I suited up after a quick breakfast. Threw a Cateye LCD lamp on the front and took off.
Sidelight (no pun intended), the Cateye is a great tool. In flashing mode it puts out enough light for modest speeds on dark streets. On any street its bright enough to ensure being seen by motorists. And batteries last a long time - recommended.
Got a nice warm up cycling over to the Starbucks were the gang usually meets. Had coffee and a donut (no I don't carry a badge) and waited to see if anyone would show. This also had the effect of allowing the sun to rise enough to light things up.
No one showed, so the bike is still a phantom to the gang. Meanwhile, I took off on our usual route.
The weight of the 28mm tires seems to slow the sprint some. Also, I can see how, in some circumstances, their cushiness could come across as a bike that feels dead. But, it's not a dead bike at all. Power goes in and comes out fine. Quick handling is a piece of cake as proven dodging potholes and cracks in the pavement. But, I don't have to do so much dodging with this ride. Cool!!!
The frame is made up of Deda Zero-Uno (aka COM 12.5) in standard oversize diameters held together with Henry James lugs and bottom bracket. This seems like a good combo for someone my size.
In Lake Forest I stopped for an OJ a Starbucks and fixed a slipping seat post. Then back south for the second half of the trip.
This wasn't my fastest ride - but I'm never fast in cool weather. I don't know if its psychological, limiting the wind-chill, or just the bulk of clothing slowing things down. But I got a good workout anyway. It was a fun trip.
Meanwhile, the alternate fork has its first coat of paint - and it's looking good. It has attachments for a rack and fender - those should be coming soon. It's a prettier fork, with curved blades and a nice HJ crown.
Meanwhile, there are pictures below of how the bike looked this morning.
Profile
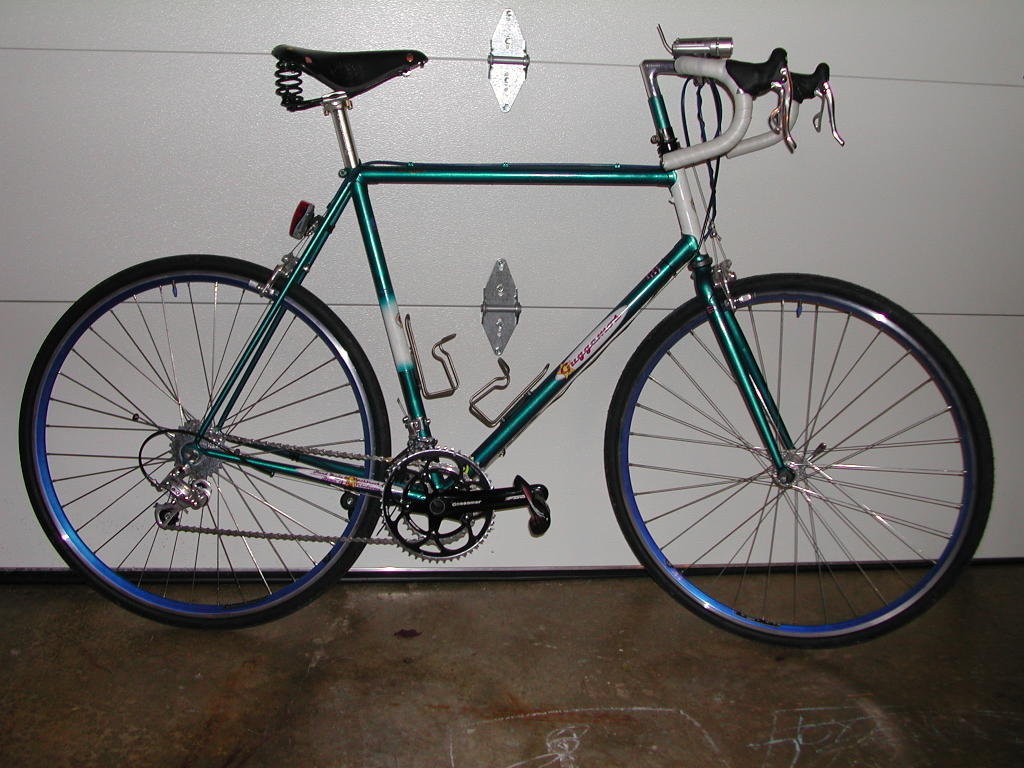
Here you can see the unresolved steerer/stem and the need to finish paint. This is fresh off a morning ride, so there are still road boogers on the bike.
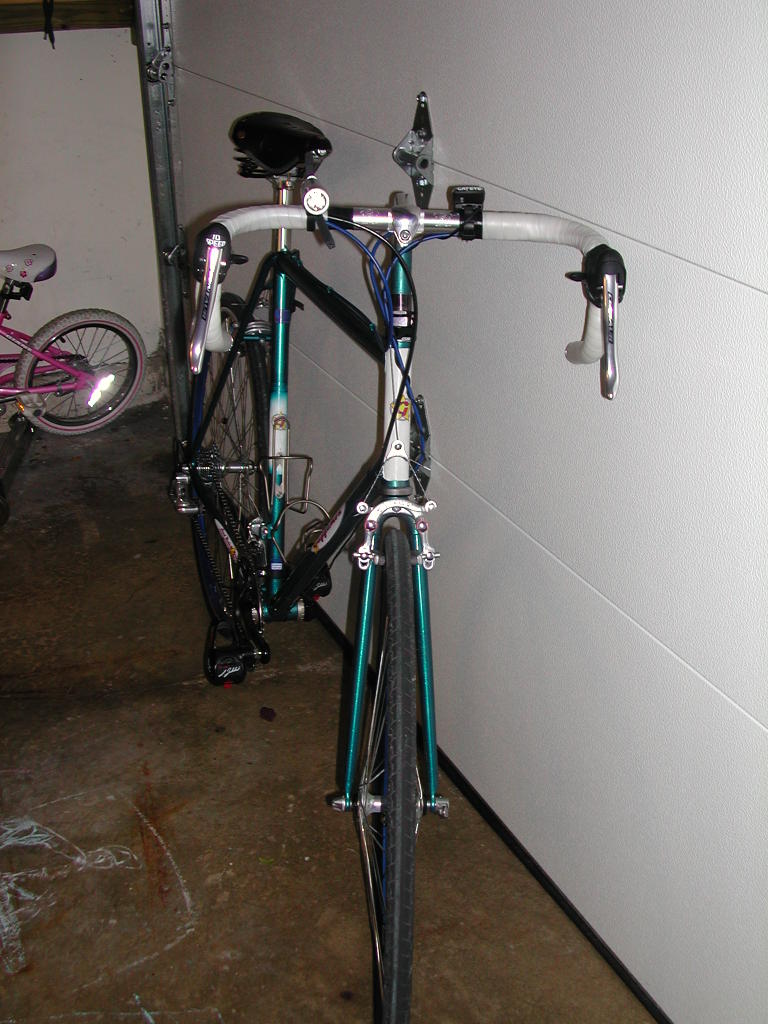
Long Steerer

The final layout of the stem and steerer are yet to be resolved. You can see the system here that is used to hold the headset together while using a quill stem.
Seat Cluster
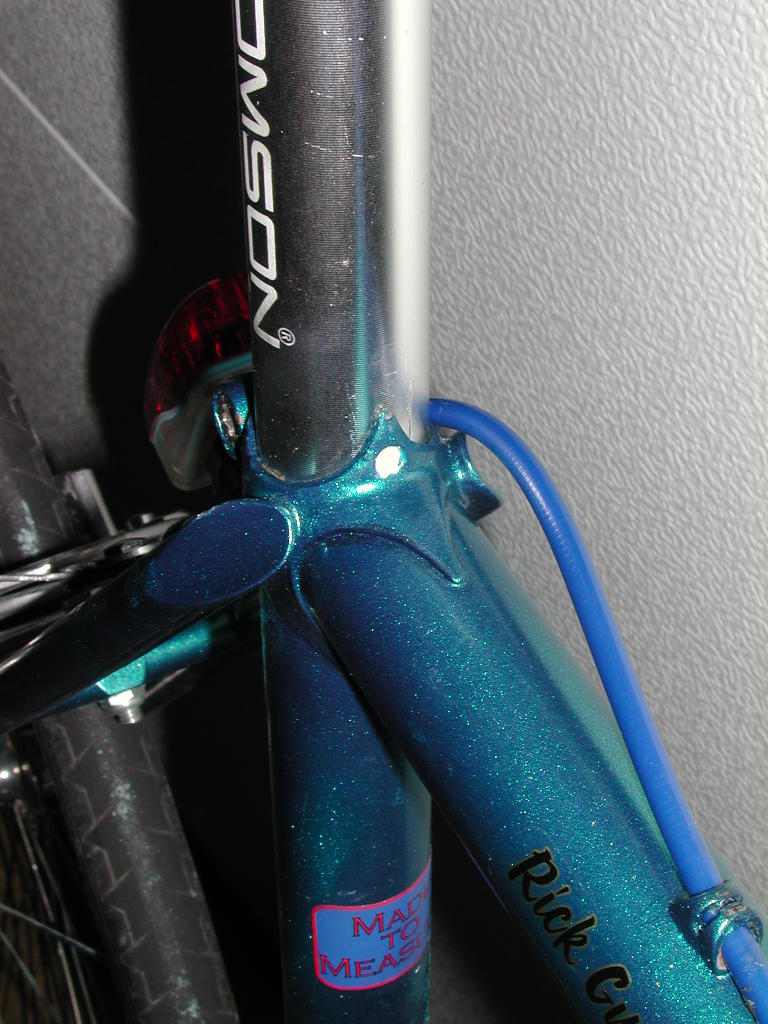
Trying to show off by placing a dab of white paint into the hole drilled through the lug.
Top of rear triangle

Generally the rear triangle looks clean, but next time I'll put the cable stop on the other stay to simplify routing the cable away from the seat post bolt.
Saddle Seatpost Interface

A straight post and Brooks Conquest are a bad combo from a fit perspective. Time to dig out another post.
Friday, October 07, 2005
1st ride - the evil temptation
Well I couldn't wait any longer, I had to take a ride. Wednesday nite I built everything up (without having completed the paint) and yesterday morning Nick and I went for a ride with me on my new frame.
First of all, the ride is a dream! I rides like an old fashioned Cadillac - smooth. This is probably due to the 28mm tires and the sprung saddle - but it really doesn't matter - this is a bike that won't beat me up on a Century.
Charlie (my 6 year old) wants me to insert his name here - done.
Back to the bike, it seems perfectly stiff - no noticeable flex anywhere. It responds nicely to my kick up a hill. The handling is steady, not twitchy, but seems to be capable of steering anywhere I want it to go to miss a bump, hole, or whatever.
It looks and feels like the wheels track one another well. All of this said, there appears to be a slight misalignment of the rear triangle that causes the chainline to be slightly off center. Grumble.
Well, I tuned a couple of items tonight and mounted the computer. I'll ride in the morning with my friends - hope they won't be too bummed out by the paint. Then, I'm thinking I'll keep riding it until its snows. That way, I can trash the current paint and keep learning about this frame. At that point, I'll get it bead blasted, straighten the rear end, and have it painted right.
That's all for tonight.
Cheers
Monday, October 03, 2005
Reaming Again!
My steerer reamer arrived today! It's another cheap Indian adjustable reamer from Enco. I couldn't wait to try it out.
The tube only needs a tiny bit cleared off. Even so, its slow going. This reamer only lets me make the tiniest adjustments at a time. I'm guessing that this is because the tube diameter (7/8") is so small. The tighter circle probably makes it harder for the reamer to plane off nice smooth shavings.
So far, the steerer has only been cleared down to the upper headset cup. There is 8" of steerer above the cup, so this is a bit of work already. On the other hand, I have a Nitto Technomic stem (can you say long) - and need to ream the tube down farther.
All of that said, I couldn't wait to finally see how this bike rides. Remember, there's no chain on the bike yet, nor brakes. But, I popped the new Thompson stem in, mounted my Brooks conquest sprung saddle (guessing at the height), and the wheels with my nice 28mm tires.
Putting my foot on the pedal was a little hard. When I tried to turn it right side up, the crank would spin away. Anyway, having got my left foot mounted, I pushed off several times with my right, the way we did when I was a kid - thus getting up some speed (maybe 5-7 mph) and coasted several times around the cul-de-sac. So far so good - nothing breaking, nothing rubbing, and no lack of control. So, it was launch again this time up the block. Then back down. A few more laps and I was done.
Results: 1) It felt great. The ride over the bumps (old concrete street) were muted. I think this is more due to tires than seat, but I've accomplished one design goal. 2) It felt more comfortable no-handed than my Trek. I should qualify this. At some point (maybe less than 3 mph) wheel flop becomes excessive on the new bike. This is with a 73 degree head angle and 61mm of rake. The front tire is way out there. Above that, there is still some flop on center - but it feels predictable. The Trek has always felt skittish at all speeds - this bike feels much better even with its flop. And, when it is turning, the flop seems to go away. That is, it's an on center phenomena that seems to disappear as the bike tips and makes its way around a curve. Finally, with both hands on the bars, I don't feel the wheel trying to flop, even on center. Obviously, mounting an chain and some brakes will allow me to further explore handling - over a much broader range of speeds. 3) Wheee!!! It's fun to finally be on my bike - even though its incomplete.
My decal paper has arrived, and I think my decal sheet is ready to print - so I'm positioned to finish finishing the bike. I'm also charged up again to make progress. The Steerer needs some more reaming. The paint work needs completion. I'd like to do some polishing of the dropout faces. And, then all the gear needs to be installed and fiddled to proper operation. Naturally, the paintwork will be the slowest part of all this. But, I'll be showing the complete product to my friends shortly. Yahoo!
Space Improvements
Nick (my oldest son) and I spent a bit of time Saturday on shop organization.
We extended the back of one bench top almost 10" for more surface area. This should result in our being able to put both the grinding wheel and the drill press at the end of the base of the L formed by the bench-top. That change alone will make a big difference in workspace, and give me more room around the grinder to manipulate large and awkward objects.
We also mounted about 4 linear feet of peg board creating more tool storage locations. We have another 4 feet to do, but already much is out of the way. Now all the handles for my frame-reamers/facers/taps are hanging up, also the frame alignment tools. Further, other bike tools (brakes/BB/etc) are now consolidated here as well.
Part of the need for putting up 4 more feet of peg board comes from files. I have amassed quite a collection - many more than I ever would have imagined when I began this venture. Partly this is due to sloppy brazing. As I learn to control the silver better, there is less to clean up. But, when there's silver to clean up, it takes a variety of files (including rotary) to do a nice clean job. Part of the mess comes from realizing that using the correct size file makes coping tubes easier, and similarly having different grades allows one to hog out metal quickly and then leave it with a nice finish.
But, I have to admit that there's one other reason why my workbench is drowning in files. I don't know what to do with the old dull ones. Partly, I have a hard time saying: "Yep, this file is shot, time to replace it." So, I may get out a new file, but keep the old one around - never accepting it's fate. The other issue is: what to do with old files? I'm not aware of being able to have them sharpened or reconditioned - if any of you are, please let me know. Otherwise, what should I do with them? I suppose the recycle bin is the best alternative - and considering that many of my files were purchased cheaply, that shouldn't be a tough decision - but it is.
It's not romance or love for the tool that holds me back. It's not clear what is holding me back. But if I can break through this barrier, I'll have a cleaner workbench and hence probably do finer work. I need to go into the shop with some focus this week and clear out this old steel.
A related challenge is that I acquire files much more quickly than handles. Naturally, as old files die, their handles can be repurposed to new ones. But, the range of files used has grown faster than the number of handles as well. As a side note; too many handles don't necessarily fit files of the size they are rated to fit. Anyhow, its time to bite the bullet and buy another half dozen handles.
On other fronts:
1) Work continues to be postponed on the external quill stem. I'm waiting until shop reorg is complete.
2) My new threadless stem arrived - but it's a 1.125" and I ordered 1". I suppose I can find some shims, but this isn't proving to be the speedy solution I hoped for.
3) My reamer for the Steerer hasn't arrived. Hopefully today so I can finish off frame #090105.
I've been trying to find an economical source for a build-kit for my daughters bike. Its no doubt a market niche, hence it takes some research. So far, the cost of a good (not great) set of wheels in her size is the same as for an adult sized bike. And, I'm not looking for BMX wheels even though they have the same diameter. Either I need something based on hub gearing or on a multi-cog freewheel/freehub.
It occurred to me that the place where the most construction takes place around small wheels is with 'bents. Considering this, I thought to look for web sites servicing bent builders. I found www.gaerlan.com, and sure enough, it looks like they can help me put together an "affordable" build kit. I'm probably still looking at $400 (despite having some pieces already in stock) but this seems like a workable number. Even more so because it involves parts which will be reusable when Sarah outgrows her frame. Sometime late this year or early next year, I'll make this investment.
Well, enough for now. Gotta get back to work.
Subscribe to:
Posts (Atom)

