Well, I've started trying to make my "new" style stem. So far, two problems:
1) It's really heavy. The tubing that fits tightly to the steering tube has a relatively thick wall and it's a lot heavier than frame tubing. I can probably live with this.
2) The uncut steerer is too short. If the quill is long enough for where I want the bars, then the clamp on the seat lug is beyond the steerer. I could acquire a really long steerer and replace the one in my fork. But, I think I'll take a different course.
I'm going to grind off the lugs for the seatpost binder-bolt. Then fill in the lug's slot with some silver. Then, I'll mount two binder-bolts lower on the quill - probably an inch or inch and a half apart. This should allow a secure connection to the steerer, while allowing the extension of the stem to be above the top to the steerer. Cool. Pictures when this is complete.
Wednesday, August 31, 2005
Monday, August 29, 2005
An Idea
Sometimes I take a perverse approach to problem solving - this may be one of them.
For simplicity I'm using threadless steerers and headset. No steerer to thread, less fuss about steerer length - it all sounds good. But, then you have to use a stem which clamps around the steerer and provides the backing against which the headset is adjusted.
Well, I generally think that a traditional quill stem is more attractive and provides me with a better fit by letting the handlebars sit up higher. Yes, I would put a ton of spacers on the steerer and then flip the (aheadset style) stem at an upward angle - but that seems unattractive to me.
My first thought was just to create a clamp around the steerer against which to adjust the headset. That could work, and would allow me to put a quill stem inside the steerer. I may still do this.
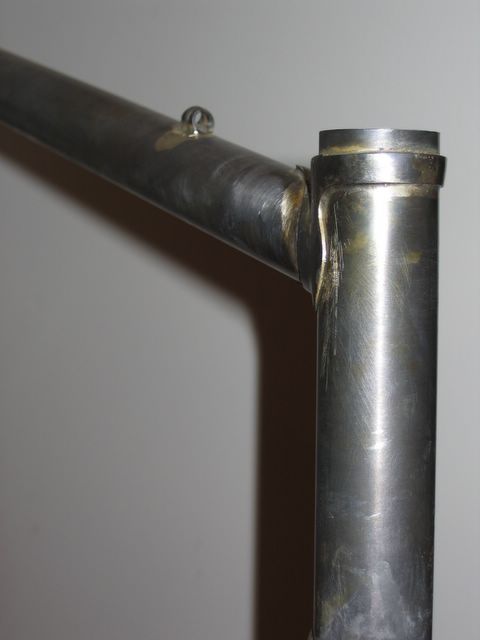
But I've been thinking, and may have a better (but not perfect) answer. It seems to me that I should be able to get a piece of 28.6mm outside diameter tubing that has a reasonably close fit telescoping over the steerer. In fact, I've purchased a piece of straight gauge CroMo which should do fine.
This tubing should fit easily into seat lug, where it can be brazed into place to form the quill. Another piece of 28.6mm tubing can be brazed to the front of the seatlug forming the extension. At the bottom of the quill, a clamp can be brazed on. Then we cut a slot on either end of the quill (with a round hole at its end), and our stem can fit over the steerer while clamping on at the top and bottom.
The effective length of this stem is limited by the length of the steerer. That is, if the quill is longer than the steerer, then its clamp won't grab the steerer. This is apt to allow a little bit of play back and forth as one rides. So, we're going for effective clamps at each end of the quill. Hopefully there will be enough steerer for this to work.
At the point, we need to miter the end of the extension and braze on a short tube that will be the handlebar clamp. Slit this tube after brazing on the actual clamp and we almost have a stem.
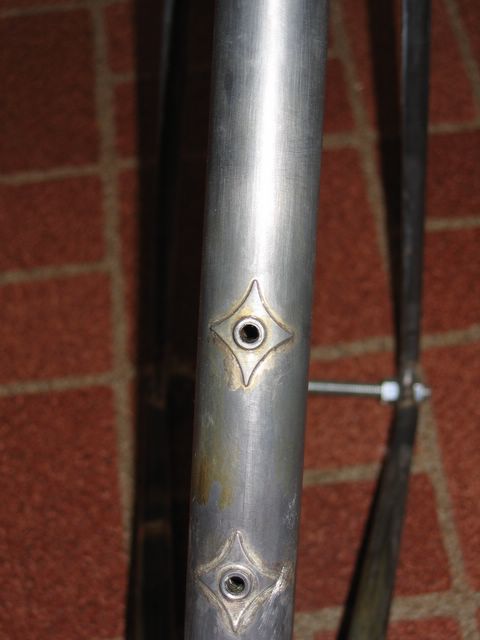
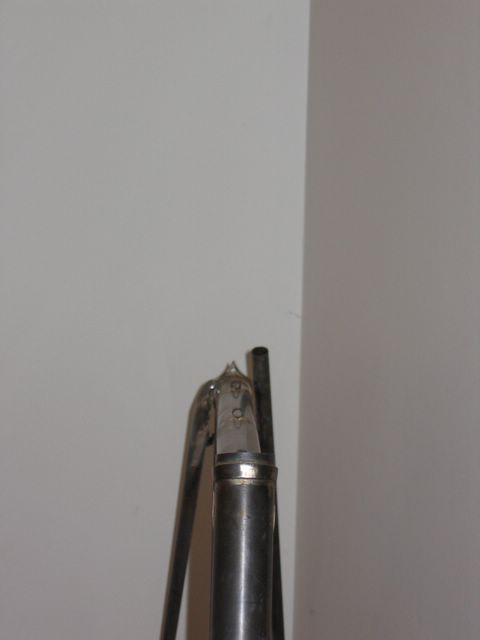
The points on the lug (that I'm going to use), which are in front and back of a seatpost, are now in our way. At least I don't want to keep them there where they'll pierce any flesh that falls on top of them. Also, the top of the quill is open. So, now we file off the the points, leaving the opening with a smooth convex curve (from side to side) above the quill. If this piece doesn't look too goofy, we should have a nice (possibly new style) of stem to try on our bike. Soo..... I better get this finished too before I take everything over to the painters.
For simplicity I'm using threadless steerers and headset. No steerer to thread, less fuss about steerer length - it all sounds good. But, then you have to use a stem which clamps around the steerer and provides the backing against which the headset is adjusted.
Well, I generally think that a traditional quill stem is more attractive and provides me with a better fit by letting the handlebars sit up higher. Yes, I would put a ton of spacers on the steerer and then flip the (aheadset style) stem at an upward angle - but that seems unattractive to me.
My first thought was just to create a clamp around the steerer against which to adjust the headset. That could work, and would allow me to put a quill stem inside the steerer. I may still do this.
But I've been thinking, and may have a better (but not perfect) answer. It seems to me that I should be able to get a piece of 28.6mm outside diameter tubing that has a reasonably close fit telescoping over the steerer. In fact, I've purchased a piece of straight gauge CroMo which should do fine.
This tubing should fit easily into seat lug, where it can be brazed into place to form the quill. Another piece of 28.6mm tubing can be brazed to the front of the seatlug forming the extension. At the bottom of the quill, a clamp can be brazed on. Then we cut a slot on either end of the quill (with a round hole at its end), and our stem can fit over the steerer while clamping on at the top and bottom.
The effective length of this stem is limited by the length of the steerer. That is, if the quill is longer than the steerer, then its clamp won't grab the steerer. This is apt to allow a little bit of play back and forth as one rides. So, we're going for effective clamps at each end of the quill. Hopefully there will be enough steerer for this to work.
At the point, we need to miter the end of the extension and braze on a short tube that will be the handlebar clamp. Slit this tube after brazing on the actual clamp and we almost have a stem.
The points on the lug (that I'm going to use), which are in front and back of a seatpost, are now in our way. At least I don't want to keep them there where they'll pierce any flesh that falls on top of them. Also, the top of the quill is open. So, now we file off the the points, leaving the opening with a smooth convex curve (from side to side) above the quill. If this piece doesn't look too goofy, we should have a nice (possibly new style) of stem to try on our bike. Soo..... I better get this finished too before I take everything over to the painters.
Saturday, August 27, 2005
Got to work again!
It's Saturday! For most of you, that means the weekend and time off. With a career in Real Estate, Saturday's usually a work day for me. Lately, work has been 7 days a week - which is a good problem. Unusually, August has been a very active month. Well, things feel in place and all I had today was a two our stint of floor duty in the afternoon - so its a weekend day for me too!
Meanwhile, the family headed off to Pittsburgh for a ballgame. Some of you may be wondering why anyone would drive 8-10 hours to go watch the only AA franchise in the majors. Don't ask. :) Anyhow, I again have a weekend without family duties. So, that means I got to work on my stuff today. In the morning it was framebuilding and after floor I went for 3 hour ride. I'm not getting enough mileage lately - so that felt good.
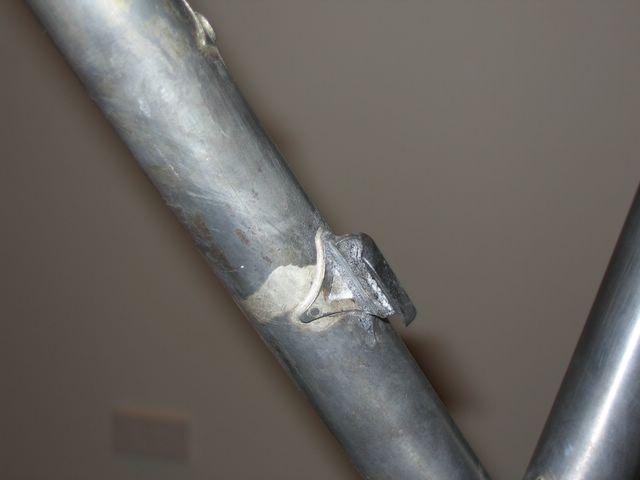
What did I get done, you ask? Well, I mitered a chainstay bridge out of 0.5 inch tubing and drilled it out to accept a water bottle boss on the back side. The boss is to attach a fender. Again, I used the Schmidt method and was able to produce a filet that required only the slightest bit of additional silver from the outside - neat.
In fitting the chainstay bridge, I tried to position the boss to be the same distance from the rear wheel axle as where the bottom of the brake bridge would be. I've seen too many badly fit rear fenders and want to avoid that. Unfortunately, no-one seems to indicate the radius of their fenders, so it's hard to be sure the optimal positioning. But, it seems reasonable that the worst fitting problems can be avoided if both mounts are the same distance from the axle. Hope I'm right.
Then I took an old chainstay bridge (that was drilled beneath for a fender), and started to clean it up. Ugh!!!! I thought is just had rust, but it seems that it also had some form of thick grease or rust preventative (obviously not very effective). I soaked it in mineral spirits for about 20 minutes to loosen the grease up. This helped, but didn't do the whole job (maybe it should have been an overnight soak).
Then, I chucked the bridge (one end at a time) into the drill press and sanded it off. This seemed to get most of the rust and the remaining grease off. But there were some pits of rust. I tried the little bit of picklex that I have left, but it's worn out and didn't have much effect. So I resorted to hand sanding.
Then, I twisted a length of sanding tape into a twine-like diameter and proceeded to work on the inside. This all proceeded pretty well. Finally, I put a carbine tip in the rotary tool and got the inner ends real clean.
I found it especially difficult to miter the bridge. None of my files really seemed to match the diameter of the stay, but I got an acceptable fit. From here, it was time to Schmidt again. This time, while effective, I needed a little more build up on the outside due to the imperfect fit. In the end, it looks satisfactory and its level (which is a good trick without a jig or what not).
After cleaning things up, I temporarily installed the fork and mounted the wheels. Then I mounted the brakes. Yahoo!!! They fit the rims perfectly. So, that's great.
There's only a little left to do, although it'll take its share of time. Let's see:
Meanwhile, the family headed off to Pittsburgh for a ballgame. Some of you may be wondering why anyone would drive 8-10 hours to go watch the only AA franchise in the majors. Don't ask. :) Anyhow, I again have a weekend without family duties. So, that means I got to work on my stuff today. In the morning it was framebuilding and after floor I went for 3 hour ride. I'm not getting enough mileage lately - so that felt good.
What did I get done, you ask? Well, I mitered a chainstay bridge out of 0.5 inch tubing and drilled it out to accept a water bottle boss on the back side. The boss is to attach a fender. Again, I used the Schmidt method and was able to produce a filet that required only the slightest bit of additional silver from the outside - neat.
In fitting the chainstay bridge, I tried to position the boss to be the same distance from the rear wheel axle as where the bottom of the brake bridge would be. I've seen too many badly fit rear fenders and want to avoid that. Unfortunately, no-one seems to indicate the radius of their fenders, so it's hard to be sure the optimal positioning. But, it seems reasonable that the worst fitting problems can be avoided if both mounts are the same distance from the axle. Hope I'm right.
Then I took an old chainstay bridge (that was drilled beneath for a fender), and started to clean it up. Ugh!!!! I thought is just had rust, but it seems that it also had some form of thick grease or rust preventative (obviously not very effective). I soaked it in mineral spirits for about 20 minutes to loosen the grease up. This helped, but didn't do the whole job (maybe it should have been an overnight soak).
Then, I chucked the bridge (one end at a time) into the drill press and sanded it off. This seemed to get most of the rust and the remaining grease off. But there were some pits of rust. I tried the little bit of picklex that I have left, but it's worn out and didn't have much effect. So I resorted to hand sanding.
Then, I twisted a length of sanding tape into a twine-like diameter and proceeded to work on the inside. This all proceeded pretty well. Finally, I put a carbine tip in the rotary tool and got the inner ends real clean.
I found it especially difficult to miter the bridge. None of my files really seemed to match the diameter of the stay, but I got an acceptable fit. From here, it was time to Schmidt again. This time, while effective, I needed a little more build up on the outside due to the imperfect fit. In the end, it looks satisfactory and its level (which is a good trick without a jig or what not).
After cleaning things up, I temporarily installed the fork and mounted the wheels. Then I mounted the brakes. Yahoo!!! They fit the rims perfectly. So, that's great.
There's only a little left to do, although it'll take its share of time. Let's see:
- Mount the Columbine chain hanger. I better see if anyone can recommend the proper position for it.
- Install the crank and front derailer to insure that the derailer hanger is at the right height.
- Re-install the pump peg (the current position is sub-optimal).
- Sand and file.
OK, Tally Ho!
Friday, August 26, 2005
Missing Velomart
Fred Parr has received a few mentions on this blog, and while we've yet to meet face to face, I consider him a friend.
The following will sound a little like an obituary - sorry for that, but I need to set a stage.
Fred has a background that includes a wildly diverse set of experiences and careers. For example, he's been a stuntman in movies and a forensic auditor in the military.
Some of Fred's experience is more pertinent to framebuilders (especially wanna-be and newly becoming). For example, he learned his initial building skills from his father who (many years ago) worked as a welder for Ryan Aircraft (they built the Spirit of Saint Louis) and later had fabrication roles at the famous Skunkworks building the likes of the U2 and related aircraft. Not a bad base from which to learn metal crafting. He also knew and exchanged knowledge with a number luminaries of the bike building industry who became better known than he. For example Art Stump and Mario Confede.
Any three great framebuilders can come up with three different "best" solutions to a problem. So, I won't get pulled into wars about who's right or best. But Freddy can keep up his end of the argument about the "best technique" with the greatest of them - bar none.
On the other hand, he welcomes newbies and offers to help them learn. For all the great information available through the Frame Forum and the framebuilders.phred, I wouldn't have made the progress I have without Fred.
One of the ways Fred has helped builders (of all stripes) has been in making available the specialized torches and related equipment that work best for most of us, at discounted prices. I probably shouldn't let this out, but he actually upgraded my order to 2-stage regulators for free, because he thought they would work better for me.
Another way Freddy helps is by pushing the envelope regarding brazing materials, fluxes, and tubing. Whether or not you choose to use it, Picklex really is a remarkable product. I've used three of his fluxes, and they really do clean up well. I've tried Allstate 11 at his recommendation (and for free) - it really does allow for nice small filleted joints. His new filet silver is really easy to manage and move around with a torch. His new fluxes make even Harris 56 easier to manage and move with the torch. And while I'll only know if I don't have failures, I'm confident that his new fluxes make better joints to stainless steel.
Similarly, Fred has always been available to discuss a problem and its solution. He offers to review test-joints sent to him and to provide feedback.
So, I was sadden to hear of the end of Velomart (his webstore). Freddy and Georgine are making some lifestyle changes related to her retirement. So, it may take a while to see if/how/where Freddy will continue to be involved with the builders community. My guess is that unless something gets in the way, he'll continue to be here for us. Nonetheless, I'm still sad that Velomart is gone.
Monday, August 22, 2005
Making Progress Again
Tonight I cleaned out the end of the left chainstay and its DO, then checked out the fit and alignment one more time. It all looked good.
After disassembly, I put a ring of Fred Parr's new 56+t silver in the stay and then coated everything inside and out with his new flux. After clamping it all together, it took only a short while to see the silver weep out of the end of the stay. There's a 1mm gap from the shoulder of the DO to the end of the stay. So, after letting it all cool and re-fluxing, I used some of Freddy's new filet silver to fill the gap. That stuff is a little like magic. It softens up and starts to flow without losing its body. It's easy to move around with the torch. Cool!
After cooling and cleaning it was time to put a wheel in. It looks good both vertically horizontally. Very Cool! I think this is going to work.
Next I fluxed and pinned the top of the left seat stay. Again, I was using some of Freddy's new flux combining the black and the white. This time I was using up some Harris 56. It was working almost as well as Fred's filet silver. That is, I first flowed it through the joint, then backed off the heat to build up a little fillet between the stay and the seat lug. It was much easier than normal for me with the silver maintaining a viscosity that can be made sticker or looser depending on how you work the heat. It wasn't as quite good as the filet silver, but it was pretty darn good.
Now I'm psyched about doing some practice silver filet joints to send back to Freddy.
So, it's down to the stay cap, the chainstay and brake bridges, and general cleanup. I've spent about 4 times the effort on the rear triangle as the front - and there isn't even a critical miter anywhere in the backend. I'm going to have to have a better jig before starting my next frame.
Until next time.....toodles!
Sunday, August 21, 2005
Rear Triangle Follies
For the better part of a month, I've been trying to figure out the alignment of my rear triangle. You see, it's wrong but I haven't been able to determine what or how?
Part of my problem has been the availability of concentrated periods of time. Today, Janet and the kids went up to Wisconsin for the weekend to see Grandma, then my showing appointment canceled. Suddenly I had a whole day to work in the shop!!
Without a frame jig, I've been using Suzy's approach of a straight beam off the front triangle to position/align the rear triangle. In concept this should work well - albeit with a certain amount of effort. Suzy makes it work, but I've had problems.
BTW, this once again reinforces my respect for Suzy Jackson who truly must be a goddess among garage bicycle builders.
When the chainstays were first installed, I put my Dropout (DO) tools on and they aligned perfectly. I was surprised but happy. Then, I installed a wheel. Whoa Nelly!!!!! It's off to the right by an awful amount and crooked vertically.
So I start measuring things like: Length from the back of the DO to the center of the BB (or the inside of the back edge of the BB, or the outside of the front edge of the BB), level side-to-side of the chainstays starting near the BB and working my back to the DOs, same as previous items except to the back of the axle slot in the DO, and finally in desperation I ran string DO to DO via the head tube and measured its offset from the seattube.
I did many measures over a long period of time because I didn't want to rush in with a repair unless I was sure of the problem. Unfortunately, none of these measures showed what the problem was. Whenever there seemed to be discordant measures left to right, a re-measure would refute the first. Arghhhh!!!!!!
I must be poor at measuring. At one point I was looking for a twist in the BB such that the stays could be good relative to the BB but not to the rest of the frame - I couldn't find it.
So, yesterday, I began by rechecking the front triangle w/ v-blocks on a flat surface. It checked out fine. Then, two beams were run from the downtube past either side of the seattube and over the DO tools. I didn't use shims to equalize for tube sizes, but made sure that the beams aligned to the downtube (and so had only one point of contact on the seattube). I then sighted down between the two beams which clearly indicated that the back of the rear triangle was offset to the right relative to the front triangle. There were several more tries to ensure that the result was consistent - and it was.
I looks like the difference is 1-1.5mm, which isn't much - but lets see what we can do.
I took the approach of installing my dummy axle and adding a couple of mm to its normal width (132). Then I heated the left stay socket until the flux was nicely melted. After things cooled, I screwed the dummy axle back to its normal width and heated the right socket.
After cooling and defluxing, it was back to measuring. The results of all measures were largely the same as before: All good except the beams showed an approximate 1.5mm shift to the right and the wheel was still to the right. There was one key difference: the wheel wasn't as far to the right as before. Concluding that the beams weren't giving me an accurate measure of how much to adjust, I looked at how much the rear wheel needed. It was 5mm (yeow!).
So, using the same method as before, I gave the rear triangle a 5mm shift to the left. Measure and check the wheel, it looks pretty good. Now there is still a difference vertically from left to right, and it appears that the left DO is out of phase with the right DO. So I cold set the stay to achieve the proper height (drop?).
After thinking about the alternatives, I decided to remove, clean up and replace the left DO. With stainless, I didn't want to take a chance on weakening the joint by merely heating and twisting the DO into phase. So, the DO is out and I've started cleaning it and the tube. a little careful refitting and I should have an aligned rear-end.
At that point, I'll need to finish the top end of the left seatstay, install the brake and chainstay bridges, and sand & file the frame.
Its a relief to think I finally have the rear-triangle mystery solved. That said, I think its time to acquire a jig to avoid these issues, and particularly to avoid re-heating joints.
That's it for now. Hopefully there will be more pictures soon.
Sunday, August 14, 2005
Off topic
Well......
Who's dumber: Me or Canon?
I have a Nikon Coolpix 880. An early 3 megapixel consumer camera. It takes good pictures, although it is slow.
Anyhow, I borrowed one of my wife's Compact Flash cards when mine got full. Next time I tried to use the camera - it was dead. That is, won't turn on, doesn't show an error code, no lights, no noises dead. I changed the battery. I tried the AC adaptor. My camera was dead.
I'd rather not invest in a camera now (when there is so much frame-building equipment yet to buy), otherwise it would be a good excuse to start shopping.
This has slowed down my framebuilding photography - as can be seen by this site. It's also put me out of the photo loop in some other circumstances.
Fortunately my wife has a nice digital camera (it was her CF card that I borrowed), made by Canon. It's newer than mine, has more m-pixels, and features and shots faster (good for the kids and dog - speaking of which I should post a picture of Doc). But she doesn't really want it in the shop, and as our only camera I don't either.
Anyhow, I got out my dead camera before diner. I tried fooling around some more to see if anything would get it going. I tried removing and replacing the CF card thinking it might not be seating correctly. After several tries, I got an error code on the upper display one time. Then nothing more. More muttering and fooling around.
Then I did it. I pulled the card and put another in. That was it! Voila, it works. I looked at the card that was pulled out - it's Canon branded. While it works fine in any of the card readers I've tried, and in my wife's camera, it kills my camera. Now, given the difference in ages between the card and my camera, I'm confident that Nikon did nothing to prevent Canon cards from working. But, this is the free card that came with my wife's camera, and it appears that Canon has designed it to disable any non-Canon camera in which it may be placed. Dirty pool!!!!!! Shame on Canon!!!!!
But, maybe some of you will be spared the aggravation if you know that this sort of nonsense is going on.
Cheers,
RG
Wednesday, August 10, 2005
May I brag for just a moment?
I got an e-mail tonight from Richard Sachs. All it said was "nice graphics" with a link to my page of decals. Well doesn't that just swell my head up! Not that my metal-work is up to compliments yet, but it certainly was a nice comment from someone who is respected by framebuilders around the world. Cool.
Well, enough of that - I've been busy tonight. As you will see below, there are finally some pictures of this frame. My wife lent me her camera which does a good job, but for which I'm still learning how to control the flash and exposure levels.
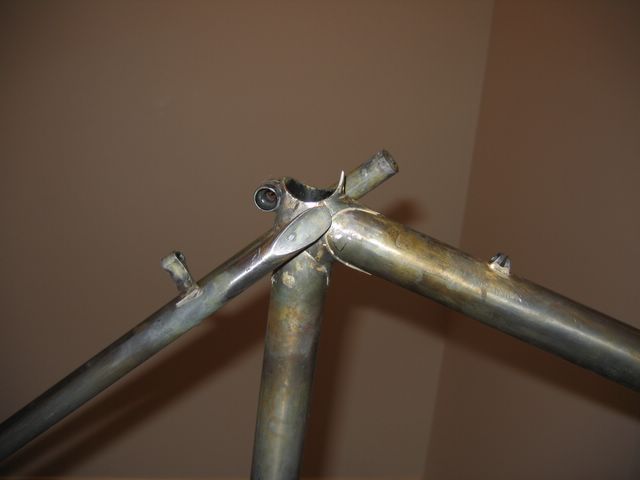
I have some top-eyes for my seatstays, but I really wanted to try mitering the stay-end and brazing on a piece of tube to make a scallop. The first question was how to do this. The logical approach would be to form the end on the stay, then fit the stay in place - shortening from the bottom as necessary. However, I wasn't sure how to hold the completed stay on the seat cluster for brazing. And, it seemed like a pinned joint would be nice, to add some mechanical bond to braze.
So, I opted to work backwards. After fitting the stay to the drop-out, the upper end was rough mitered with a hacksaw (I sprung for a Lenox at the beginning of my building - what an improvement over my old generic steel adjustable hack saw - recommended). My 10" round file made a nice little bed in the seat-cluster for the stay to sit in. Then a 12" half-round bastard hogged out material until switching over to an 8" bastard which seemed to make the perfect shape for the section of 1" tubing I was using for the cap.
The tubing was split in half with a hacksaw, then cut off of the donor tube creating two half-round pieces. Once the stay was filed to shape and the cap seemed to have a tight fit, I trimmed the cap down (with aviation snips) to something closer to the shape of the end of the stay.
After some prophylactic cleaning, the stay was pinned to the seat-cluster and brazed into place. A little more cleanup, and then the stay-end was liberally fluxed. A loop of silver was set into the stay, held by the flux. The cap was pinned to the stay and cluster and fluxed up. Then, I turned the frame in the jig so that the cap faced the floor - and heated it up creating a Schmidt-style internal fillet. A light touch of silver went around the outside and touched up the stay to cluster junction - then I let things cool.
At this point everything looked fine, except that the excess cap needed to be trimmed. Generally, I'd use a file for this as the rotary tool can be a little tricky to handle. However, there was quite a bit of metal still to cut back, so I tried the rotary tool and got great results. I actually worked in closer to the tubes than I planned - there has been no hand filing yet in the pictures.
One thing that I learned is that the final cap will be blunter than the miter below it. The thickness of the tubing used for the cap shows itself more on the outside or downward edge. So while the miter looked like a very tapered bit, the final product is a little blunter than I'd have liked. Still, I'm very pleased with my effort. Now to make the left side stay match the right.
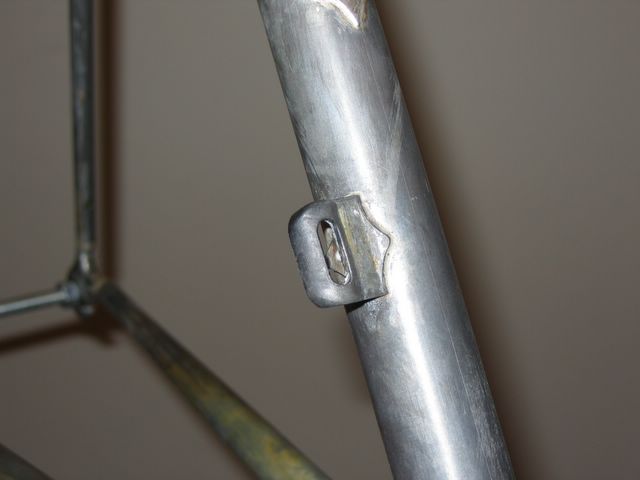
My next steps are to recheck the rear-end alignment, and correct if necessary. Adjust the angle of the left seat stay as necessary and recheck the rear-end alignment. Finish off the left side seat stay like the right. Check alignment. Fit and mount the brake bridge. Check Alignment. Fit the chainstay bridge and check alignment. Then its time to fit the left side downtube cable stop, the pump peg, and sand/file everything until its ready to deliver to Troy for paint.
The BB shell doesn't have a built-in chainstay bridge. None the less, the chainstays are round-oval-round without indents. They seem plenty stiff as is. I tried to do a cold set adjustment and just couldn't get the leverage to change anything. But I want a fender mounting point so I'll put the bridge on anyway.
That's it for tonight. See ya next time.
Well, enough of that - I've been busy tonight. As you will see below, there are finally some pictures of this frame. My wife lent me her camera which does a good job, but for which I'm still learning how to control the flash and exposure levels.
I have some top-eyes for my seatstays, but I really wanted to try mitering the stay-end and brazing on a piece of tube to make a scallop. The first question was how to do this. The logical approach would be to form the end on the stay, then fit the stay in place - shortening from the bottom as necessary. However, I wasn't sure how to hold the completed stay on the seat cluster for brazing. And, it seemed like a pinned joint would be nice, to add some mechanical bond to braze.
So, I opted to work backwards. After fitting the stay to the drop-out, the upper end was rough mitered with a hacksaw (I sprung for a Lenox at the beginning of my building - what an improvement over my old generic steel adjustable hack saw - recommended). My 10" round file made a nice little bed in the seat-cluster for the stay to sit in. Then a 12" half-round bastard hogged out material until switching over to an 8" bastard which seemed to make the perfect shape for the section of 1" tubing I was using for the cap.
The tubing was split in half with a hacksaw, then cut off of the donor tube creating two half-round pieces. Once the stay was filed to shape and the cap seemed to have a tight fit, I trimmed the cap down (with aviation snips) to something closer to the shape of the end of the stay.
After some prophylactic cleaning, the stay was pinned to the seat-cluster and brazed into place. A little more cleanup, and then the stay-end was liberally fluxed. A loop of silver was set into the stay, held by the flux. The cap was pinned to the stay and cluster and fluxed up. Then, I turned the frame in the jig so that the cap faced the floor - and heated it up creating a Schmidt-style internal fillet. A light touch of silver went around the outside and touched up the stay to cluster junction - then I let things cool.
At this point everything looked fine, except that the excess cap needed to be trimmed. Generally, I'd use a file for this as the rotary tool can be a little tricky to handle. However, there was quite a bit of metal still to cut back, so I tried the rotary tool and got great results. I actually worked in closer to the tubes than I planned - there has been no hand filing yet in the pictures.
One thing that I learned is that the final cap will be blunter than the miter below it. The thickness of the tubing used for the cap shows itself more on the outside or downward edge. So while the miter looked like a very tapered bit, the final product is a little blunter than I'd have liked. Still, I'm very pleased with my effort. Now to make the left side stay match the right.
My next steps are to recheck the rear-end alignment, and correct if necessary. Adjust the angle of the left seat stay as necessary and recheck the rear-end alignment. Finish off the left side seat stay like the right. Check alignment. Fit and mount the brake bridge. Check Alignment. Fit the chainstay bridge and check alignment. Then its time to fit the left side downtube cable stop, the pump peg, and sand/file everything until its ready to deliver to Troy for paint.
The BB shell doesn't have a built-in chainstay bridge. None the less, the chainstays are round-oval-round without indents. They seem plenty stiff as is. I tried to do a cold set adjustment and just couldn't get the leverage to change anything. But I want a fender mounting point so I'll put the bridge on anyway.
That's it for tonight. See ya next time.


Monday, August 08, 2005

Sunday, August 07, 2005
It's not about the bike?
We're back from Wyoming and had a great trip. What a beautiful part of the country - but being out there started my allergies and has cut back my breathing. Its hard to tell about the later when you're at altitude (7000-10,000 feet), but now that I'm home, its clear that my breathing is worse than it's been in a long time. URG!
Lots of folks were riding out there. They ranged from downhill/free-riders, to fast roadies, to touring folks. The valley has a lot of space with relatively flat roads, and there area all the steeps (road or off-road) anyone could ask for. There's also a nice trail system that seems to largely follow the snake river. So, the options are great! I just wasn't sure if there would be enough locals (or at least folks who live and work in the area) with the itch. Much of the area has become a billionaires haven - and its not clear to me how many of them want to spend time on a bike. Then there are poor transitional types (ski-bums and there summer equivalents - is there a name for them?) who may be willing to put a serious part of their personal assets into a bike. And, of course there are the long-term folks in the business & ranching class. All in all, I was surprised at the number of expensive bikes spotted.
Anyway, on to the meat of this post.
When posting, one doesn't really know how one is being received except by site statistics and comments from readers like you. One of the things that has amazed me is the lack of reader postings. Mind you, frame-building doesn't likely have a broad audience, but folks who get into the site spend a lot of time here. Does something about the site dissuade, or intimidate folks from commenting? Hard to say. Anyhow, I thought it might be of some interest to share what I know about you the reader from site statistics.
85% of you are using a Windows system. 10% use an Mac system. and 5% use Linus or the popular Unknown. This is interesting to me as the most recent stats I've heard are that Mac only has a 3% market share. My overly simple interpretation of this is that folks interested in frame-building have a bit of an esthetics (rather than engineering) bias. I'm not saying that this is true of You, or of all viewers, but when one gets past the religious wars - Mac users tend to come from backgrounds where visual tools are important. By the way, posts are welcome on most any topic, but the question of what's better - Windows or Mac is old, tiresome, and unnecessary - so let's stay away from that one on this blog.
53.54% of the monitors used are 1024X768. Of the rest, virtually all of them have a higher resolution. From this I infer that most of you have, or have access to fairly current PC hardware. Some may be accessing using work or school provided hardware, but still there don't seem to be many limited systems looking at this site.
Explorer captures about 63% of the viewing market. Foxfire and Netscape pull in about 24% (with Foxfire completely dominating Netscape). Opera has 5%, Omniweb 4% and Safari 4%. These sound like pretty normal numbers to me.
85+% of viewers are from the time-zones which span the US, Canada, and western South America. Another 7-8% come from time zones spanning continental Europe and the middle of Africa, while close to 10% come from time-zones covering parts of China, South-East Asia, and Australia.
Viewer languages might not seem interesting in that 95% are English, like this site, but Chinese and German hold 2% shares each, and Dutch has a 1% share.
While there is only 1-2 average visits per day, the average visit length is over 3 minutes and drills down through 4-5 pages. Mid-month is, by far, the most popular time to visit (are you busy paying bills at the end of the month?). While I have no statistics, a review of visitor details shows that a number of you keep coming back to see what's new.
So, this small audience has enough interest in the subject-matter to spend long periods of time sifting through my posts. Which leads me to be puzzled why no one posts comments. Well, comments aren't required - but do feel welcome to contribute! Perhaps you have an idea for how to improve the content of the site? Maybe you have a question or comment regarding my frame-building efforts? Don't hold back, you can join in.
Cheers,
RG
Subscribe to:
Posts (Atom)

