Tuesday, August 31, 2010


Monday, August 30, 2010
Next Step
It's time to move onto the next step with this carbon frame (feel free to click pictures to enlarge).
First I bonded the threaded Ti shell into the CF BB sleeve. To keep epoxy off the threads, I coated them with heave anti-seize grease. Then I cleaned the outside of the shell with acetone. After applying epoxy to the sleeve and the shell, the two get pressed together, sliding the non-drive side of the shell into the drive side of the sleeve. When the drive side of the shell is even with the drive side of the sleeve, we're good. Then I wipe off the excess epoxy from either end, and clean off the outside of the sleeve with a paper towel and acetone. Once this has set up, I trim the non-drive side of the sleeve, and sand it down even with the non-drive side of the shell. The last step is to clean the grease out of the threads and try fitting a BB - like this:

You can see that I've clearly marked the drive-side, so that I don't mount it backwards into the frame. Don't laugh, it's easy to do.
From here, I work from the Bible for this frame, which is the printouts from BikeCad for the design. This includes a picture with the measurements that are key for me to setup (and double check) the jig, and pages of details ranging from measurements to colors. It looks something like this:

Next it's time to start setting up the jig. The BB drop is the same as the last frame I did, but I double check this to make sure. Then I make sure that the BB is the correct width:

Looking good, so I center it on the jig:

215mm is the center-line on my jig, indicating that everything is fine.
The next step is checking to make sure that the jig is level so that tube angles can be set accurately:


First I bonded the threaded Ti shell into the CF BB sleeve. To keep epoxy off the threads, I coated them with heave anti-seize grease. Then I cleaned the outside of the shell with acetone. After applying epoxy to the sleeve and the shell, the two get pressed together, sliding the non-drive side of the shell into the drive side of the sleeve. When the drive side of the shell is even with the drive side of the sleeve, we're good. Then I wipe off the excess epoxy from either end, and clean off the outside of the sleeve with a paper towel and acetone. Once this has set up, I trim the non-drive side of the sleeve, and sand it down even with the non-drive side of the shell. The last step is to clean the grease out of the threads and try fitting a BB - like this:

You can see that I've clearly marked the drive-side, so that I don't mount it backwards into the frame. Don't laugh, it's easy to do.
From here, I work from the Bible for this frame, which is the printouts from BikeCad for the design. This includes a picture with the measurements that are key for me to setup (and double check) the jig, and pages of details ranging from measurements to colors. It looks something like this:

Next it's time to start setting up the jig. The BB drop is the same as the last frame I did, but I double check this to make sure. Then I make sure that the BB is the correct width:

Looking good, so I center it on the jig:

215mm is the center-line on my jig, indicating that everything is fine.
The next step is checking to make sure that the jig is level so that tube angles can be set accurately:

The seat-tube comes first:

This will be fine tuned with a machinists protractor - in this case at 73 degrees.
Then the head-tube gets set - which is a little fussier on this jig - so I go right to the protractor.

Part of the fussiness here is that we have to simultaneously set the angle and top-tube length. And changing one changes the other. Getting the head-tube right is the hardest part - because it's height above the BB must also be set, but that's a separate operation.
Here's an example of the fit between the seat-tube and BB.

And here's the same joint with the down-tube in place:

That's all for tonight - hope you're enjoying the pix.
Thursday, August 26, 2010
Odds & Ends & Clean Miters
It's my day off, and the list of chores wasn't too long so I squeezed in some shop time.
First I worked on the steel frame, forming and brazing two small stainless pieces to protect the finish of the stays from the feet of the pump.
The shape of the handle (at the valve-end) is such that, when the pump is parallel to the seat stay, a little bit of the handle just touches the stay. We don't want that to bump and wear the paint, so the one stainless protector is much longer to cover this spot too.
I also got some filing done on this frame, and have a few more hours of cleanup before the painter - but its getting real close now.
After taking an afternoon ride, I went back to the shop and did some more work on the CF frame.
Here are a just a couple of pictures of the mitered tubes. The first should make clear how the shoreline of the miter is different on the inside of the tube compared to the outside. While this also happens with steel tubes, its much more pronounced on a CF tube due to the greater wall thickness.

And here is an example of how the BB fits up. Note that I don't have a good way to hold everything tightly in place while taking this picture, maybe I can get a better shot when its in the jig for the initial glue-up.

You can see that the BB tube is cut to rough length (about 3MM long), with the rough end facing the camera. I will be gluing the Ti BB sleeve in next, aligning the drive side with the finished end of the BB shell. Then I can sand the the rough end down to match shell down to match the sleeve.
After that it will be time to miter the rear triangle and cut the head tube to length. Then the fun begins.
One last thing, these tubes came from EDGE Composites (very nice folks with which to work), but they are now called ENVE Composites.
First I worked on the steel frame, forming and brazing two small stainless pieces to protect the finish of the stays from the feet of the pump.
The shape of the handle (at the valve-end) is such that, when the pump is parallel to the seat stay, a little bit of the handle just touches the stay. We don't want that to bump and wear the paint, so the one stainless protector is much longer to cover this spot too.
I also got some filing done on this frame, and have a few more hours of cleanup before the painter - but its getting real close now.
After taking an afternoon ride, I went back to the shop and did some more work on the CF frame.
Here are a just a couple of pictures of the mitered tubes. The first should make clear how the shoreline of the miter is different on the inside of the tube compared to the outside. While this also happens with steel tubes, its much more pronounced on a CF tube due to the greater wall thickness.

And here is an example of how the BB fits up. Note that I don't have a good way to hold everything tightly in place while taking this picture, maybe I can get a better shot when its in the jig for the initial glue-up.

You can see that the BB tube is cut to rough length (about 3MM long), with the rough end facing the camera. I will be gluing the Ti BB sleeve in next, aligning the drive side with the finished end of the BB shell. Then I can sand the the rough end down to match shell down to match the sleeve.
After that it will be time to miter the rear triangle and cut the head tube to length. Then the fun begins.
One last thing, these tubes came from EDGE Composites (very nice folks with which to work), but they are now called ENVE Composites.
Tuesday, August 24, 2010
More Carbon Build
Well, for some reason, these pictures aren't showing up properly on VelocipedeSalon.com, so now they're here.
A picture of the blades I use to cut carbon fiber.

To hold the tubes while cutting, I use a bench mounted Park stand:

Here's one end rough cut:

And here's the other end rough cut:

A picture of the blades I use to cut carbon fiber.

To hold the tubes while cutting, I use a bench mounted Park stand:

Here's one end rough cut:

And here's the other end rough cut:

Monday, August 23, 2010
Back in the real world.

I've just started cutting tubes for the carbon frame - which you can check on in my 'Smoked Out' over at VelocipedeSalon.com.
Friday, August 13, 2010
Beginning a Carbon Frame
Here are some pix of the preliminary steps of building a carbon frame. As with other materials, we need to gather up our tubes, inspect them, and then prepare them to be cut, mitered, and fit together.
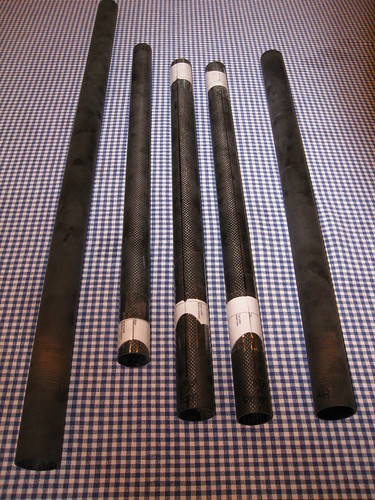
Here's a pic of the tubes we'll be using. Bike Cad has printed off the miter templates, which I have taped to the tubes as a guide for cutting and fitting them together. Note that the outer tubes (which have no woven outer layer) are for the BB and Head-Tube. As a consequence, we will only use a short piece of each.
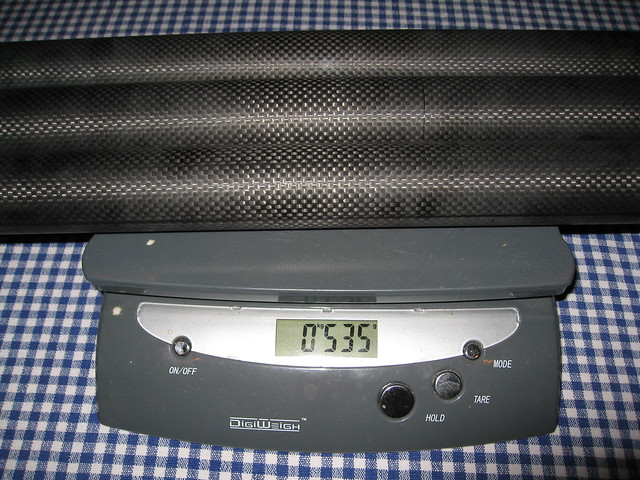
As you can see, the three main tubes weight 535grams. This isn't outstandingly light for three reasons: 1) These are untrimmed, the final weight will be less; 2) They have a cosmetic outer weave, which adds weight; 3) I'm building for ride and durability, not lowest possible weight.
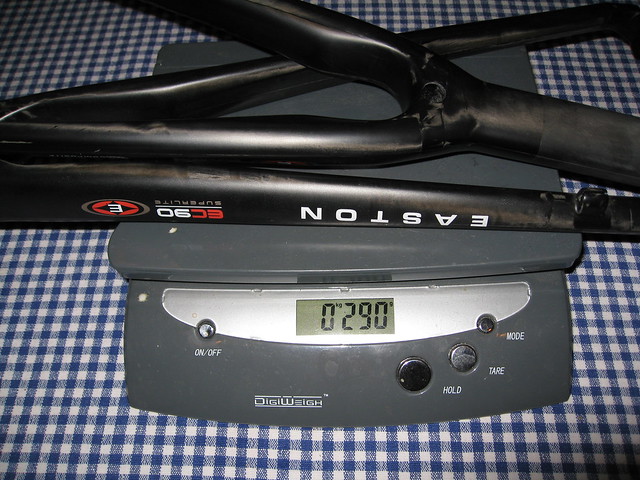
Here are the Easton rear stays. Note the molded in cable stop on the drive-side Chain-Stay.
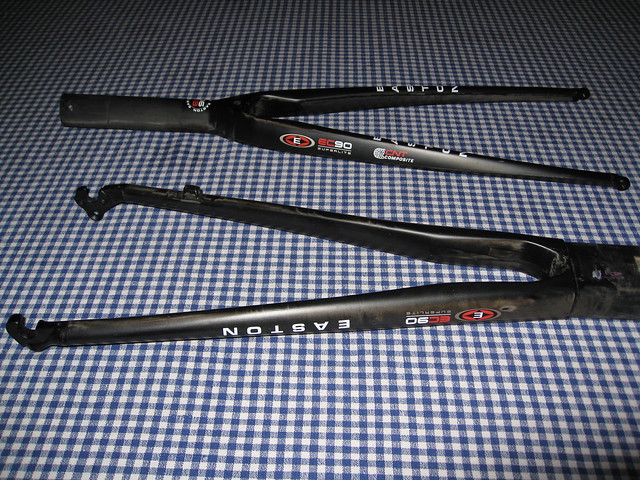
Looking more closely, these only contribute 290 grams including dropouts (but without the derailer hanger or the screws which hold them together).
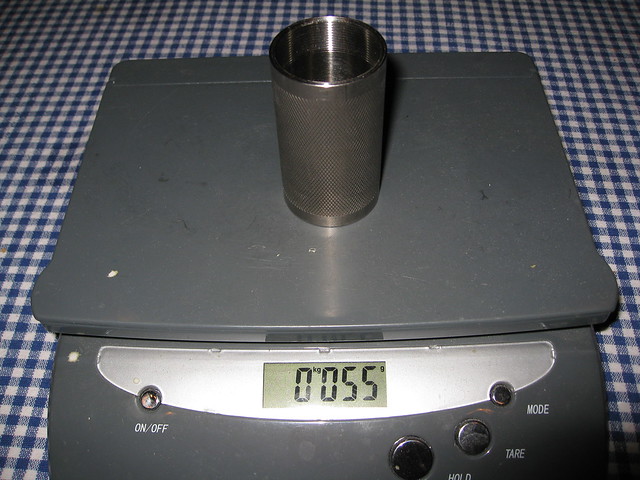
Here is the Paragon Machine Works Ti BB insert. It's made to be bonded into a carbon tube. The knurling on the outside helps to give it a better bond and resist torque forces from the crank.
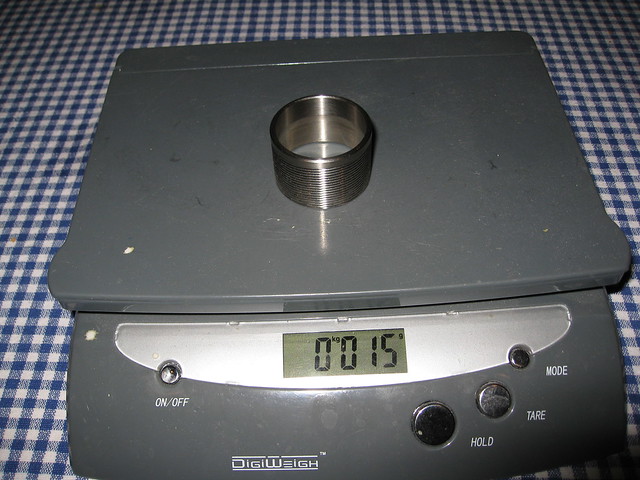
And here is one of the two PMW Ti Head-Tube Rings. These allow the head-tube to be milled for a normal (in this case threadless) 1-1/8" headset. Let's say something like a Cane Creek 110.
Ok, we're up to 910 grams so far. Adding joints (glue, epoxy & CF), cable guides, the derailer hanger, water bottle mounts, and screws to hold the stays together, while subtracting for what will be trimmed off the tubes, and I'd say (just top of head) that a 1250 gram frame is likely. We'll see when we're done. But, while that is almost twice what the lightest frames run, it is still plenty light to create a bike that undercuts the UCI weight limits. More importantly, that weight will contribute to its longevity.
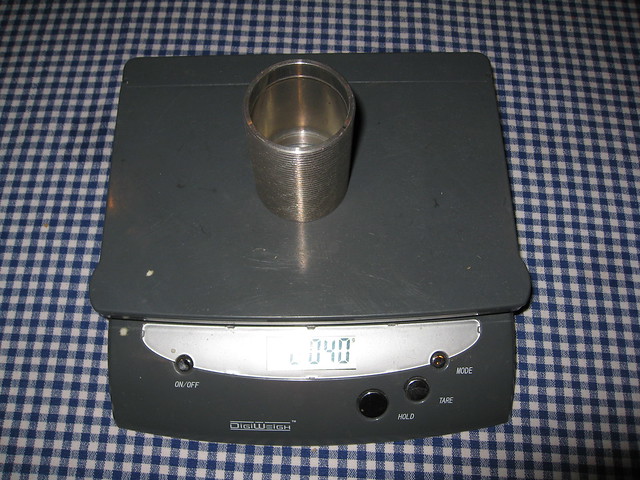
Now, just for grins, let me show you a PMW Aluminum BB30 sleeve. I won't use it on this frame, but it does help reduce weight. You can see that it has a spiral cut into the outer surface, rather than the knurling. One nice thing about working with CF, we won't heat distort this sleeve - which leads to post weld machining of BB30s.
Final note, I'll be off the grid (so to speak) for about a week. Therefore, if you don't hear anything more for a while, its not because I've lost interest in this project.
Here's a pic of the tubes we'll be using. Bike Cad has printed off the miter templates, which I have taped to the tubes as a guide for cutting and fitting them together. Note that the outer tubes (which have no woven outer layer) are for the BB and Head-Tube. As a consequence, we will only use a short piece of each.
As you can see, the three main tubes weight 535grams. This isn't outstandingly light for three reasons: 1) These are untrimmed, the final weight will be less; 2) They have a cosmetic outer weave, which adds weight; 3) I'm building for ride and durability, not lowest possible weight.
Here are the Easton rear stays. Note the molded in cable stop on the drive-side Chain-Stay.
Looking more closely, these only contribute 290 grams including dropouts (but without the derailer hanger or the screws which hold them together).
Here is the Paragon Machine Works Ti BB insert. It's made to be bonded into a carbon tube. The knurling on the outside helps to give it a better bond and resist torque forces from the crank.
And here is one of the two PMW Ti Head-Tube Rings. These allow the head-tube to be milled for a normal (in this case threadless) 1-1/8" headset. Let's say something like a Cane Creek 110.
Ok, we're up to 910 grams so far. Adding joints (glue, epoxy & CF), cable guides, the derailer hanger, water bottle mounts, and screws to hold the stays together, while subtracting for what will be trimmed off the tubes, and I'd say (just top of head) that a 1250 gram frame is likely. We'll see when we're done. But, while that is almost twice what the lightest frames run, it is still plenty light to create a bike that undercuts the UCI weight limits. More importantly, that weight will contribute to its longevity.
Now, just for grins, let me show you a PMW Aluminum BB30 sleeve. I won't use it on this frame, but it does help reduce weight. You can see that it has a spiral cut into the outer surface, rather than the knurling. One nice thing about working with CF, we won't heat distort this sleeve - which leads to post weld machining of BB30s.
Final note, I'll be off the grid (so to speak) for about a week. Therefore, if you don't hear anything more for a while, its not because I've lost interest in this project.
Thursday, August 12, 2010
Shaved Chest and Pasties
That's the answer to the question: What to do about nipple chafing? The humidity has jerseys clinging to chests. I open mine up to better ventilate, and the zipper tends to rub on my nips. After a couple of hours, this gets uncomfortable. On my way home, the answer came to me. Of course, I'm not really going to try that approach, but I might try some chamois cream or bag balm.
Anyway, let's move on...
For almost a year I've been riding Hutchinson tubeless clinchers. They're a little expensive, but I like them. The ride well and I think their rolling resistance is less than clinchers with tubes. These wheels have about 1500 miles on since installing the Hutchinsons.
Until today, I didn't have any sense of ever getting a puncture, or whether the No Tubes sealant was doing much. I did top off the sealant in the spring, but I really didn't know if it was making any difference. About 20 miles into my ride, I got leak. Turned out to be sharp little flint embedded in the center of the rear tread. I heard a sudden whoosh of air, which then slowed and became a series of short whooshes, and then they stopped. As the tire turned, I could feel the jet of leaking air (at least while the whooshing was happening) on my left calf. But, the leak stopped and while the tire was soggy, it was holding the remaining air and not bottoming out.
Judging by the initial leak (Big and sudden), the tire would have been flat before I could stop, were it not for the No Tubes. That impressed me.
I have a little gadget that combines a small pump and a CO2 inflator. Being my first Hutchinson flat, I wanted to see if I could continue to ride without installing a tube. Naturally, I wanted to save my one CO2 cartridge in case I needed to use a tube. So I gave about 150 strokes of the pump into the tire. I didn't seem to do much. I don't think that 300 strokes would have made much more difference. So I set out to see how the tire would fare.
The short story is that a couple of little whoopsie bumps in the pavement burped the air out of the tire and it was time for a tube.
No problems mate! I'm equipped for that. Except it turns out that extracting the tire bead really can't be done with plastic/nylon/whatever irons. At least not the one's I was using and probably not any others either. Any time I got more than about an inch of bead up, it would spit the levers out. And if that didn't happen, then next lever I'd try to use would bend and cause the whole bead to slip back onto the rim. I spent about 40 exasperating minutes like this. Fortunately, I was traveling through a forest preserve, and was able to sit on a picnic table in the shade of a shelter.
The wheels I'm using for tubeless are Easton EA70s, which have proven, so far, to be a good economical wheel. Stan of Stan's No Tubes considers these to be a good wheel (rim) for converting to tubeless tires - which is why I'm using his system with the Hutchinsons.
There is a special No Tubes rim tape which seals the spoke openings (makes the airtight). Then you mount the tires, pour some sealant in (after removing the valve cores), seal things up and pump up the tires. The mounting went just fine, and I set the beads with just a cheap floor pump. I did use levers to get the beads over the edges of the rims (tubeless tires have tight, stretch resistant, beads), but there was no unusual effort or drama (apart from keeping the sealant in the tires until they were pumped up).
Naturally, I wasn't prepared mentally or tool-wise for the idea that normal tire levers wouldn't work. So multiple times I carefully worked the bead into the center of the rim, all the way around, and tried to make the levers work. No good.
Then I had a brainstorm. There's no tube to worry about - so the risk of using "non-standard" tire levers is minimized. I pulled out an ancient park uni-tool (a small box-end wrench with various allen/screwdriver nubs sticking out of the periphery of the box ends), and a folding allen wrench. Using the end of the uni-tool with a straight screwdriver blade in one hand, and a 6mm allen wrench in the other hand, I successfully got that darn bead off the rim!
I shoulda taken pictures of the inside. Some of the older sealer had coagulated in long ribbons, and there was evidence of the sealer working to make sure the rim tape was airtight, along with the remaining liquid sealer. I cleaned the sealed latex, and checked for anything sticking through the tire, and started mounting the tube and tire back on the rim.
Putting the first bead on went by hand. The second wasn't hard either, although its important to push the valve back when starting to get the tirebead well established in that portion of the rim. For the last three inches, I needed the plastic tire irons to remount the second bead - and yes they worked just fine for that.
So I'm left wondering why it was so hard to get the tire off, when remounting it (with a tube inside) went very well. Perhaps I'll never know, but I'm going to purchase some alloy tire irons to replace the plastic ones on this bike. If you try the Hutchinsons (and I to heartily endorse them), you should also carry alloy tire irons ATMO.
Finally, with heat and bugs limiting my shop time, I'm starting to prepare for building another frame - this one from Carbon Fiber. I'm going to try to get the camera working to document some of the processes as I go along. For now, the design is finalized (in BikeCad) and the drawings and specs have been printed. It's time to Measure and mount the miter templates to the tubes, and then start cutting.
The frame is approximately a 57.5cm. Traditional Italian design for handling. The head-tube is a bit longer than most modern equivalents from Italy (actually the extra space is in the form of an external headset), but this allows for the use of a deeper drop handlebar - and a bigger variety of positions.
Proportions will be all in the normal range, and the tubing is round (which is best from an engineering point of view). The headtube will be carbon fiber tube, 41.5mm diameter, with Ti inserts which get milled for the headset cups. The downtube is 38.2mm - strong but not huge. The toptube is 36.3mm, big enough to assist the downtube in keeping thing stiff. And the seat tube is 35mm, which will fit a standard front derailer and a standard 31.6mm seatpost. The bottom bracket is a 42.26mm carbon tube with a threaded (English) Ti shell bonded inside. The tubes are all from EDGE, while the Ti bits come from Paragon Machine Works. Both good folks with which to work.
The rear triangle is my last Easton EC90. To date, I've had good success with these, but it appears that they no longer make them. So future builds will use either Dedacciai or Edge rear triangles.
Anyhow, enough talk, its time to go start getting the tubes ready.
Anyway, let's move on...
For almost a year I've been riding Hutchinson tubeless clinchers. They're a little expensive, but I like them. The ride well and I think their rolling resistance is less than clinchers with tubes. These wheels have about 1500 miles on since installing the Hutchinsons.
Until today, I didn't have any sense of ever getting a puncture, or whether the No Tubes sealant was doing much. I did top off the sealant in the spring, but I really didn't know if it was making any difference. About 20 miles into my ride, I got leak. Turned out to be sharp little flint embedded in the center of the rear tread. I heard a sudden whoosh of air, which then slowed and became a series of short whooshes, and then they stopped. As the tire turned, I could feel the jet of leaking air (at least while the whooshing was happening) on my left calf. But, the leak stopped and while the tire was soggy, it was holding the remaining air and not bottoming out.
Judging by the initial leak (Big and sudden), the tire would have been flat before I could stop, were it not for the No Tubes. That impressed me.
I have a little gadget that combines a small pump and a CO2 inflator. Being my first Hutchinson flat, I wanted to see if I could continue to ride without installing a tube. Naturally, I wanted to save my one CO2 cartridge in case I needed to use a tube. So I gave about 150 strokes of the pump into the tire. I didn't seem to do much. I don't think that 300 strokes would have made much more difference. So I set out to see how the tire would fare.
The short story is that a couple of little whoopsie bumps in the pavement burped the air out of the tire and it was time for a tube.
No problems mate! I'm equipped for that. Except it turns out that extracting the tire bead really can't be done with plastic/nylon/whatever irons. At least not the one's I was using and probably not any others either. Any time I got more than about an inch of bead up, it would spit the levers out. And if that didn't happen, then next lever I'd try to use would bend and cause the whole bead to slip back onto the rim. I spent about 40 exasperating minutes like this. Fortunately, I was traveling through a forest preserve, and was able to sit on a picnic table in the shade of a shelter.
The wheels I'm using for tubeless are Easton EA70s, which have proven, so far, to be a good economical wheel. Stan of Stan's No Tubes considers these to be a good wheel (rim) for converting to tubeless tires - which is why I'm using his system with the Hutchinsons.
There is a special No Tubes rim tape which seals the spoke openings (makes the airtight). Then you mount the tires, pour some sealant in (after removing the valve cores), seal things up and pump up the tires. The mounting went just fine, and I set the beads with just a cheap floor pump. I did use levers to get the beads over the edges of the rims (tubeless tires have tight, stretch resistant, beads), but there was no unusual effort or drama (apart from keeping the sealant in the tires until they were pumped up).
Naturally, I wasn't prepared mentally or tool-wise for the idea that normal tire levers wouldn't work. So multiple times I carefully worked the bead into the center of the rim, all the way around, and tried to make the levers work. No good.
Then I had a brainstorm. There's no tube to worry about - so the risk of using "non-standard" tire levers is minimized. I pulled out an ancient park uni-tool (a small box-end wrench with various allen/screwdriver nubs sticking out of the periphery of the box ends), and a folding allen wrench. Using the end of the uni-tool with a straight screwdriver blade in one hand, and a 6mm allen wrench in the other hand, I successfully got that darn bead off the rim!
I shoulda taken pictures of the inside. Some of the older sealer had coagulated in long ribbons, and there was evidence of the sealer working to make sure the rim tape was airtight, along with the remaining liquid sealer. I cleaned the sealed latex, and checked for anything sticking through the tire, and started mounting the tube and tire back on the rim.
Putting the first bead on went by hand. The second wasn't hard either, although its important to push the valve back when starting to get the tirebead well established in that portion of the rim. For the last three inches, I needed the plastic tire irons to remount the second bead - and yes they worked just fine for that.
So I'm left wondering why it was so hard to get the tire off, when remounting it (with a tube inside) went very well. Perhaps I'll never know, but I'm going to purchase some alloy tire irons to replace the plastic ones on this bike. If you try the Hutchinsons (and I to heartily endorse them), you should also carry alloy tire irons ATMO.
Finally, with heat and bugs limiting my shop time, I'm starting to prepare for building another frame - this one from Carbon Fiber. I'm going to try to get the camera working to document some of the processes as I go along. For now, the design is finalized (in BikeCad) and the drawings and specs have been printed. It's time to Measure and mount the miter templates to the tubes, and then start cutting.
The frame is approximately a 57.5cm. Traditional Italian design for handling. The head-tube is a bit longer than most modern equivalents from Italy (actually the extra space is in the form of an external headset), but this allows for the use of a deeper drop handlebar - and a bigger variety of positions.
Proportions will be all in the normal range, and the tubing is round (which is best from an engineering point of view). The headtube will be carbon fiber tube, 41.5mm diameter, with Ti inserts which get milled for the headset cups. The downtube is 38.2mm - strong but not huge. The toptube is 36.3mm, big enough to assist the downtube in keeping thing stiff. And the seat tube is 35mm, which will fit a standard front derailer and a standard 31.6mm seatpost. The bottom bracket is a 42.26mm carbon tube with a threaded (English) Ti shell bonded inside. The tubes are all from EDGE, while the Ti bits come from Paragon Machine Works. Both good folks with which to work.
The rear triangle is my last Easton EC90. To date, I've had good success with these, but it appears that they no longer make them. So future builds will use either Dedacciai or Edge rear triangles.
Anyhow, enough talk, its time to go start getting the tubes ready.
Monday, August 09, 2010
Summer Time
Went out to the shop after work to start final filing and sanding on a frame.
It was drippingly hot in there. You can tell when parts of your shorts and shirt, which aren't touching your body, and soaked with sweat. It gets awkward when the sweat off your brow is dripping onto the work you're trying to file - it kinda clogs things up.
Having said that, there is something relaxing or even peaceful, about focusing on the task at hand. When first starting, there can be a sense of foreboding regarding just how big a job this will be? But once I start to put a file to the work, this quickly evaporates. Watching the work closely, studying the shapes from different angles, pulling out a riffler to touch up this spot, or a rat-tail to smooth out that fillet, and then sanding the filed surface to a smooth finish.
All the other issues of the day fade away as the work absorbs more and more of my concentration. Little by little, the final shapes reveal themselves, and I take measure of how close they come to my original vision. Variations from that vision don't generally bother me, usually it means that when seen in the flesh, the new shape appealed to me more than the vision. But, the variations also speak to skillfully I can envision in 3D - which is a hard skill all by itself.
Mosquito season has begun. So far, most of them are small: hard to see or hear. Until they've bit, and the venom started to itch, you're not aware of their presence. I had close to an hour of work before dinner, and nearly as much afterward. But then the skeeters started, and it was all over. Unfortunately, at this rate, I can't make much progress. I think maybe I'll try some citronella candles tomorrow and see if they help keep the darn bugs away.
It was drippingly hot in there. You can tell when parts of your shorts and shirt, which aren't touching your body, and soaked with sweat. It gets awkward when the sweat off your brow is dripping onto the work you're trying to file - it kinda clogs things up.
Having said that, there is something relaxing or even peaceful, about focusing on the task at hand. When first starting, there can be a sense of foreboding regarding just how big a job this will be? But once I start to put a file to the work, this quickly evaporates. Watching the work closely, studying the shapes from different angles, pulling out a riffler to touch up this spot, or a rat-tail to smooth out that fillet, and then sanding the filed surface to a smooth finish.
All the other issues of the day fade away as the work absorbs more and more of my concentration. Little by little, the final shapes reveal themselves, and I take measure of how close they come to my original vision. Variations from that vision don't generally bother me, usually it means that when seen in the flesh, the new shape appealed to me more than the vision. But, the variations also speak to skillfully I can envision in 3D - which is a hard skill all by itself.
Mosquito season has begun. So far, most of them are small: hard to see or hear. Until they've bit, and the venom started to itch, you're not aware of their presence. I had close to an hour of work before dinner, and nearly as much afterward. But then the skeeters started, and it was all over. Unfortunately, at this rate, I can't make much progress. I think maybe I'll try some citronella candles tomorrow and see if they help keep the darn bugs away.
Friday, August 06, 2010
Subscribe to:
Posts (Atom)