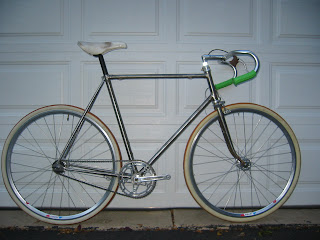
Ok ok, I promised some pictures. So we'll start with a couple of shots of the Path Racer from when I built it up to test clearances. Most of the build is temporary, but the bars, brakes and tires are part of the final product. The tires are large, and even though the brakes have arms of decent length, it's important to see that everything works together. I'm fairly pleased with how everything is coming together, so take a peek:

Here's and image showing the clearance for the tire and easily a fender: If you enlarge the image and look closely, you will see into the underside of the steerer tube.
What you can't see is that this crown has between 4 and 6 hours of filing smooth it out and give it its shape. Originally it was quite asymmetrical and stuck out considerably around the fork tubes.
Because this frame is made from older materials and with older methods, everything about it takes time. One of the nice things, however, is that the older materials are much easier to work. Lugs can be adjusted more easily, shapes can be changed more easily, and tubes can be mitered more easily.
Last night I spent several hours building a chain stay bridge (the last bit of brazing for this frame). It would have been possible to use a pre-formed bridge, but there were two reasons not to: a) With the fastback stays, so much would be chopped off of a pre-formed bridge as to seem wasteful; b) The NOS brakes on this bike expect to fit on a simple tube. There are special washers on the brake nut designed to clamp around the tube.

This shot shows how the washers fit and several other things that we'll get to soon.
Below you can see that the bridge is mitered on each end to fit against the seat stays.

And here you can see that it is bored
 through to take the brake bolt. Also that a water bottle boss has been brazed into a hole on the bottom side (or in this picture the top side).
 And below is a view of the boss head-on:

The boss does create a problem for us. It is long enough to interfere with the brake
 bolt passing through the bridge. Here is a picture of showing the filler holding the boss from the inside of the bridge and you can see how the end of the boss has been bored off to accommodate the brake bolt.
Finally, here is a picture of the test fit of the brake to the bridge. It may look nice here, but going back to the first picture, you can see that the fender boss interferes with the brake washers. Hence the washers will need a little 'adjustment' to make sure that all goes together smoothly.
That's if for tonight, hopefully we can meet again soon!

No comments:
Post a Comment