Saturday, February 25, 2006
The winter of my discontent
Carbon one went to the paint shop about 2 weeks ago. It was going to be ready for decals "...in a couple of days....". As of last Monday, it was to be ready "...by Friday morning..." I should probably note here that I'm trying a local garage & bodyshop. There's a good bike painter about an hour away, but his painting is part time and he's pretty backed up. So it seemed worthwhile to try and find someone who might be a little more focused in case I find some takers for my carbon frames.
The guys I chose have a real old fashioned auto shop. Their building dates back almost to the birth of automobiles. Except in the front and back doors, there are no windows - but the high doomed roof has a row of skylights. The brick walls are painted white, and the garage seems to go on and on, from the front office, the mechanical stalls, the paint booth, the bodywork stalls, and then garage's projects. The later include a couple of muscle cars, an antique Ford tow truck, the rebuilding of a used v-large (capable of pulling semi's) tow truck, and a couple undefined project cars (including an old Nash coupe).
Across from the paint booth, is a sort of a machinist shop. I say "sort of" because most of the machinery has a heavy layer of dust and doesn't seem to have been used for a while. I imagine that the right person could largely build their own body panels from scratch with the available equipment, which includes: Gas and Electric welders, a mid-sized metal lathe, an industrial drill press that must be 10-12' tall, work tables, anvils, and more.
The guys that run this garage can do just about anything imaginable with a car or truck, and tend to be fair and reasonable.
Anyhow, my frame isn't a big job for them, but I'd hoped that they would be a bit more responsive than what I've seen so far. URGH.
Frame 010106 is near to ready for paint. I've begun detail work and can have it ready with one good day's effort. But, I still have to build the fork. I'm going to start with a one built of Reynolds pre-raked blades (45mm) with a Henry James raked (3 degrees) crown. This shouldn't take too long either. So, maybe by next weekend it can go off to paint.
Next is Sarah's frame. I've decided to discard the first effort and start from scratch. There's really not much to save from that heavy (straight-gauged tubing) training exercise. Sarah is very excited about the idea of having a bike with her name on it. We're waiting for the rim and spokes. Short spokes are hard to find and our source is beginning to cut and thread their own which has lead to a delay in delivery.
Meanwhile, I just got a call from Joe. My DCS set is in. This is Dedacciai carbon tubes and lugs, allowing the frame dimensions to be customized a good bit. My question is to figure who to build this for. I can only test out so many of my frames at a time. So, I need someone else who might also pose a bit of a fitting challenge. Well, stay tuned and find out how that turns out.
That's it for now, I'm headed back to bed.
Wednesday, February 15, 2006
Catching Up
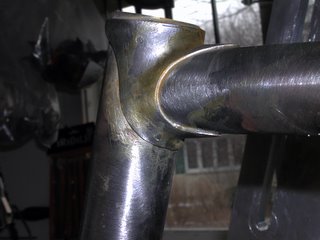
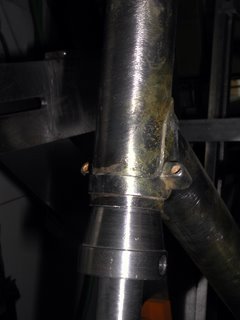
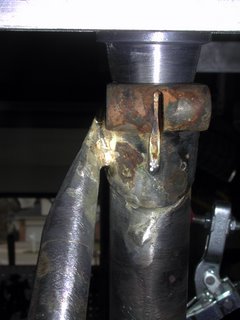
This week has seen some progress. Carbon 1 is in the paint shop. They should call me in a day or two to apply the decals. I'm hoping to have this one built up by next weekend. It'll have a blue/yellow/red stripe - the colors of a local racing club. Carbon 1 will be built up with:
- Record rear derailer
- FSA compact front derailer
- Chorus Cassette
- Cane Creek integrated headset with tall collar
- Deda Power compact crank
- FSA Platinum Ti BB
- Cane Creek brakes with Ti hardware
- Deda Newton Stem
- Deda 215 handlebar
- Deda Super Carbon Seatpost
- Sella Itala SLR 135 w/ Ti rails
- Deda Tape (probably blue and yellow)
- Campagnolo Zonda wheels (I have some Ksyrium SL3's in reserve is the Zonda's are too heavy :) eh)
So, this should build up to a fairly competitive machine.
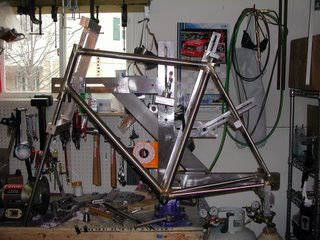
Progress continues on 010106, and some photos are included above. The first shot gives the overall look of the frame in the jig. The next couple of shots show the rear dropouts. I've started to shape them - but will finish filing after alignment/brazing/cleanup is done. I'm going for a crisp angular look.
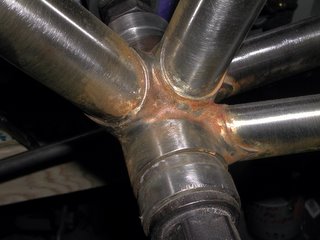
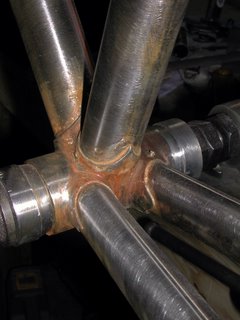
Next are some shots of the BB. This is post soaking (to remove the flux) - and clearly not all the rust has been cleaned off yet. Then there are some headtube shots, and a picture of the attachment of one seat stay.
The seat stay is a story in itself. This is the first time I've tried to use a top eye. For those who don't know, this is a solid plug of metal which is brazed into the end of the seatstay as a way of finishing it. Anyhow, I blew this first attempt.
I got the stay and plug put together and cut to length. I wanted an effect where the end of the top eye was rounded and the backside hollowed out so that it just seems to grow out of the seat lug. After working the top eye to fit like this, I fluxed up both ends and put a ring of silver into the bottom of the stay.
Unfortunately, when the stay was fluxed up, it was hard to tell which side of the top eye was which. I didn't even notice this, and apparently thought I knew which side was which. Whoops! I brazed the bottom end fine (the top was pinned to the seat lug). Then I started heating the top. As the flux became transparent, it became obvious that the stay was on backwards.
At this point, a decision had to be taken: Reheat the bottom and turn things around, or braze the top and file the top eye to a more normal profile. I don't like heating up the dropouts or stays too many times. Its easy to distribute the heat unevenly and cause a bent stay that throws alignment off. So, I chose function over esthetics. There will be another chance to produce the top eye I want.
Looking at the photo of the seat cluster, you'll see that most of the excess metal is removed from the top eye and now I can work on creating a nice flat taper. I used silver to attach the stay to the seat lug. Some people recommend against this, but I flow 56 silver right where the top eye and lug touch, then use Fred Parr's special filet silver to build up around that. So far, this is a winning combination - no problems.
The macro photo with flash hide nothing. Believe me when I say the edge (which isn't yet done) of the joint looks much better in real life. I think this is going to end up being a very attractive joint yet.
The other point of interest is that my joints are requiring little cleanup - after flux cleanup they have nice crisp edges. This is a point that required practice and experience to achieve. I'm not perfect yet, but I'm pleased with my progress.
Well, that's it for now. More soon.
Monday, February 13, 2006
Carbon to Paint
I recently purchased a bench mount Park stand. It's a sturdy piece, but not top of the line. The arm engages in sort of a conical nylon sleeve bearing. I asked Joe B. to make me a mount for my jig that allows it to be connected to a Park stand. Unfortunately, his stand (the pro model) is different from mine.
Well, he sent me a piece to try - and it has me optimistic. I'll send it back for some more work, but it looks like he can duplicate the taper of the cone and then I can directly thread it onto the Park stand. At that point, the jig will mount onto this and be capable of be spun upside down - which should be very handy.
This week I hope to get 010106 finished off. It needs seat stays and some small bits, then it can go to the painter too! So then it will be on to Sarah's frame. Hopefully I can put this together pretty quickly as she's feel impatient with Daddy and the time he's taken. That reminds me, I have to call Gaerlan to see where my wheel parts are. When this is done, I'll probably have to start her twin brother bike, and then one for their older brother. All and all this should keep me busy for a while - but Joe will be shipping me a DCS carbon kit very soon so that will need to be completed too. So much to do and so little time. Anyhow, more pictures soon.
