Thursday, April 28, 2005

Slipping Slipping into the Future

Time is truly a frustration of late, it just slips away. That's really a good problem, it means work is busy and the kids won't have to go hungry.

Last weekend (can it be Thursday already?) I did a couple of filleted joints on a work stand I'm making. They weren't bike quality but were the first time I've had any real success with Low Fuming Bronze. It felt good to turn them out in fairly short order and be ready to attack the next step in building this stand.

This week should be anvil shopping and practice lugged joints (along with painting some new closet doors for my daughter's room). That will keep me busy.

I tend to be a supporter of the Post Office and it's employees. So I ordered a few Cyclus tools and a pair of Mafac brakes from renaissance in Holland. No one was home when the first package arrived on Friday so they left me a slip. Saturday I went to the post office to pick it up, but they couldn't find it. They took my number but didn't call back. Monday I went to the post office and they still couldn't find it, so I asked to file a claim. No can do! Not without waiting 10 days. I asked why and was told that I didn't know the package was lost. Let's see, they tried to deliver it - so we know they had it. They didn't deliver it but don't know where it is. So how can it be anything but lost? Well, they told me that it might have been sent to the regional distribution center by accident. How long should it take to come back? One to two days. Hmmm? Well I still haven't seen it, but my second order arrived. I guess I'll try again at the post office, but I wish that renaissance used DHL or FedEx.

It's been a while since I handled Mafac brakes, they feel good. It's hard to decide whether to use them natural, or to polish them to a real finish. Anyhow, I should have ordered the version that came with levers; the original plan was to use a flat bar but now a drop seems more likely. Maybe I'll order a pair or two with levers just to have the inventory.

That's all for now folks.


Wednesday, April 20, 2005

Time Away

It's been since Saturday that I last touched a tube and it feels like an itch I can't scratch. It's been a busy few days, between work and and extra-curricular activities. No complaints re either, but they haven't left me time to go into the shop.

Last night I was volunteering in the Kitchen at the Curling Club. Its our annual meeting and dinner, after which the season is officially over. That's probably good because curling doesn't wear off the pounds like riding. I've become big this last winter. And, I don't mean famous.

Tonight I'll be going to a Captains Meeting for the MS150. The Illinois Chapter of the Multiple Sclerosis Society uses this ride as their biggest fund-raiser for the year. This is my third year participating and my second as a sort of junior-assistant captain of the Wheeler Dealers. Traditionally we raise the largest total dollars of all the teams, but a couple of other teams are now nipping at our heels. This could be the year we get knocked off our pedestal (that's a good problem).

Chad Smith is the Captain of my team (he's also the guy in the bright jersey pictured with me). He's a good guy and his wife is a real sweety. A few years back Trish got diagnosised with the progressive form of MS (this is a form which only gets worse rather than having remissions). In spite of this, she's an upbeat, friendly, charming gal. So having got connected to she and Chad as part of my first Tour de Farms (MS150), there's no turning back.

Anyway, there's a team captains meeting this evening which Chad can't attend, so I'll sub for him. I've attended these before, and it will be a lot of fun, even though we have some serious work to accomplish.

By the way, if anyone would like to help me reach my fundraising goals, click on the link which will take you to my MS150 page where you can learn more and contribute. Any and all contributions are appreciated, go to a good cause, and are efficiently spent.

This gap in my work may be good. It gives my respirator and lug pins time to arrive - both of which should help me to work better. I've also been discussing technique with a few folks off-line, and have some new tricks to try.

It's time to move on to some other work, so I'll end this here.


Monday, April 18, 2005

Twisted Tubes

I've been mulling over my cut apart joints, also the pictures that Suzy Jackson has shared of her cut apart bottom bracket.

Silver can fit into some tight spaces. Heat is key, but so is knowing where to put it. I'm probably going to try a tip one size down from my 153 (2.2mm), with as big a flame as possible. I want to see if the tip size can concentrate the flame, or if it only limits the size of flame possible.

The review of my lugged joint shows how much the one tube shifted, and its impact on filling the joint. Not good. Once things are fluxed up, its hard to see where the tube should sit. I think that when my pins arrive, I'll be able to better control this and get much better joints.

Apart from this, I'm not very concerned about my filling at this time. I have a problems with excess filler dripping down the tubes and cluttering the lug edges. In terms of strength and safety, this seems like a preferable problem to underfilled lugs.

The more I work, the more apparent it is that my vice needs to be moved. I like its position for filing, and its firmly supported. But, its too hard to work on both sides of a joint when brazing. One possibility is to cantilever the vice away from the work bench, but it seems likely to make the vice less steady. Another is to make a separate stand for the vice and position it in a more convenient postition. Maybe this weekend I can try making a stand.

Meanwhile, I need to miter a few more tubes and practice some more fillets on my workstand.

That's all for now.


Saturday, April 16, 2005


Here you can see the nice radius on right and left but in the center there's merely a transition from the diameter of the mitered tube to that of the main tube.
Copyright R. Guggemos

Fillets this Time.

I had some time today, so I decided to try another fillet joint and then cut it up - pictures are below.

Before going farther, lets describe fillet and lugged joints, in one paragraph, for those who may not know the difference. There are two ways of brazing tubes together to make bicycle frame. Brazing, by the way, is essentially a process of gluing together a couple of tubes where the glue is a metal that melts at a lower temprature than that of the tubes - the idea is to avoid overheating the tubes and thereby changing their mechanical properties. Many brazed frames are built with lugs. A lug is a metal piece that has a circular opening for each of the tubes being joined. It completely covers the area where the tubes meet, and covers some amount of additional real estate on each tube. The lug itself doesn't hold the tubes together (that's done with the brazing material), however it may impart some additional strength and/or stiffenss to the joint. Lugs can be big or small (click on the link to the left for Strawberry Cycles and see how small a lug Andy Newlands is able to produce). Lugs are often decorated either by carving (shaping) them in pleasing way (including putting holes of different shapes through them), or by painting them, or (in the case of stainless steel lugs) by polishing them to a chrome-like luster. The alternative is to work without a lug. In this case a fillet (pronounced fill-it) of bronze is built up between the two tubes. This is filed to a pleasing radius (which may be big or small depending on a host of variables). In the process, a fillet should be formed on the inside of the tubes as well. A fine line of bronze runs between the two tubes (where they meet) and bridges the inner and outer fillets. In this way, the joining tube is encapsulated with bronze for a strong joint.

Working with bronze, I seem to fear the heat some; which was part of my focus today. Starting with the biggest flame available on the 153 tip at 10lbs O2 and 7 lbs propane, I also adjusted it more towards neutral than carborizing. This seems like the right way to get things hot enough for the bronze. I also explored using the side of the flame some of the time. Instead of pointing the flame directly at the rod, I'd run the flame almost parallel to the tubes. This way it was possible to to get a large area very hot (after pre-heating) and edge the hottest part into the rod without seeming to burn the flux so badly. Mostly this worked well where I could reach the work this way.

One thing that isn't clear to me is how useful or even important it is to have the joint suspended in a way that it can be turned upside down and spun from right to left while building the fillet joint. I'm working from an aluminum armature held in my vice to which the two tubes are clamped. As such, its hard to move things around. I had to do some moving because the vice is connected to the corner of the workbench. Certain angles just aren't accessible to work the flame. Anyhow, I may try clamping the armature into my bike stand next and see if the added flexibility helps.

I did one dumb thing with todays joint. I mitered a larger diameter tube to a smaller diameter tube. This results in a pair of ears that extend beyond the outer circumference of the smaller tube. The difference in tube diameters is small (0.125"), but this is enough to make the joint much harder to execute well as you can see in the pictures below. I was also using a strong rod, but one which tends to be more liquid when melted and consequently forms a narrower fillet. This tends to excacerbate the problems caused by the tube sizes I chose.

Looking below, there are a couple of key findings: 1) the inner fillet is large and encircles the joint giving strength all the way around (I used the trick of placing a circle of rod inside the tube before the joint is assembled); 2) where the miter touches the main tube, a nice fine fillet formed which files to a pleasing radius; 3) where the miter gaps from the tube, the fillet only forms a nice transition between the tube, leading to a less strong joint.

My summary, I'm getting closer to being able to create functional joints either with lugs of filleted, but still need some improvement. I'm going to try a couple more head-lugs and then move to practicing on a BB. These will all get cut up to determine if that improvement is occuring, or if I need to keep at it.

Cheers

Here you can see that the mitered tube (1.125") is bigger around than the main tube (1.0"). As always you can click the picture to enlarge it for a better view.
Copyright R. Guggemos

The interior view of the joint. Fillet all the way around, but a bit heavy on the Bronze on the right side.
Copyright R. Guggemos

Top layer showing a nice internal fillet and adequate encapsulation of the miter.
Copyright R. Guggemos

2nd Layer showign the transition away from full encapsulation of the miter.
Copyright R. Guggemos

Here's the bottom layer.
Copyright R. Guggemos

Here's the bottom of the joint showing encapsulation of the miter with bronze.
Copyright R. Guggemos

Friday, April 15, 2005

Looking Inside the Joint

I tried using a smaller flame on my upper lug. Not as much silver slipped down the tubes this time, and the flux didn't get burned. But, it actually seemed to be harder to work the filler around. I did limit myself to inserting filler in only 4 places. So, all in all, it feels like I've made some progress. I am, however, going to try a flame midway between what was used on the 1st and 2nd joint.

After cleaning things up, it was time to start cutting. For the most part, I was satisfied with what I found. One of the tubes apparently shifted in its lug prior to brazing. This resulted in a bit of gap between the two tubes, even though the miter had been carefully fit. The lugs are of the pressed variety and therefore leave a bigger gap around the miter. For the most part this filled better than anticipated.

The couple of spots where there appeared to be a gap on the shoreline didn't reflect gaps on the inside. Yipee!!!

On the downtube, I borrowed from the method Fred Parr recommends for filleted joints. That is to put in a circle of brazing material prior to brazing the joints. Sure enough it melted and made a nice little fillet around the inside of the joint. It may be overkill, but if I can get better at forming this ring, I'll use it on all the frames I do.

The bottom line is that I'm mostly satisfied with the joints. Once I start pinning them, I don't think I'll have the problem of tubes shifting. Other than that, the fill of brazing material looked adequate to make a strong joint. A couple of more lugs will tell me a lot, but I think its time to focus more how to be economical with the filler (and simplify my cleanup).

Stay Tuned.

Without the flash, you can better see the silver between the lug and tubes on the right. All pictures can be clicked on to enlarge.
Copyright R. Guggemos

I was worried about maintaining contact between the tubes while brazing, and sure enough....here's a gap between the tubes, on the left the silver covred the gap, but you can see air space on the right.
Copyright R. Guggemos

Here's part of my problem child. You can see the unfilled gap in the circle.
Copyright R. Guggemos

The shadows are deceptive in this picture, there's actually good coverage of silver between the lug and tube.
Copyright R. Guggemos

Filler between the lug and tube
Copyright R. Guggemos

Here's one side of a miter - you can see parts of 2 tubes + the lug. On the top side the fill is great, on the bottom its only ok, not covering the big gap.
Copyright R. Guggemos

Here's the other side of the miter looking well filled.
Copyright R. Guggemos

Silver doesn't fill all the gaps in a pressed lug, but it does an ok job.
Copyright R. Guggemos

Hard to believe that these fit together neatly before being cut up.
Copyright R. Guggemos

I'm feeling like a real cutup.
Copyright R. Guggemos

Side view.
Copyright R. Guggemos

Here's the tight junction between the top and bottom tubes. It's tight because the lug set is for a mixte.
Copyright R. Guggemos

It looks like as much filler spilled doing the top lug as with the bottom. But, actually it was only half as much. :)
Copyright R. Guggemos

Is this supposed to come apart like this?
Copyright R. Guggemos

This looks ok.
Copyright R. Guggemos

Sliced throgh the lower point of the lower lug. It's well connected. You can also see part of the miter with good fill.
Copyright R. Guggemos

Here's a slice where you can see silver filling the miter away from the lug. Again the shadows are deceptive.
Copyright R. Guggemos

I'm trying cuts from many directions - this one is good.
Copyright R. Guggemos

Another good one.
Copyright R. Guggemos

A little super-glue and its back to normal.
Copyright R. Guggemos

Tuesday, April 12, 2005

Jiggedy Jigs

Its interesting, there have been a number of nice notes regarding the site from want-to-be framebuilders who haven't taken the first step yet. The old saw is that an expert is someone who knows one more thing than you do. Some of the questions received may prove the point. But, perhaps my lack of expertise is what make me an approachable source? Anyhow, I'm happy to share my knowledge and opinions and will try to distinguish between the two in my replies. Everyone is free to ask questions - but should understand that I don't have all the answers. Fair enough?

I've been asked about jigs (this post may be of little or no interest to the established builder) and it seems likely that every soon-to-be framebuilder thinks about this a lot. I certainly did. To begin with, one either works on the floor, a welding table, or with some form of jig. Let's face it, welding (brazing) on the floor is crude and rude. For many, a welding table is just one more thing to buy and thus an impediment to getting started. So the jig is already sounding attractive. Then there's the question of alignment. Without a jig, how will anything be in alignment? One may even believe that holding the frame pieces firmly in their aligned positions until cooled will result in minimal cold-setting. This makes a jig sounds pretty good.

Of course, not all brazing (or welding) can be done in all jigs. And in reality, the authorities I've consulted (don't expect me to footnote a silly blog) are quite clear that primary (my term for pre-cold setting) alignment is achieved by: 1) careful fitting of tubes, lugs, and bits so they are aligned in their pre-brazed state; 2) fixing (pinning or tacking) the joints firmly, but with minimal heat, in this alignment; 3) carefully heating the tubes, maintaining symmetry in the application of heat, and careful cooling of the frame. It seems that the most key aspect of this is the heating process, which by the way is helped by applying heat for the minimal time necessary. None of this speaks to the use of jigs. So, the intuitive approach of new-to-be builders is probably a bit off the mark regarding jigs.

That said, something is required to help make sure the parts of each joint are properly aligned. As Suzy Jackson has so ably demonstrated (as well as have many before her), the solution can be as simple as a straight, stiff, piece of aluminum of sufficient length. I especially like her approach to the rear triangle. If you haven't visited her site, you should. Considering the startup costs, unless one already has a basic metal-working capable workshop, jigs are probably an unnecessary initial investment. They have the potential to help make the process faster, and if you're building for a living this could be critical. For myself, a lug mandrel seems more important - so that one can hold the lugs without damage while working them to a proper fit around their tubes.

My journey is beginning with the use of a beam made of 80/20 extrusion.

But, let's further explore this jig thing a little further. I've had some discussions with Doug Fattic about his English jig, and feel like maybe this has opened my eyes a bit to the options for and goals of a jig.

First let me say this is not the place to debate what's a fixture and what's a jig. The term jig is being used here with a broad definition. For my purposes, the beam I use is a jig. It helps hold pieces in their proper relationship to each other for assembly. But is that all a jig can or should do?

What about facilitating properly spaced/angled/centered miters? How about laying out a design, and establishing the relationships between different pieces? Certainly Anvil and Bringheli and others offer jigs to help cut tubes - some of which are quite specialized. But generally, I think most soon-to-be builders are thinking about building jigs. So, let's focus on them.

Most of the building jigs I'm aware of, both commercial and homemade, work based on a vertical alignment of the frame. They may allow all sorts of motion, twisting, tilting and swiveling in order to make better access to the various joints, but they start with an essentially vertical orientation. The jigs also allow a variety of motions for the tubes and fittings of the frame- the basic geometry of a bike frame may seem simple, but the diamond frame has few instances where a single variable is independent and any jig design has to account for this. How this is done may be more important to you as a builder than the various movements and access holes that are commonly advertised.

Take for example the matter of BB (bottom bracket) drop (I don't use height because it is dependent upon the wheels and tires installed). In the case of a bike with a level TT (top tube), lowering the BB has the effect of making the HT (head tube) shorter and brings the TT closer to the ground. If a jig clamps the TT (some do and some don't), then these clamps must move with the ST (seat tube) BB combination. Moreover, if the TT clamps to the jig, then there must be a mechanism to establish and lock its height above the BB, as well as a mechanism to adjust and lock its angle (if compact frames are desired).

One might ask, well why have the complication of a clamped TT? There are two reasons: 1) unless lugs are being used, the TT can be easily bumped ajar until its been tacked; 2) clamping the TT means that there is a mechanism to sight against the HT to determine its proper length. So, now the question is: haven't you determined the HT length in the design process when you did your drawing. Indeed this is a reasonable way of doing things and to my mind a necessary method when work is based on a beam. But, with the right configuration of jig, its possible to create the design directly on the jig.

This is where Doug Fattic's approach comes in. His jig allows for clamping all of the tubes of the main triangle. It maintains the necessary inter-relationships between the parts while allowing for the requisite modification of tube lengths, wheelbase, BB drop, etc. This jig is used lying down on an alignment table, and has inscribed measures of length and angle throughout. So, Doug can position his seat, handlebars and cranks on the jig - and adjust their relative positioning to achieve the fit he's looking for. Then he can review the various angles, heights and tube lengths to ensure that he obtains the handling he seeks. Finally, he can read off the angles and lengths he needs to cut his tubes appropriately. In the end, he hasn't had to use a piece of paper, but has designed the whole frame on the jig. Pretty neat. I would suggest that an added advantage is that the tubes are held in place by gravity. Yes he clamps them in, but setting things up, he sets the tubes on their v-blocks and they stay in place. Little or no possibility of dropping a tube on the floor. Try that with a vertical jig.

Is Doug's jig the ultimate tool? Probably not. It provides no support for argon purging, so it isn't a particularly good place for tig welding. It is not intended for welding or brazing up joints. Rather the joints are tacked or pinned, and the frame is lifted out of the jig, set on a bike stand or in a vice, and brazed from there. Is this the fastest production method? Probably not, as Doug will attest. But to do his sort of one-of-a -kind building, his jig not only helps him achieve good primary alignment, but helps his whole design/specification process. And, he feels that this nets out with a faster process for him.

Note: I don't know of anywhere that you can buy an English style jig. Doug is looking at developing and publishing a plan based on 80/20 extrusions - which may someday be available for folks to build their own.

Going back to the vertical jigs, they're not a bad thing. If you prefer to plan on paper or a computer (which gives you the option of saving the design), a vertical jig works fine. Some do provide argon purge for TIG, and some have the necessary standoff to braze/weld on the jig.

Other considerations: 1) Do you build a fork first and design/jig around that?; 2) Does the jig design work from a dummy headset requiring you to cut your headtube to length, or is the HT set on cones which can be distant form the location of the headset cups? Some builders prefer to trim the headtube as one of their last steps - this allows some flexibility for unexpected fork dimensions, plus the excess tube provides a place to feed the rod in while brazing the head lugs. 3) If measures are built into the jig, are they accurate? Is there a way to reset them to allow for wear etc.?; 4) What dimensions (wheel size, rider size, tube diameter) of frame do you anticipate building over time, and are these covered by the jig?

How heavy is the jig? Does it come on a stand? Is it balanced/counterbalanced so when you whirl it around - it will stay where you want it? How easily is it locked into a precise position? How long will the locks last? Is there a risk that the locking mechanisms may distort the jig?

There are lots of things to think about before selecting a jig. I probably haven't listed most of them. The key thing is that the jig will define how you work. To the degree that you've done some building and have some opinions regarding how you want to work, that will be an advantage in deciding if and what jig to buy. In the meantime, a stout beam (one that can be clamped tightly in a vice as it cantilevers out, holding your frame in position to braze) is probably the best way to start. IMHO

Cheers

Monday, April 11, 2005

Blogitis - and my building goals

Seems like I have blogitis now that this site is set up. Probably it will calm down after this is up for few days. Anyhow, it seemed like a good idea to share my first building goals.

I like a nice handling bike. To me, that means no-hands is easy even at lower speeds, and that the bike seems to just fall into the corners as if it were on rails, but it's still easy to steer in the corners when the unforeseen is spotted. Years ago I had a PX-10E (vintage '71-'72). It handled pretty well, but I found that the beautiful (haven't yet seen on prettier) Stronglight crank seemed to have soft chainrings. I was 6' and 155 lbs at the time an I bent a couple of 52s. Plus the frame was a little small.
So I saved my money, sold the Peugeot and bought and built up a Bob Jackson Messina. This was quite a feat as I was a starving student at the time. The bike was pretty: mustard yellow frame with black headtube and black seattube panel. It had the old "Bob Jackson" block letters. Big ones on the downtube, small ones on the front of the toptube. A mix of japanese components (including slick racheted Sun Tour bar end shifters) finished it off. Once I upgraded from a Nylfor headset to a Tange, it too handled pretty well. After some years, my home was burglarized and I lost the BJ. The sad thing was that I spotted it in use (it was hard to miss) several times, and I saw it hanging on the wall in a bike repair shop that had a reputation as a fence. But, the Chicago police had bigger things to worry about so I turned to my insurance.

A Specialized Sirrus was next - a Red 12 speed with rear indexed shifting on the downtube, a heavy frame of generic butted CrMoly, it handled very well. It was cut as a crit bike and handled faster than I liked - it was a bit nervous after about 75 - 80 miles, but it definitely felt like it was on rails in the corners and yet it could be steered. The problem was a stiff ride. Now the BJ was less plush than the PX-10, and this was less plush than the BJ, so combined with my rising age - it could be a literal pain in the butt. After a while, I read the magazines and found that Carbon was hot (or is that cool)! It was stiff and solved every comfort complaint ever uttered by mankind! Trek had a model combining 3 carbon tubes with aluminum for the best of all worlds (heard that one lately?) - and Campy's first working version of Ergo. I've been riding it ever since, but I've never liked the ride or the handling. Its never felt good no-handed. Corners are fine, but I feel more cautious on it than prior bikes. Probably should have just moved its kit over to the Specialized.

Anyhow, ever since my dream has been of a comfortable bike with impeccable handling. Over the years, my sense of what works and what's marketing has matured. The value of wider tires is clear - my new bike will be on 28s but will fit 32s or maybe 35s. People never believe me that wider tires aren't slower. I pull up next to them at the top of a hill, match speeds and then coast using the same basic bike position - no one ever goes faster or farther than me, and many fall behind until they pedal. On 10 year old Veloce (hardly high line stuff) kit! My hubs get overhauled every 12-14 months regardless of need. My tires typically run at or below 100psi. On 25s (the biggest the bike can hold, I use 95 in back and 85-90 in front. Even at 200 pounds snakebites aren't a problem, and I'm the coasting king. So, big comfortable tires are in.

Various sources are further shaping my ideal. Jan at Vintage Bike Quarterly recently looked at handling and introduced the concept of pneumatic trail. My tires will be 700c (650B is too much hassle for me and 26" look to small), but my take is diameter is not a big factor except for how to fit things together. My buddy with a Bike Friday has no trouble keeping up while coasting despite the little wheels. I like the 700c Herse's and Singer's in Jan's article and think I'll copy one of those geometries. This should give me the ride I'm looking for and even throws in a cool old-fashioned fork bend (lots of curve located low on the fork blade).

At 50, I prefer my bars a little higher so a traditional quill stem is called for. Its probably time to return to a Brooks saddle but this time one with (shhh, don't say it) springs. I'm looking at going with a geared hub. Its a real disappointment that the Nexus 8 speed isn't available in North America this year. And it's huge disappointment that the Rolhoff costs a grand USD! Looks like it'll be a Nexus 7 speed. I think a single cog drive train looks cool - maybe even a chainguard, but living without gears isn't in the cards. The dropout plan is traditional horizontals with a derailluer tab. This makes for versatility, plus I could put on a chain tensioner that would allow for two chain rings on the front and a broader range of gears. If I go this route, it would probably be sans front derailleur - shifting shouldn't be that often that stopping would be a problem (at least that's the current thinking).

A pair of NOS Mafac centerpull brakes is on order, don't know of any better stoppers and they're light. I haven't settled on a handlebar yet or brake levers - we'll just see as things come together. I've played with a number of color schemes, but that isn't settled yet either. And I have two different decal sets designed, but I don't know which I'll use (it'll depend on the paint scheme).

My first project is a distinctly old-fashioned bike. It seems appropriate, if the bike is retro enough for steel and lugs, then let's do it big. Now you know as much as me, so you can watch my progress from an informed position.

More in the future.

BFT Headset Adjuster
Copyright R. Guggemos

Quill Stem on Aheadset

Thanks to everyone on the list for their input re how to make a quill stem work with an aheadset. Mark Stonich wins the prix for finding the most elegant solution. He's pointed me to the BFT Headset Adjuster (picture to follow) available from Calhoun Cycle. I think I'll be going with this solution, at least to start.
Fred e-mailed today. He actually replied yesterday despite lots of activity in his office, but my spam filter occasionally grabs and holds his messages ransom. I'm confused, he doesn't show up on any of the filters (msn.com, Outlook) and he is on the the safe lists. This must be one of the unknowable aspects of the information age.

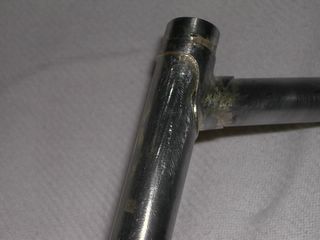
Anyhow, Fred seemed to think the joint represented a credible start, just need to keep the tip farther out of the work - I find this encouraging. It seems likely that with some practice, keeping the tip back will become second nature.

Its been a long time since I handled a torch, and that was just for welding. In just in the short time I've been working at this my comfortable level with managing and directing the flame has risen significantly.

So, its off to prep some more joints. I'll start with putting a top headlug about this one and see how well I can keep them aligned (while not charring this one). Then it'll be time to cut them up and see how they filled out on the inside. Given the lugs are stamped, they have a bit of extra space (void) around the actual tube miters - it will be interesting to see how the silver handled this.

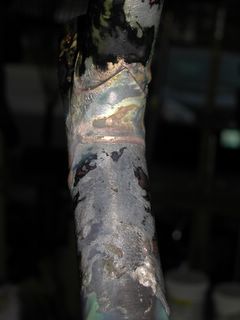
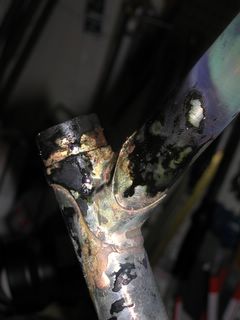
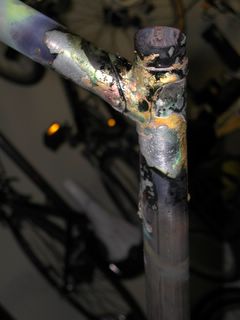
Looking at the pictures, some of them could be blown up, cropped and made into abstract "art" with all the curious colors swirling around. I'll have to get out the photo editor and play with that one of these days. There may even be a touch of a Landshark paint job in hidden in there.

Anyhow, its time to get off to the shop.

This was the side w/o much charring
Copyright R. Guggemos

Head on
Copyright R. Guggemos

From the front - I had to take of quite a bit of excess silver here
Copyright R. Guggemos

Once again showing the out of round socket and another gap
Copyright R. Guggemos

Here's a different exposure
Copyright R. Guggemos

Again, the gaps are evident
Copyright R. Guggemos

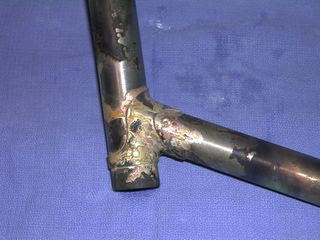
Well, this is out of sequence, but where does the blue and green coloring come from?
Copyright R. Guggemos

After Cleaning - this lug will be cut up - so no fine polishing
Copyright R. Guggemos

The backside is cleaner, but shows a gap
Copyright R. Guggemos

The reverse side - see the big drip
Copyright R. Guggemos

More evidence of overflowing silver - that Saf-T-6 just flushes off with a little warm water
Copyright R. Guggemos


Copyright R. Guggemos

Click to see full size - the down tube socket shows signs of being less than round
Copyright R. Guggemos

A drunken sailor must have drilled that off center hole
Copyright R. Guggemos

Nicely glazed flux on this side
Copyright R. Guggemos

Whoops, that's a might big drip of filler
Copyright R. Guggemos

Straight Gauge 4130 Tubing with old fashioned pressed lugs
Copyright R. Guggemos

A little crispy with the flux
Copyright R. Guggemos

Lovely colors
Copyright R. Guggemos


Copyright R. Guggemos

Sunday, April 10, 2005

A long wait.

After almost thirty years, I've finally begun to move forward on my dream of learning the arts, craft and science of building bicycle frames. Until recently, my knowledge has been theoretical and largely from secondary sources.

Over the last six months I've developed a number of primary sources, due in large part to the generosity and support that the professional community of framebuilders shows to would-be and less-experienced builders. Many of the leading lights in the frame building community support both a list-server and a blogging website as online exchanges of information and training. And from these contacts comes the opportunity for more personal relationships to develop to further help people such as me become qualified at frame building. I am grateful to all who support this transfer of knowledge.

I am using this site to document my experience and help learning, both for my own reflection, and hopefully to help inspire and develop skills for others to become frame builders themselves. It will contain photo's that may entertain some, and will be used to solicit feedback and learning from the masters of this craft. I have no lathes or mills, limited jigging, and only the most basic bicycle specific tools. This isn't a move toward monastic self-deprivation. Rather, its an economic measure that will be overcome with time and experience.

I have invested in the best torch apparatus that I can afford, as I feel that this will be one of my key tools of the trade. Freddy Parr has been instrumental in helping me to acquire same and in developing my skills as a brazer of metals. A quick call to Fred and an insurmountable problem become history - although my skills still aren't ready to build an actual frame, much less a threaten any established builders (even of the hobby persuasion).

So far, I've begun by filing miters, just to learn how to handle a file and achieve a specified angle in a specified location on the tube. I'm getting half way decent at this, although not particularly quick. I've began brazing with simple lap joins in 22 ga. sheet metal. I've also done 2 fillet joints that seem successful (after 4 clear failures, but I'm not cutting these apart - they're being used to make a work stand - when that's done, my fillet joints should be pretty enough to cut up). I've also done my first lugged joint.

Pictures of the latter will be up shortly, showing post-brazing, post-flux removal, and post filing. There are problems with this joint. 1) I flowed to much material (silver) through the joint and down the tubes (I seem to have trouble seeing what's going on confusing flux for material and vice versa); 2) Some gaps in the edge of the joints; 3) Some burning of flux (which may be related to the gaps) due to bringing the torch in too close and not moving it enough. Experts are welcome to share feedback that will help me make better joints.

That's probably all for now. Come back and visit again sometime