Monday, October 06, 2014

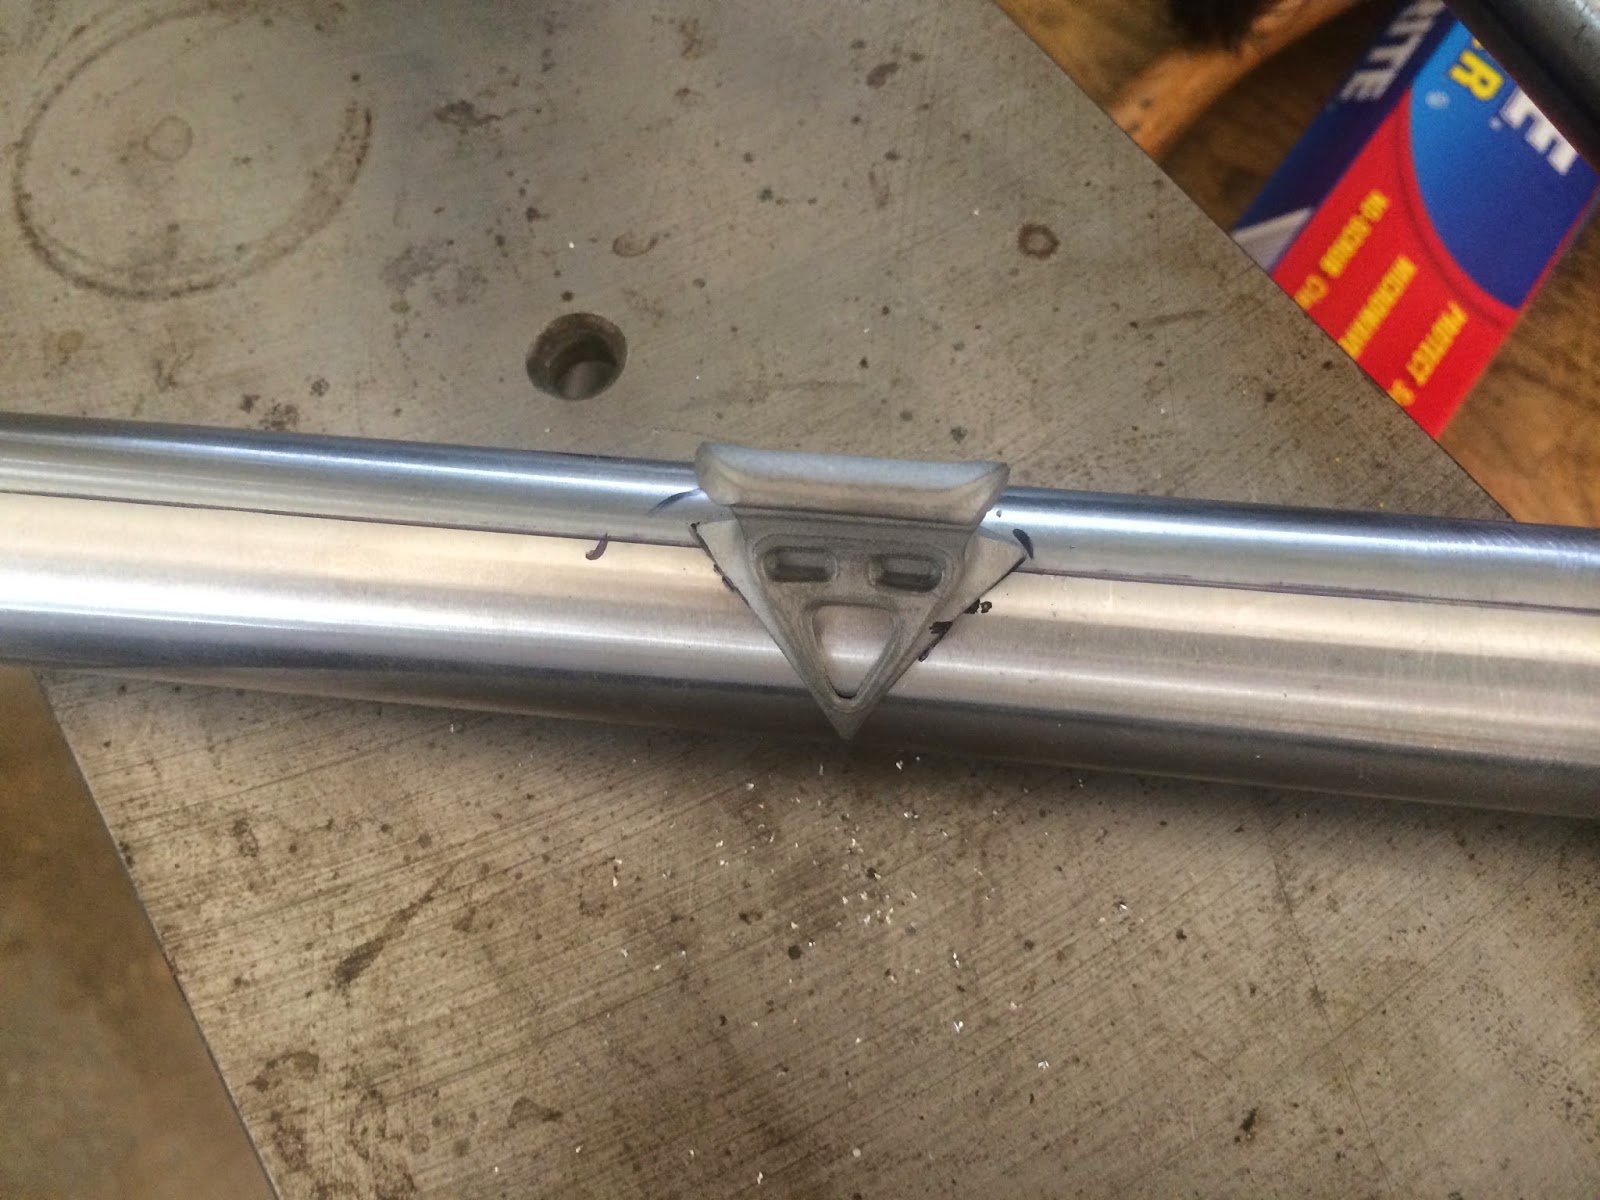
Here are a couple of pix of brazes on the chain stays:


Thursday, September 25, 2014

More cleanup prior to assembling the rear triangle.

The lugs are mostly filed,the  remaining dreck is gone from tubes.


The front triangle was placed back in the jig, and fell right into place - it looks like everything went together evenly.


The head tube and seat tube are cut to length and rough filed (not faced).


Started to fit chain stays.


It's beginning to look like a bike.


For the curious, at this point, the front triangle is 1.25 KG.


Tuesday, September 23, 2014

Pictures from 2 sessions.  Brazing and Filing, as follows.

Front end pinned and starting to flux it up.


Camera in one hand, torch in the other.

Despite bending the BB to tighten the ST/DT angle, when I started to reassemble the frame, the seat tube wanted to pull back.

A little heat on the front pulls it a bit forward and eliminates the tension.


Here's the seat lug pinned and fluxed.


The seat cluster was only pinned on one side, so I gave it a tack.  And spilled some filler.


The jigs centering cones get in the way of pinning the bottom lug edge, so a tack there as well.

Here the seat lug has been brazed, soaked, wire brushed, and is beginning to be filed.  Al little excess filler was drawn through both ports.  In general, however, the shore lines are nice and crisp - shouldn't be hard to clean up.


And here's the upper head lug at a similar point in the process.

Sunday, September 14, 2014

Back at it on a Sunday afternoon.  No quite as many pictures this time, as you'll see.

Got the BB mounted to the ST, and put the pulley mount on the ST.


In this pic, you can see that I pulled a bit too much brass through the drive side.  But, that's better than not getting complete fill.


Then it was on to the fork.  Start by sanding surfaces clean before brazing:
Here is the steerer after prep


And the crown is now brazed to the steerer.  The crown has a ledge on the bottom that the steerer butts up to.  I cut a pair of openings in the ledge to make it easier to feed the filler wire.

This is my first fork with separate reinforcing tangs.  
There is a pocket in the crown that allows the reinforcer to slide in next to the fork blade.  


You can see the pockets here.


Here the reinforcers are in place.


Apart from more fiddly fitting, there's the question of how best to approach brazing.  


There are three (or more) different weights of metal in play.  The reinforcers are quite thin.  The fork blades are medium weight, and the crown is quite thick.  Moreover, the crown has some delicate curlicues, the points of which are sharp and sensitive to heat.  

This picture better shows how a vise holds the jig while brazing.


It's just waiting for the torch and filler.

Here its been soaked, and I've begun cleaning it up.  


I'm reasonably satisfied with how it came out.  The next one will be better.

That was it for metal work today.  However, it was time to make a repair on my alignment table.  The handles of the nut (giant), that holds the BB in place, are made of what appears to be Bakelite, or something similar.  On two occasions, this has got away from me just as it reached the end of the threads, and fell on the floor.  The whole piece weighs several pounds, enough to break a handle when it falls.  Of course, each time, it landed on a different handle.  

After each incident, I've epoxied the pieces back together, and they've seemed to hold.  However, I wanted a stronger solution.  Today I sleeved the handles with knit CF tubes, I'll probably put another layer on in the future.  Right now, the epoxy is curing under a wrap of electrical tape (sticky side out).  Holes in the tape allow excess epoxy to squeeze out as you see above.


Tuesday, September 09, 2014

Got a few things done before work today, so you get some pictures.

After taking the front triangle out of the jig, I checked the alignment as pinned.


Everything was within a mm or less.  Next the top tube came off:

 
The tubes need to be marked where fittings will be added.  In this case, not to many bits.  A pair of triple cable stops on the top tube, and a derailleur hanger, pulley mount, and cable stop on the seat tube.  The plan is for the top tube to look like the below.
 And here it is after a quick soak:
The filler is Fred Parr's Fillet Pro from Cycle Design, and the flux was Stainless Light.  This gives good flow underneath and a nice little fillet around the edge.

The front derailleur hanger is from Richard Sachs.  His have a nice touch, an alignment nub which locates the hanger during brazing without any clamps or other holders.  You can see the nub below:
After drilling a hole in the proper location, the hanger will happily sit on the seat tube all by itself.
After some filler and a soak:
The following pix are out of sequence, the front triangle is still pinned together.  They show places where the lugs aren't fully conforming to the tubing, and need to be brought into line.
See the gap?

And below?

And that's it, what I did this morning before going to work.

More soon.


Sunday, September 07, 2014

I recently made the move to an iPhone based on a 1/2 price sale.  The biggest driver was the camera, and now I have a convenient way to document building activities.  Hopefully posts will now be more frequent.

I'm working on a cross bike at the moment.  The lugs are Newvex, meaning that they're probably silly ornate for cross bike.  Still, it'll look nice.


 All the curlicues require clean brazing.  They can't be cleaned up later.

From there, its on to fitting the DT to the BB.  Start by fitting on jig, and setting up pins.  Then I can take it off the jig, and registering the tube to the BB with the pins, scribe lines off the BB.

That's blue layout dye on the tube, but sometimes a black marker works just as well for a scribing medium.

Originally, I planned to use Reynolds 631 but the tube was too short.  That surprised me as the frame isn't that big at 57cm, but I grabbed a True Temper Versus tube and problem solved.

You can see the scribed line below.  Look closely and you'll see one of the holes for the pins.

For this joint, I trimmed with a hacksaw before breaking out the files.

Sometimes trimming first is faster.  Depending on shapes, the hacksaw might be replaced by a rotary tool with a cutoff disk.

OccasionallyI'll use a sanding drum on a bench-top drill press, although generally this is only something I do with carbon tubes.

Here's the trimmed tube:


Now comes my favorite tool: a Grobet USA 14" bastard cut half-round file.  

This is a file that fears no tube (although some take longer to due to being hardened).  

For today, its short work, followed by a little finishing with a 12" 2nd cut and an 8" bastard cut.


Here is a tube, coped to the scribed line.  That, however, isn't quite what we need.  Scribing often involves positions and angles that don't allow the scribe to get right into where we want it.


Now it's time for a test fit, and to determine what needs to be cut back.


The first image was too dark, even using the fancy phone.

Here's a try using an LED bike headlight.  It's better, but probably doesn't show you what I saw, so lets try another angle.

Below you can see that the bottom side of the tube is a bit long.

Small matter, just a few more strokes of the file before its done.  Note in the picture, the BB is again pinned to the tube to ensure proper registration.

So at this point, it was time to trial the seat tube.  The angle between it and the DT, as cast into the BB, was a bit off.  I could force things together, but don't like to build that kind of stress into a frame.

It's time to adjust the BB.  The BB is a pretty heft casting, it's not really going to adjust  very much.  Primarily, the ends of the sockets will move, and the inner socket will then allow some movement by the tubes, so all will be well.

Doing this requires some big heavy bars (I think mine came from Omar at Oasis Cycles).  

This pic should offer a sense of the scale of the bars.  They're solid, with copes built-into the ends so that they can fit together inside the BB or a lug.  

Prop one against the floor, and find a 200 pound weight to hang off the other, and shortly the adjustment is complete.


Often, though, adjustments are necessary to maintain a tight fit of the the socket around the tube.  Spare the hammer and spoil the BB.  It's what I say.

Mounting things into the jig now shows that everything fits together without springing any of the tubes.

And after removing from the jig, we can look at how the seat tube and down tube come together in the BB.

Mind, the seat tube hasn't been fitted for anything but its angle (which is steep on this frame).  

The cope on the bottom will come next, but for now, the square end makes is easier to see how well the tubes fit together.  And they look fine.

The next pic is fun because its hard to see what's going on.  Well, that's what I think.

All of the lugs suffer from oval openings.  In part, this has been corrected by squeezing the longer diameter to make the holes rounder.

This doesn't always work.  For example, the seat cluster is a fairly rigid casting, with the TT socket and seat bolt ears providing a bit of triangulation around the seat tube socket. 

These accouterments also make it impossible to find purchase in the vise for the required squeeze. 

At these times one just has to file away metal to achieve the necessary round bore.  Although it occurs to me now that an adjustable reamer might be worth a try in the future.

To file the backside of the ST bore, the lug was laid on its back, on top of the vise jaws, with the seat bolt ears firmly clamped in place.  


But, I'm no good at filing up side down, making it difficult to file the front side of the bore.  

Luckily, those rigid seat bolt ears can also be used to secure the lug under the vise jaws.  And yes, I could put my weight behind the file while opening up the front of the bore.  

Apart from opening bores on all the lugs, I drilled the vent holes in the head tube.  For those not familiar, a hole is placed behind the lug that provides an open path from the head tube into the down and top tubes.  

This helps the flux removal soak be more effective, and ensures air circulation for the life of the frame, that limits condensation and thus limit internal rust.


The holes are drilled using progressively larger drills until the required diameter is reached.  

In this case the required diameter is 1/2", because that's my largest bit.   

Below is a finished hole.

Some of you may recognize the tubing clamp as being from a Park stand.  I use a table mount Park bike stand as a quick clamp for tubing.  

A lot of drilling, sawing and filing occurs here.  It's much quicker than tubing blocks, albeit not quite as secure.  

When brute strength is employed, I generally revert to tubing blocks and a heavy bench vise.

By the end of the day the front triangle is test fit together with all joints coped and lugs in place.


The top tube lugs still need more pin holes set, and the vent hole in the ST is yet to be drilled.  However it feels like a productive five hours.

With this done, I'll focus on cable stops and the front derailleur hanger.

At that point, I can start brazing up the front triangle.

Meanwhile, you can see that work has started on fitting the chain stays.

Stay tuned. 

Friday, October 25, 2013

Yesterday we covered the Light and Motion vis 180 rear (red) light.  To summarize, I like it but don't take it out in the rain.

Today, we'll cover the Cygolite Hot Shot.  Its described as a 2 watt LED tail light.  That doesn't really mean anything to most riders, because there isn't a standard rating for the brightness of bike lights.  And, wattage can be an especially fickle predictor, because of the question of the efficiency with which a bulb converts watts to light.  But, lets not hold this against the Hot Shot.

Independent tests have claimed the Hot Shot is the brightest tail light outside of a De Notte (which are known for their effectiveness in bright Los Angeles sunshine).  So that's a plus.  These same reviewers suggest that the vis 180 has a broader spread of light, and perhaps offering better visibility/safety as a result.

Naturally, which light is better depends on what one is trying to accomplish.  Cruising Ventura Blvd at noon, the side view of the vis 180 isn't going to be of much use.  But the rear view of the Hot Shot may be.

The Hot Shot is inexpensive, running half or less the cost of the vis 180.  Given my foregoing comments, why isn't it my favorite tail light?  Well, how should I say this....  It's cheap.

While the vis 180 case is well sealed, the Cygolite appears sealed.  What's the difference?  Seams that look like they could be easily damaged and caused to leak.  A large, loosely fit plug cover, that crosses joints in the case.  No inner seal, or protection, behind the plug cover, and so forth.

It should be noted that the circuit board looks well made.  And there are clever aspects to the design.  But overall, it doesn't have a particularly solid feeling.  It just feels cheap.  And while it may work better than it feels, I haven't really been able to determine that yet.

To me, a common warning sign of a crummy product, is missing or minimal instructions.  None came with the Cygolite, and virtually none exist on their website.  The website shows how to change the battery, which is how I know how to open the light, and why I know what the circuit board looks like.  This also suggests to me that their battery may not be very dependable.  However, that's just speculation at this point.

On the other hand, operations of the switch, and mounting options for the light, are subjects where Cygolite prefers to keep its customers in the dark.  I find this curious.  The packaging has plenty of space, and plenty of printing, so its not a matter of saving money. It could all be high-lighted on the package for no additional cost.

And, yes, I can experiment and figure out the switch - which is what I did.  But with all the various options on modern lights, consumers deserve a quick description of the options and their operation.

For example, I plugged the light in to charge, and it lit up.  I couldn't find a switch setting to turn it off.  There was a setting with low power, but it was unclear if that was a lighting mode, or an indicator of charging.  And, speaking of charging, how long does it take?  And, can the light be safely left on the charger once its full powered?  Nothing in the package or on their website explains any of this.

FYI, the low power setting is the indication that the Hot Shot is plugged into a USB charger or port. The other questions remain just that: questions.

And then there are the mounts.  Several reviewers have complimented Cygolight for offering both seat post/tube mounts and chain/seat stay mounts.  At least one also gave it a top rating, in part, because of this flexibility.  Frankly, I wonder if these reviewers ever used the light on a bike, rather than just in a test apparatus.  Or maybe I didn't understand what they meant by flexibility.

I wanted to use the stay mounting.  That way I can combine it with my vis 180 (on the seat tube), for maximum visibility.  I've mounted many many things to my bikes over the last 50 years.  Often without referring to instructions.  But this simple mount nearly stumped me.  At first there seemed to be no way to mount it on a stay, and expose the light backwards.  It would face down, or sideways, or even sort of forward, but not back.  Hmmm.....

Then I discovered that there was an additional knuckle hidden in the mount, immediately behind the slot into which the light is clipped.  This allows the light to point in the right direction.  Its a bit hard to see, unless you methodically go about looking for just such a solution, but OK.  It just seems to me, that this is an example where instructions are warranted.

At first I wasn't sure this knuckle was really intended to rotate enough to work.  Its just a friction fit, and it wasn't clear if it was meant to turn, or just poorly constructed.  After all, it has a pretty tight fit at the beginning.  But a little twisting of the joint causes it to loosen up considerably.  And, mind you, there is no mechanism to adjust the fit. The next question in my mind was: will this fall apart in use?  But a little tugging convinced me to give it a try.  I should also note that it felt tighter at 0, 90, 180, and 270 degrees, than the intermediate positions.

So, I wrapped the stay with a rubber strip, put the clamp around it and tightened same down to hold the light in place, while supporting the mount vertically. With the knuckle twisted the light faces backwards, and it lights up.  It's bright!!!! yea.

Note to self: the screw holding the clamp to the stay is over long (another sign of cheapness - parts picked for price not fit).  On a stay thick enough to require a screw of this length, the ends of the clamp would be too far apart for screw to align with the nut and therefore the excess length is useless.

But what concerns me is close to an inch of threaded rod pointed towards the wheel.  This feels like a loaded trap, waiting to spring during a wheel change.  I'd hate to catch a spoke on it, or even scrape a finger or hand against it during a change.  But, the light didn't cost much, and its bright.  So let's get over this.

My first ride with the light was 20 miles.  Usually, when I'm well lit, cars show me some respect, but I wasn't feeling it with the Cygolite.  Must be a bad day.  Then I get off the bike, and the light is pointing down at the ground.  Both the friction knuckle and the clamp knuckle have slipped.  One I understand, but I thought that the clamp was well secured.

Next ride, I tighten clamp firmly onto the stay, and consequently secure its knuckle.  Then I wrap the friction knuckle with electrical tape, in an effort to keep it from spinning.  This time I ride 25 miles.  When I get off the bike, I see that the light is once again facing towards the ground.  My tape worked (but requires removal and reapplication when I want to charge the light).  However, that long screw holding the clamp has a loose fit in its nut and works loose during the ride.  This allows the lower knuckle to flop and gravity does the rest.

Can I make the Cygolite work?  Yes.  Is it bright?   Yes.  Should it come with instructions?  Yes.  Are the mounts worth a damn?  No!

I don't feel cheated out of my $37 delivered.  Just disappointed because I've had other cheaper lights that were better designed and presented.  Being of a prior generation, they weren't as bright.  And I'd rather have bright and kludge a mount, than a great mount and have to kludge brightness.  But, for the price, I think they could have included instructions and made a better mount.  Giving Cygolite a passing score for this light would only encourage them to continue with sub-standard efforts. The technology seems fine, lets bring the packaging up to the same standard, shall we?

To summarize the Cygolite Hot Shot: It's bright, but buyers must be willing to tinker and experiment in order for it work effectively.

I've been riding some Chinese carbon fiber wheels (wait, aren't all carbon fiber wheels from China?).  And that may well be my next subject for review.  Under $700 and 1150 grams, how does that work?

BTW, Light and Motion is sending me the correct replacement part for my vis 180, now I just have to convince them to provide me with the necessary instructions for install it.  Once replaced, I hope to try some modification to the old piece, which should make it work better in the rain.   I'll keep you posted.


Thursday, October 24, 2013

Time for a couple of product updates.

I've been doing twilight to night rides over the summer.  With the shorter days of fall, more rides have been in low light conditions,  And too often, even on bright sunny days, drivers do stupid things.

For example, I was standing in a median, with my bike, as part of crossing a road.  A late model Suburban, with a high-strung driver, decided she wanted to use the median as a left turn lane, and came barrelling at me. There wasn't anywhere for me to  go, so I stared her in the eyes, and held up my arm to wave.  My hand literally pushed her side mirror closed as she passed, with two wheels in the median.  She had to hear the impact, but she didn't stop to see what happened.  All in bright daylight.  I could hardly believe what I saw.

All of the above has made bike-lighting more important to me.  I now have a Niterider Lumina 650 and a 700 (I'm not sure that there's really any difference between these models), and they've been good at lighting up the road (1 at a time).  I use these at the second (1/2?) power setting, both to avoid blinding drivers and to make sure the battery lasts the full ride.  And so far, they've been great.  Plenty of light and coverage for my needs.

A couple of lights (beyond the typical blinker) have been tried on the back.  Somehow, this end of the bike seems to be more difficult for lighting manufacturers, so we'll give them a little more depth examination.

My favorite tail light is a Light and Motion vis 180.  It's bright and visible.  On overcast days, its bright enough to be seen during the day.  Its rechargable via USB port - convenient and green.  I like the mount which is fixed with a larger rubber band.  Some reviewers and commentators have expressed concern about this band. Frankly, I don't think its more subject to wear and breakage than any of the other methods used to attach a rear light to a bike.

The mount only works on a seat post or seat tube, which is too bad.  But it adapts to any profile or size you can imagine.  So, if you have a traditional shaped frame (level top tube, with high-mounted seat stays), and a seat bag, you may not be able to fit the vis 180 on your bike.  But for the rest of us, its an effective solution.  It appears that an (optional?) seat stay mount could easily be developed, but so far Light and Motion has chosen not to do so.  More's the pity.

L and M claim an IP67 rating for limiting water and dust intrusion.   I believe it, because I can't figure out how I'd open up the case, if I wanted to.  Everything about the light, and its mount, is clearly designed, for this light, and its use on a seat post/tube.  Its a tight, high-quality design.

So, we have a very bright and high quality light. Add to that, it seems to spread the light out nicely (think of the 180 in its name).  In fact, at night, the light makes the backs of my legs glow red - its that bright - which should make me that much more visible on the road.

Its important to note that the light needs to be positioned vertically to direct its light where drivers can see it. In order to provide for different seat tube angles, there is a hinged frame on the outside of the light, whose position is manged by a sort of ratchet.  This provides a range of positioning, while securely holding the light in the chosen position.

To remove the light from its mount (while leaving the mount on the bike), its necessary to completely collapse the ratcheted frame towards the light.  When its open, the light is locked to the mount so that it can't fall off. All of this seems like the advanced design, that one pays for, with Light and Motion products.  And most of the time it is.

But, there's a fly in the ointment if you ride in the rain.  At least there was for me.  Some road grime got into the ratchet mechanism, and then the release button wouldn't work.  Without releasing the ratchet, the frame can't  be closed.  And without closing the frame, one can't remove the light from its mount. Oh oh.

The short term solution is to remove light and mount as one piece.  But, continued working of the rubber band, in this manner, does cause me concern regarding the band's life-span.

Further, I can't adjust the angle of mounting for use on different frames.

The first time this happened, I brought the light into the shop and found a way to release the lock, so it could be separated from the mount.  Heavily applied WD40 cleaned out enough grit, so that the ratchet mechanism partially released.  With the partial release, it was possible to carefully adjust the angle of the light, but not close it.  So it could be switched between bikes, but charging the light meant removing the whole mechanism via the rubber band.

Then next rainy ride, things got worse.  The ratchet release seems to move, but it doesn't release.  Period.

IMO there is a design flaw with the ratchet.  It's probably not possible to waterproof it.  So the design needs to provide a means to flush any contaminants out.  Probably an opening or channel where debris can freely travel.  But it doesn't have this feature.

Light and Motion customer support is working with me.  They been good about recognizing my concerns, and willing to stand behind their product. They have been slow to understand the problem, as I've described it, so its unclear what solution they'll offer.

It should be noted that replacement frames (with ratchet release) are available fairly cheaply on eBay.  It appears that a number of folks break these by trying to close the frame without pushing the ratchet release. Worst case, I could always buy one.  But its not clear how to remove or replace this piece (as noted above, I can't find a place to begin opening up the light). And nothing in the instructions (available both in the package, and on line at L and M's website), speaks to this topic.  When I look at trying to remove the frame, there is no obvious way, that doesn't present a clear risk of breakage.

Consequently, I'm waiting for L and M to get back to me.

I still like this light, but don't want to use it in the rain - which was part of the justification for buying such an expensive tail-light.  Color me frustrated. Maybe I'll try some grease around the ratchet to keep it clean.

Next up, the Cygolight.   Bright and floppy.


Wednesday, June 27, 2012

Having started cleaning up and filing lugs, it seemed likely that some of you would find some pix interesting.  With no further adieu, here they are: