A few more pix:
Lower Head Tube Filet
I little bumpy on the the outside.
Filing away.
A little more sanding and we'll have a nicely radiused filet.
Friday, July 29, 2011
Sunday, July 24, 2011
A few more pix
Here is a downtube cable stop. Polish needs a bit of touch up. can you see the heart-shaped cutouts?
Hard to see from this side, but the front derailer hanger is polished.
And the bottom bracket is almost done. Just a bit more sanding.
Hard to see from this side, but the front derailer hanger is polished.
And the bottom bracket is almost done. Just a bit more sanding.
Monday, July 18, 2011
Shiny Bits
Working on some shiny bits for Nick's crit bike. Looks like there are still some gouges to sand out before completing the buff job.
Thursday, July 14, 2011
Nick's Crit Bike
Charlies mountain bike is almost ready paint. Just a bit of sanding and painting. Meanwhile, Nick's Crit bike is coming along. After tube fit up, I've brazed the seat tube and down tube to the BB. A bit of filing and sanding left, then on to the head tube. BTW, the alignment is looking very good at this point. So on to pictures.
Seat tube tacked in.
Down tube fit up looks good even after tacking the seat tube.
Filet ready for filing and sanding.
And the head tube fit up still looks tight!
See ya next time.
Seat tube tacked in.
Down tube fit up looks good even after tacking the seat tube.
Filet ready for filing and sanding.
And the head tube fit up still looks tight!
See ya next time.
Thursday, June 30, 2011
Moving along
I've been riding again for about 6 weeks or so. They we (the family) went out west, where I managed to tear a hamstring. Humph! Anyway, now I don't have to feel guilty about shop time cutting into riding time.
I'm back to finishing up Charlie's small 26er. The main thing accomplished today was to bend the seatstays, cut them to length, and cap them using pieces of 1-1/8 inch tubing. A few pix follow:
This is my tiny shop after closing up for the night. Less than 1/2 of a stall in the garage.
Here are the bent stays. I like this radius much better than the sharp kink in so many commercial offerings.
A little final clean-up remaining - but pretty close to finished.
Charlies unfinished frame above. I checked the alignment using the table and via a true wheel. Both checked out nicely.
The end of the stay will nestle nicely in the curve of the filet for the top tube/seat tube joint.
I'm back to finishing up Charlie's small 26er. The main thing accomplished today was to bend the seatstays, cut them to length, and cap them using pieces of 1-1/8 inch tubing. A few pix follow:
This is my tiny shop after closing up for the night. Less than 1/2 of a stall in the garage.
Here are the bent stays. I like this radius much better than the sharp kink in so many commercial offerings.
A little final clean-up remaining - but pretty close to finished.
Charlies unfinished frame above. I checked the alignment using the table and via a true wheel. Both checked out nicely.
The end of the stay will nestle nicely in the curve of the filet for the top tube/seat tube joint.
Wednesday, May 25, 2011
Slowly Catching Up
1) Check out House Industries at velocipedesalon.com - good stuff.
2) Also read about Suzy of Little Fish Bicycles - quite a multi-talented women who convinced any number of folks that they too could learn to build frames.
3) Step by step, things are getting better.
On the personal front, I've managed a couple of rides in a row now without disc problems. This is a win and a sign of improvement. that puts a smile on my face.
Currently I have a couple of steel frames under construction, hopefully I can get some pix soon. One is a small MTB for my youngest son. Fillet brazed with Cycle Design's LFB - interesting stuff with which to work, and I'm still getting the feel for it. One thing I'm experimenting with is using Metax (an early Columbus version of Stainless tubing) for the chainstays. Lots of careful timely cleaning is required before brazing this stuff to make sure of a good joint.
The other is a race bike for a rider who is strong in crits. He's fair sized, so it uses 2XL tubes. That's 31.7mm diameter for top and seat tubes and 25mm for the down tube. Should be plenty stiff. This one has a lugged BB w/ filet joints everywhere else.
I'm also getting a carbon frame ready for paint and should have finished pictures pretty soon. So lots going on.
Meanwhile, plenty of maintenance needs doing. The fuel line of Kevlar hoses sprung a leak, so after trying to repair it (hard to find small enough repair nipples), I went ahead an ordered new hoses and flash-back arrestors. At the same time, I ordered a repair kit for my torches valves. It's been dropped on the floor, and I think the O2 valve leaks when shut, costing me expensive O2. Unfortunately, this is on back order so I'll hve to refill my oxy tank tomorrow. Side note to this, my local welding supply is of little to no use regarding brazing supplies, or my torch (Smith aircraft torch) setup. Even when I offer them the opportunity to order what isn't in stock. I guess that I'm just too small a bit of business, but it also keeps me guilt-free when I order over the I-net.
I've also ordered some plumbing for a small air compressor (like for a brad nailer) I own. I'd like to start learning to paint frames via airbrush, and the first step is a clean reliable air supply. BTW, anything larger than an airbrush starts a slippery slope: 1) buy a good spray gun; 2) which requires a bigger compressor; 3) demanding 220V circuit in the garage; 4) which is dependent on a new panel and upgrading house to 200 amp service. I figure, by the time a I put together a basic spray booth with all the above, moving to spray guns would cost me at least $5K to start - which isn't in my current budget. So, I'll start with with airbrushes, and working out doors - probably with water based paints.
More soon.
2) Also read about Suzy of Little Fish Bicycles - quite a multi-talented women who convinced any number of folks that they too could learn to build frames.
3) Step by step, things are getting better.
On the personal front, I've managed a couple of rides in a row now without disc problems. This is a win and a sign of improvement. that puts a smile on my face.
Currently I have a couple of steel frames under construction, hopefully I can get some pix soon. One is a small MTB for my youngest son. Fillet brazed with Cycle Design's LFB - interesting stuff with which to work, and I'm still getting the feel for it. One thing I'm experimenting with is using Metax (an early Columbus version of Stainless tubing) for the chainstays. Lots of careful timely cleaning is required before brazing this stuff to make sure of a good joint.
The other is a race bike for a rider who is strong in crits. He's fair sized, so it uses 2XL tubes. That's 31.7mm diameter for top and seat tubes and 25mm for the down tube. Should be plenty stiff. This one has a lugged BB w/ filet joints everywhere else.
I'm also getting a carbon frame ready for paint and should have finished pictures pretty soon. So lots going on.
Meanwhile, plenty of maintenance needs doing. The fuel line of Kevlar hoses sprung a leak, so after trying to repair it (hard to find small enough repair nipples), I went ahead an ordered new hoses and flash-back arrestors. At the same time, I ordered a repair kit for my torches valves. It's been dropped on the floor, and I think the O2 valve leaks when shut, costing me expensive O2. Unfortunately, this is on back order so I'll hve to refill my oxy tank tomorrow. Side note to this, my local welding supply is of little to no use regarding brazing supplies, or my torch (Smith aircraft torch) setup. Even when I offer them the opportunity to order what isn't in stock. I guess that I'm just too small a bit of business, but it also keeps me guilt-free when I order over the I-net.
I've also ordered some plumbing for a small air compressor (like for a brad nailer) I own. I'd like to start learning to paint frames via airbrush, and the first step is a clean reliable air supply. BTW, anything larger than an airbrush starts a slippery slope: 1) buy a good spray gun; 2) which requires a bigger compressor; 3) demanding 220V circuit in the garage; 4) which is dependent on a new panel and upgrading house to 200 amp service. I figure, by the time a I put together a basic spray booth with all the above, moving to spray guns would cost me at least $5K to start - which isn't in my current budget. So, I'll start with with airbrushes, and working out doors - probably with water based paints.
More soon.
Saturday, March 12, 2011
A little progress
Well, it looks like at least another two weeks on the IV. While I'm chomping on the bit, it's going to be a little while yet before I can start ramping up the shop again.
With that in mind, let me share a little project completed during all this medical who-ha.
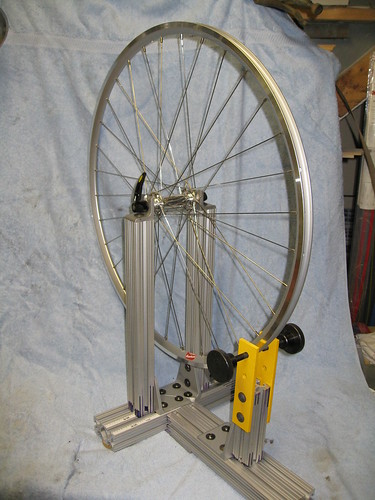
I've got a big, heavy, old Hozan truing stand. It works, but its clumsy. I've been thinking for some time about building its replacement. Then my son asked for a truing stand for Christmas.- which further accelerated the process.
To me, a truing stand should be stiff, stable and well dampened. It should be easy to adjust for a range of over lock-nut sizes and wheel diameters. And, it should be easy to center the hub in the stand, so that centering the rim is not a separate process from building the wheel. A nice to have is the ability to mount a dial indicator for fine readings of true and round.
That's not a huge list of requirements, but buying a stand that meets them tends to be expensive. For around $125, though, its possible to build such a stand using 80:20 extrusions as the foundation.
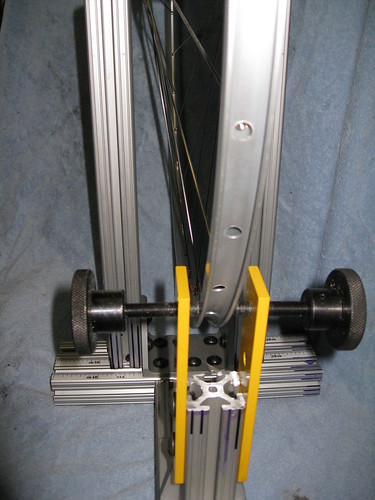
My son lives in CA, which added on further requirement: the stand has be able to be knocked down and shipped in a fixed-rate Priority Mail box. As a consequence, on the stand I made, the cross frame is limited in size, so I had to come up with a way to mount the uprights so they would fit the cross piece and come together for a 100mm front OLD.
Note, the adjustment hand screws in the picture have brass heads and were prior to trimming to length. These have been replaced with plastic headed hand screws, so they won't where out their threaded guide holes prematurely. Also, not seen in the pictures are: connector plate between the two base pieces; three rubber furniture feet on which this stand sits. These provide a tripod support (three points define a plane) which won't rock, and make sure that the stand doesn't slide around on the work surface.
Anyhow, I don't have any plans, per se, so I can't share them. But all you really need to know is in the following pictures. All parts not from 80:20 came from McMaster Carr, including the self-adhesive left and right hand metric scales used to align the uprights.
Monday, March 07, 2011
Been missing you guys.
Hey gang,
Sorry to be gone so long, but I've been busy with some medical issues. Nothing I can't get past, just stuff that interferes with life for a while.
It started in December with a herniated disk (symptom of age). When that was cleared up, I developed a staph infection (no one can tell me how). The staph was kinda ugly, but its now on the run. I'm still running a portable IV of penicillin, but I go to the Dr. on Wednesday and expect to hear how much longer that will last. Hopefully not to long cuz I can't really work in the shop with this thing.
Anyhow, as shop work gets up to speed, I'll be posting words/pix right here.
Cheers,
RG
Sorry to be gone so long, but I've been busy with some medical issues. Nothing I can't get past, just stuff that interferes with life for a while.
It started in December with a herniated disk (symptom of age). When that was cleared up, I developed a staph infection (no one can tell me how). The staph was kinda ugly, but its now on the run. I'm still running a portable IV of penicillin, but I go to the Dr. on Wednesday and expect to hear how much longer that will last. Hopefully not to long cuz I can't really work in the shop with this thing.
Anyhow, as shop work gets up to speed, I'll be posting words/pix right here.
Cheers,
RG
Friday, February 18, 2011
A crucial time
Today I stand with the teachers, nurses, and all public employees of Wisconsin who are fighting for their rights. If you do too, change this to your status for the rest of the day.
You too can choose Freedom over Greedom, post this pledge to your blog or facebook page.
Monday, December 13, 2010
Techy Stuff
"In order to find the best compromise between performance and cost, the round tube may be sized such that its bending stiffness is identical to that of a square tube with the same wall thickness. Using the first order findings of Eq. 2.12 and setting equal results in:
Plugging the diameter wrd found in Eq. 2.18 into Eq 2.13, the torsional stiffness of a round tube can be found to be larger by a factor of 4/3 (33%) while being lighter by 7%."
wrd = cuberoot(16/3*Pi) * wsq
I may never become a commercial success at frame-building (or perhaps any pursuit) because of my resolute tendency to cry BS at anything that tickles me as marketing tekno-babble rather than real engineering. And today, in any successful commercial endeavor, there there seems to be a lot of marketing tekno-babble. No where is this more true today, than in the bicycle industry; where so much that is discussed, advertised, and written regarding design and bicycle attributes is just so much nonsense.
Recently, I was perusing: Principles of Rapid Machine Design by Eberhard Bamberg, M.Sc., Advanced Manufacturing Systems Brunel University, 1993 Dipl.-Ing, Maschinenbau Universität Stuttgart, 1996 SUBMITTED TO THE DEPARTMENT OF MECHANICAL ENGINEERING IN PARTIAL FULFILLMENT OF THE DEGREE OF DOCTOR OF PHILOSOPHY at the MASSACHUSETTS INSTITUTE OF TECHNOLOGY, June 2000 © 2000 Massachusetts Institute of Technology All rights reserved. This is the source of the opening quote.
Let's begin by acknowledging that my academic career stayed far away from the hard sciences and engineering, thus making my tastes in light reading that much more unusual. And no, the goal of this read was not to learn anything about designing or building bicycles. However, while I've known for quite some time that a round shape is the most efficient shape of tubing for resisting both bending and torsional forces; I haven't had a scholarly reference or mathematical formula to back up this understanding. So, running across this quote, in the midst of a larger discussion of analyzing the properties of tubes, seemed like a bit of an early holiday present.
All of the large bike brands make much of the shapes of their tubes, suggesting that that they have found miraculous new ways to: 1) improve stiffness; 2) reduce weight; 3) improve ride qualities. I'm calling BS right here, right now. Stiffness is increased by increasing the diameter of tubes and/or increasing the wall thickness. Weight is reduced by cutting down the amount of material in the tubes, either by using smaller diameter tubes, and/or decreased wall thickness. Ride comfort, however, is a different question - and it is difficult to argue that tubing diameter or wall thickness is directly related to ride comfort.
Among stock phrases appearing in bicycle reviews, "... greater lateral stiffness combined with improved vertical compliance..." is probably the one most often ridiculed by the cognoscenti of bicycle design and building. And this ridicule is truly well earned. The side-view of a bike frame is essentially based on a Warren Truss, which is a very efficient structure for resisting the weight carried by a bridge. In other words, it focuses on resisting vertical forces.
Viewed from the front, however, there is no structure to resist lateral forces except the form of the tubes themselves.
Both the shape of a tube, and the form of a Warren Truss service to harness the opposing forces of tension and compression. Both also gain stiffness by physically separating those opposing forces as far apart as possible (hence the greater stiffness of a larger diameter tube). But the distances within tubes and between tubes vary by greater than an order of magnitude. So while a round tube's inherent stiffness is equal in the vertical and horizontal planes, the Warren Turss does not offer this direction-independent equality of stiffness.
What does this mean? A bicycle frame is more apt to bend laterally than vertically, regardless of what magazine writers or marketing specialists say.
So maybe that's true, but how about a top tube that is flattened? Surely its shape allows more vertical compliance and lateral stiffness than a round tube, because most of the material is oriented horizontally, right? And this beneficially tunes ride characteristics? Wrong Kemosabi!
Think of an I-beam: there is a vertical web connecting two horizontal plates. Fundamentally, its the plates doing the hard work. Why is this? Well, the greater effective distance a portion of a beam is stretched or compressed, the more work that portion of the beam does in terms of preventing bending. Get a compass, and draw three concentric circles. The inner represents the bending of the lower plate of the I-beam, the middle circle represents the bending of the web, and the the outer circle represents the bending of the upper plate. Clearly, the lower plate is compressed relative to the web and upper plate. The upper plate is stretched relative to the web and lower plate. And the web is merely bent. Now this is a slight generalization of the forces are work, but it makes the point.
A tube is more like a box beam, where there are two webs, one on each side, and two plates. A beam is made more stiff by increasing the distance between the plates - thus increasing the differential between the compression and tension. That squashed top tube causes the sides of the tube to be further apart from each other, and the top/bottom to be closer together. So.... while it appears as if it should be stiffer laterally, and more flexible vertically, it is in fact the opposite.
It's hard to beat round tubes for a bicycle frame. Where there is a benefit to ovalizing them, it is generally to give a larger area with which to bond (using a weld/braze/glue/carbon wrap/or structural lug) to the adjoining tube - and not to tune the ride or stiffness. And, that's the way it is.
Having beaten this point to death, my hope is that a few more folks will now recognize that: a) shaped tubing is just a marketing gimmick; b) frames flex laterally (or in torsion) rather than vertically. And thereby they will be better informed consumers.
Cheers
Subscribe to:
Posts (Atom)